B. Create a test script with PCWeb
II. Create a new test script
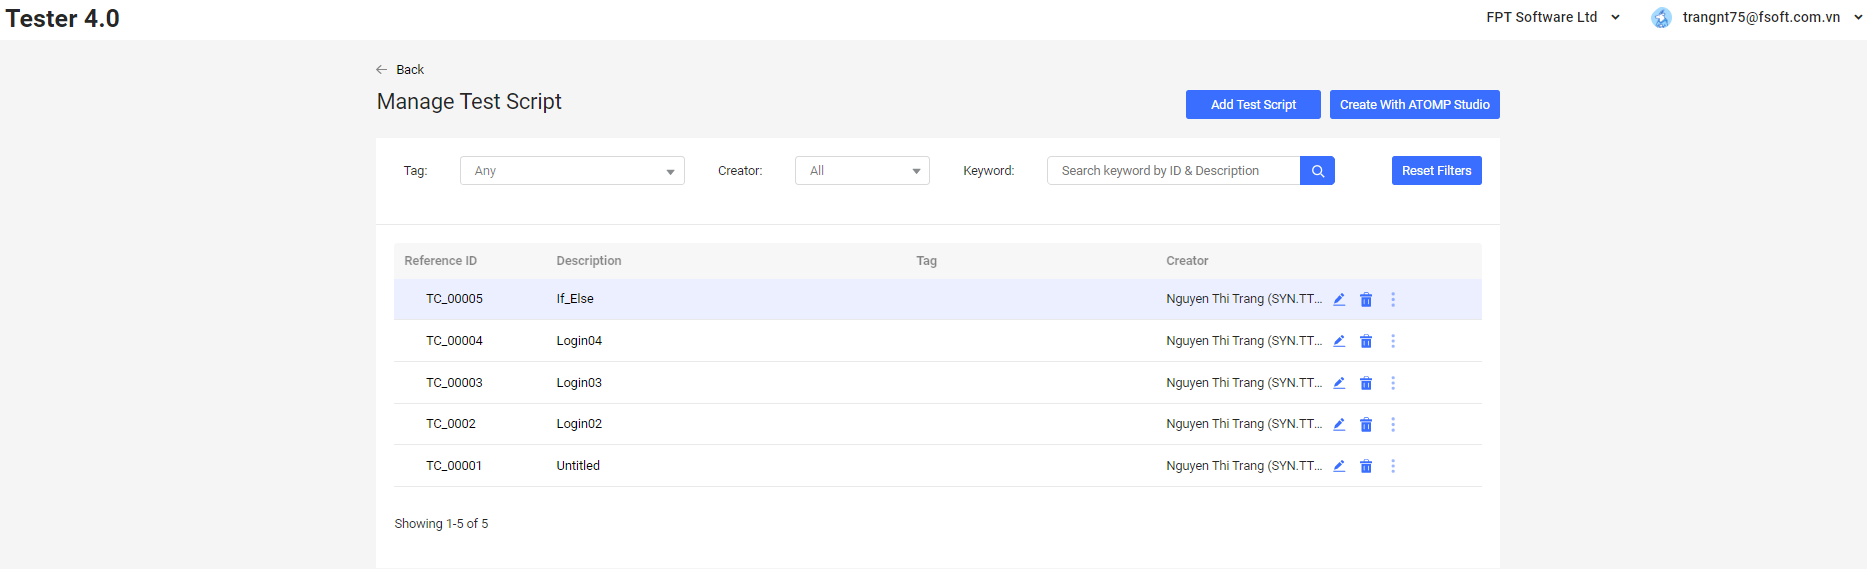
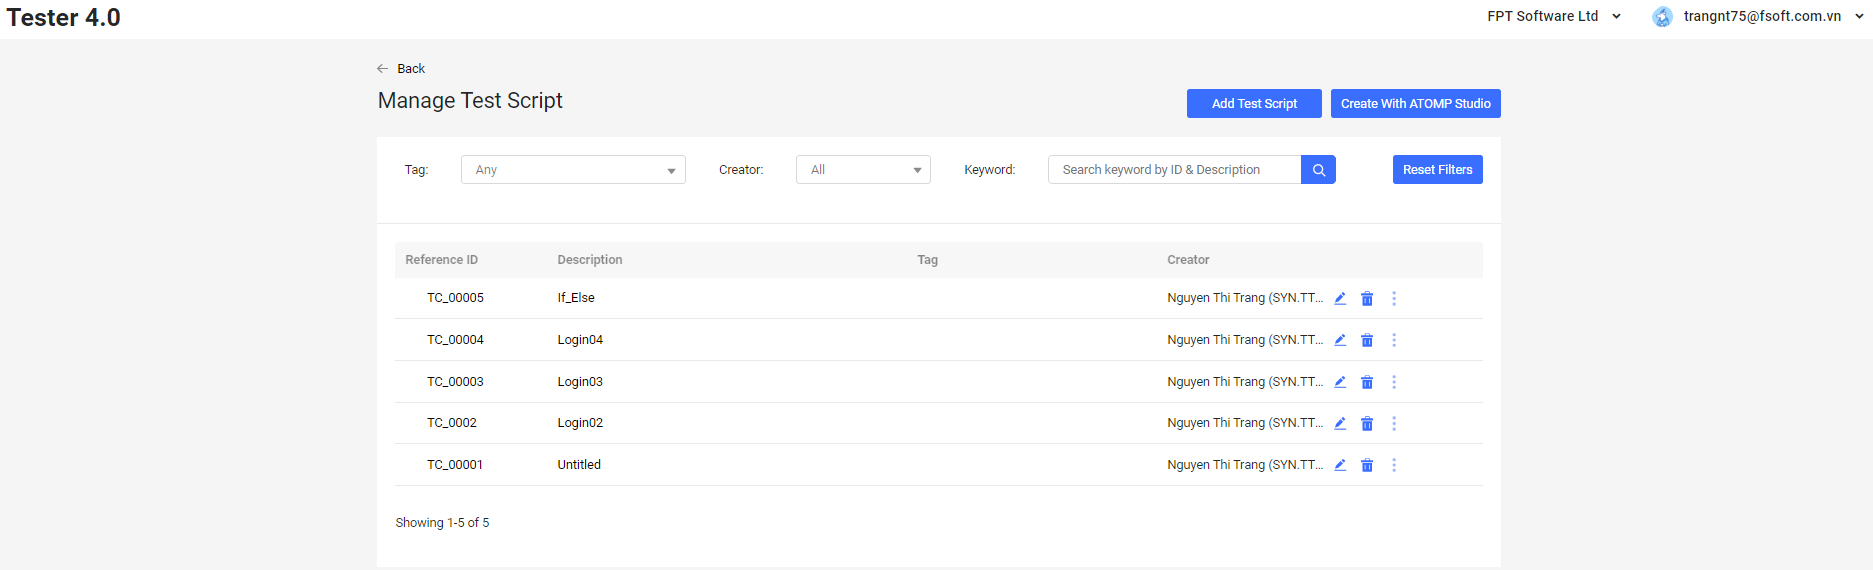
Click on the [Manage Test Script] button => Click [Create with ATOMP Studio]. The Studio Web primary screen will be displayed.
1. Start the [Recording] mode
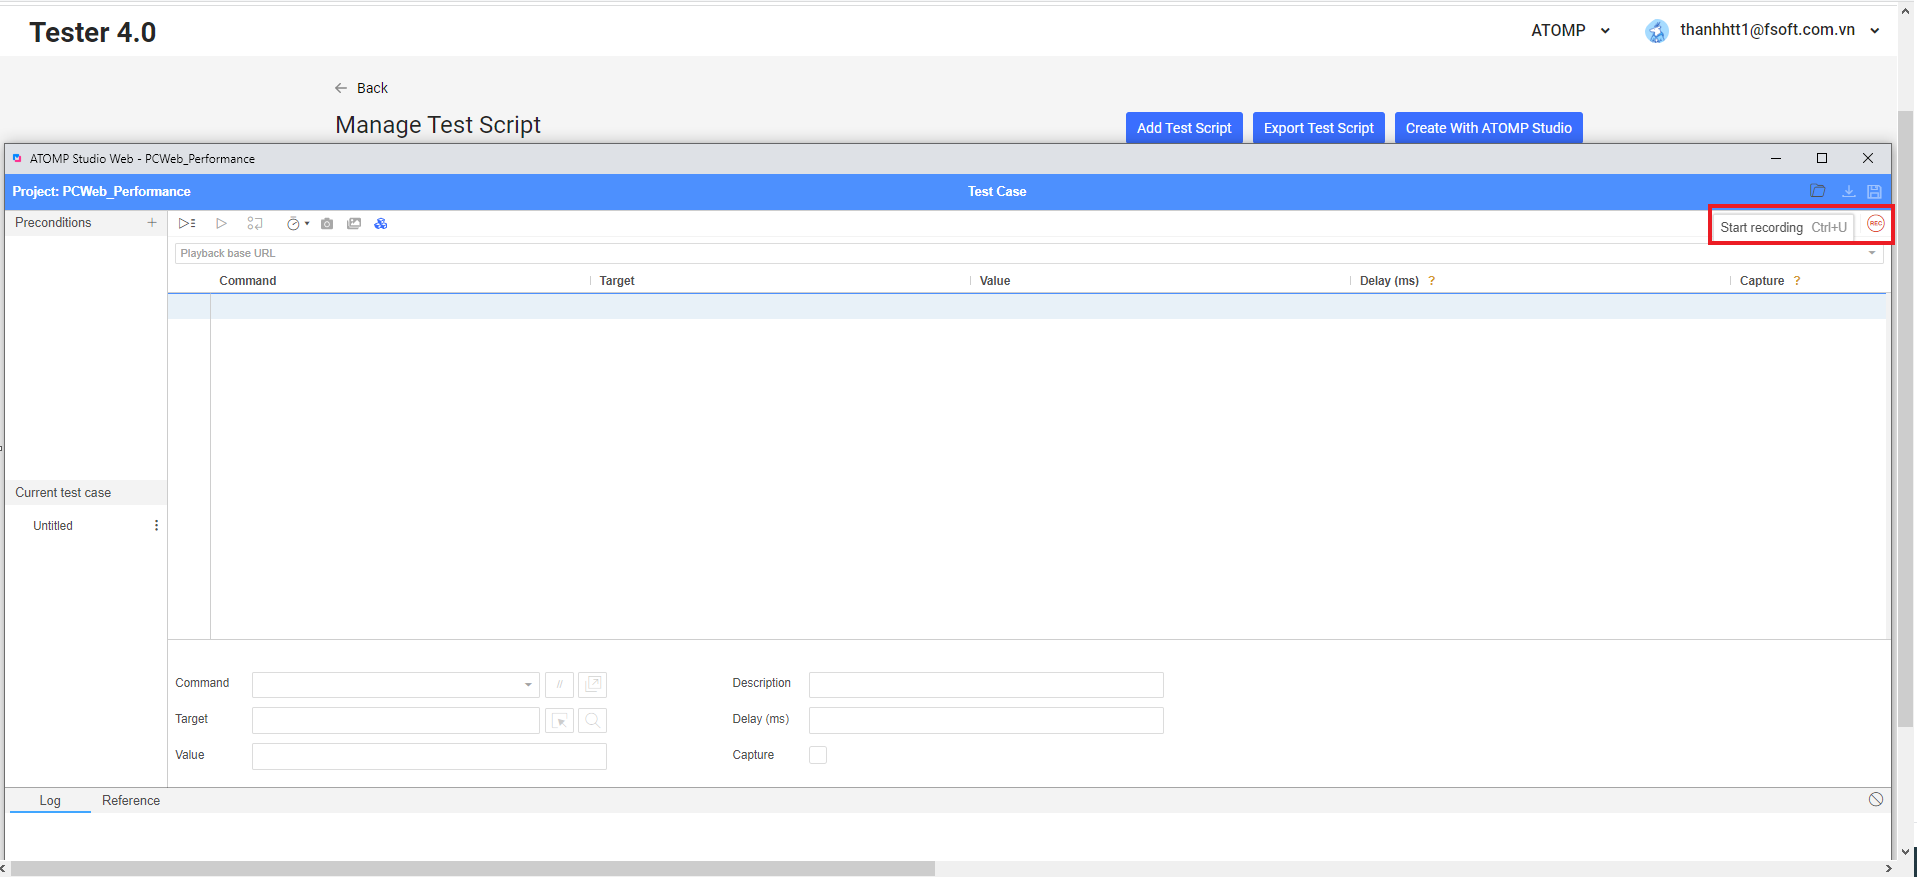
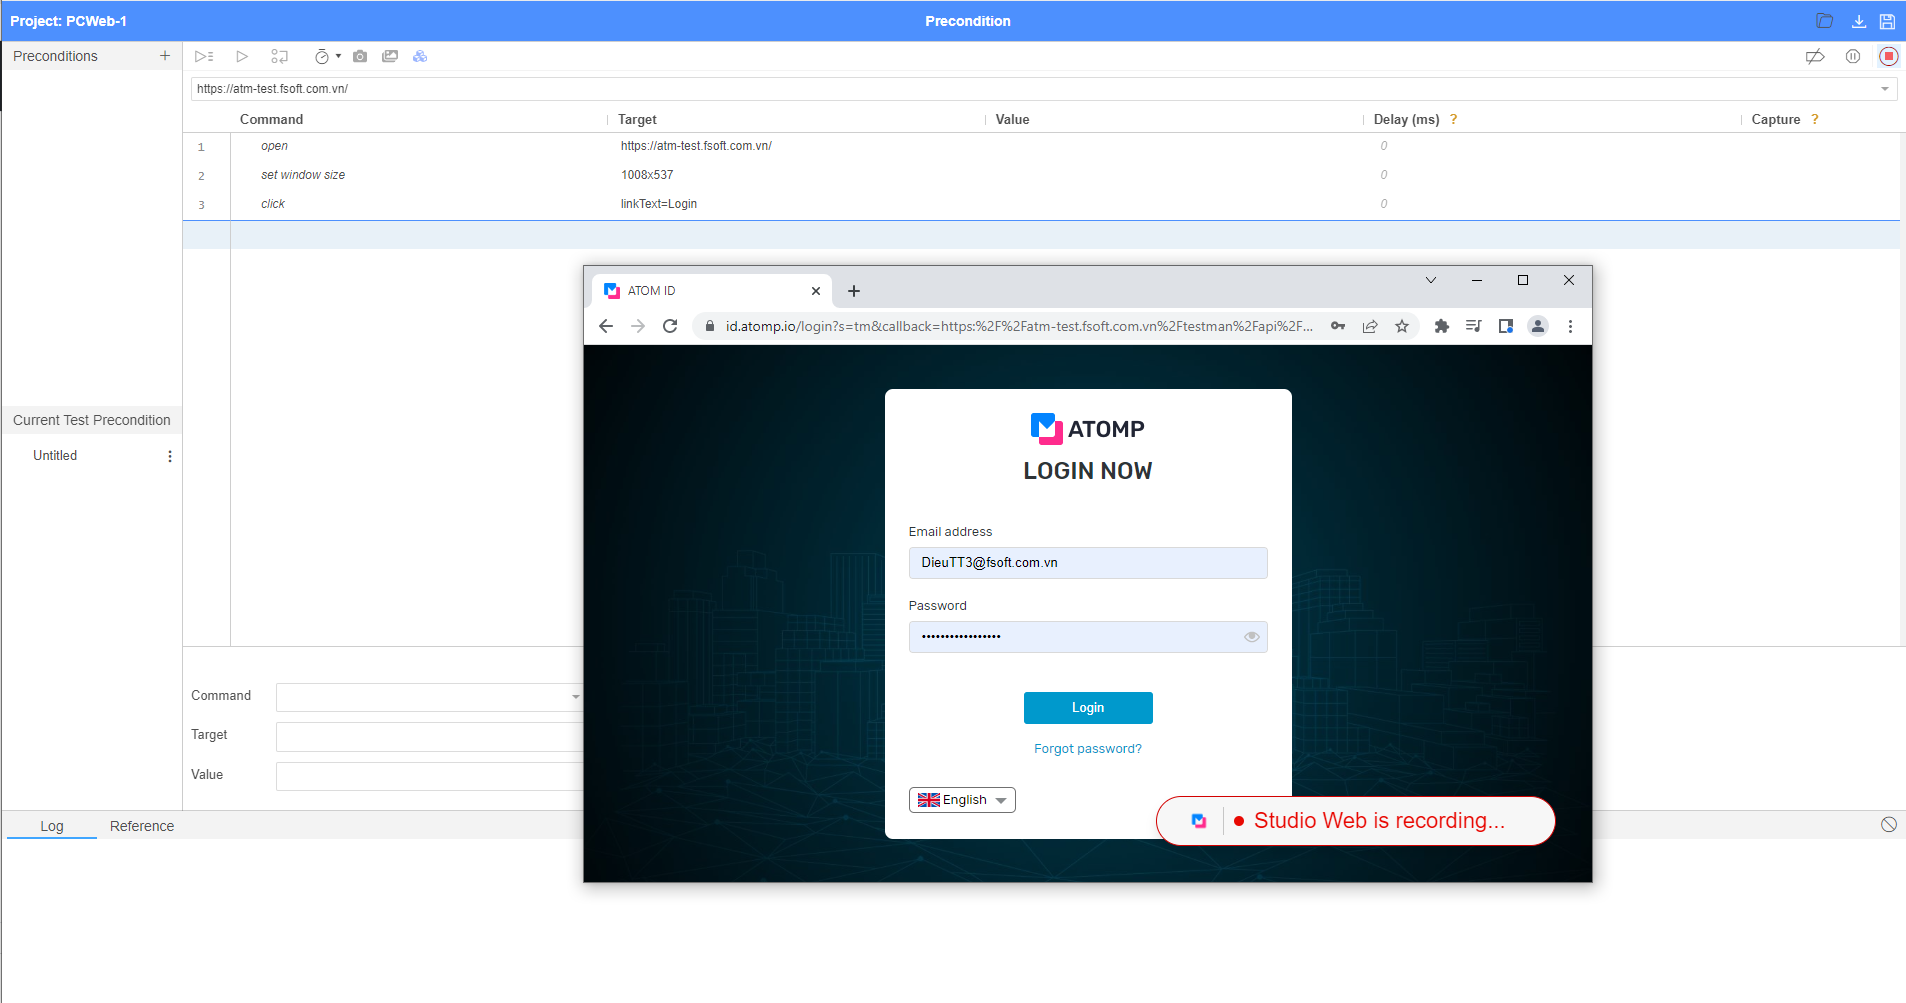
- Click on the button [Record script]
 to start recording your browser’s interactions. Below is a sample of the Recording mode.
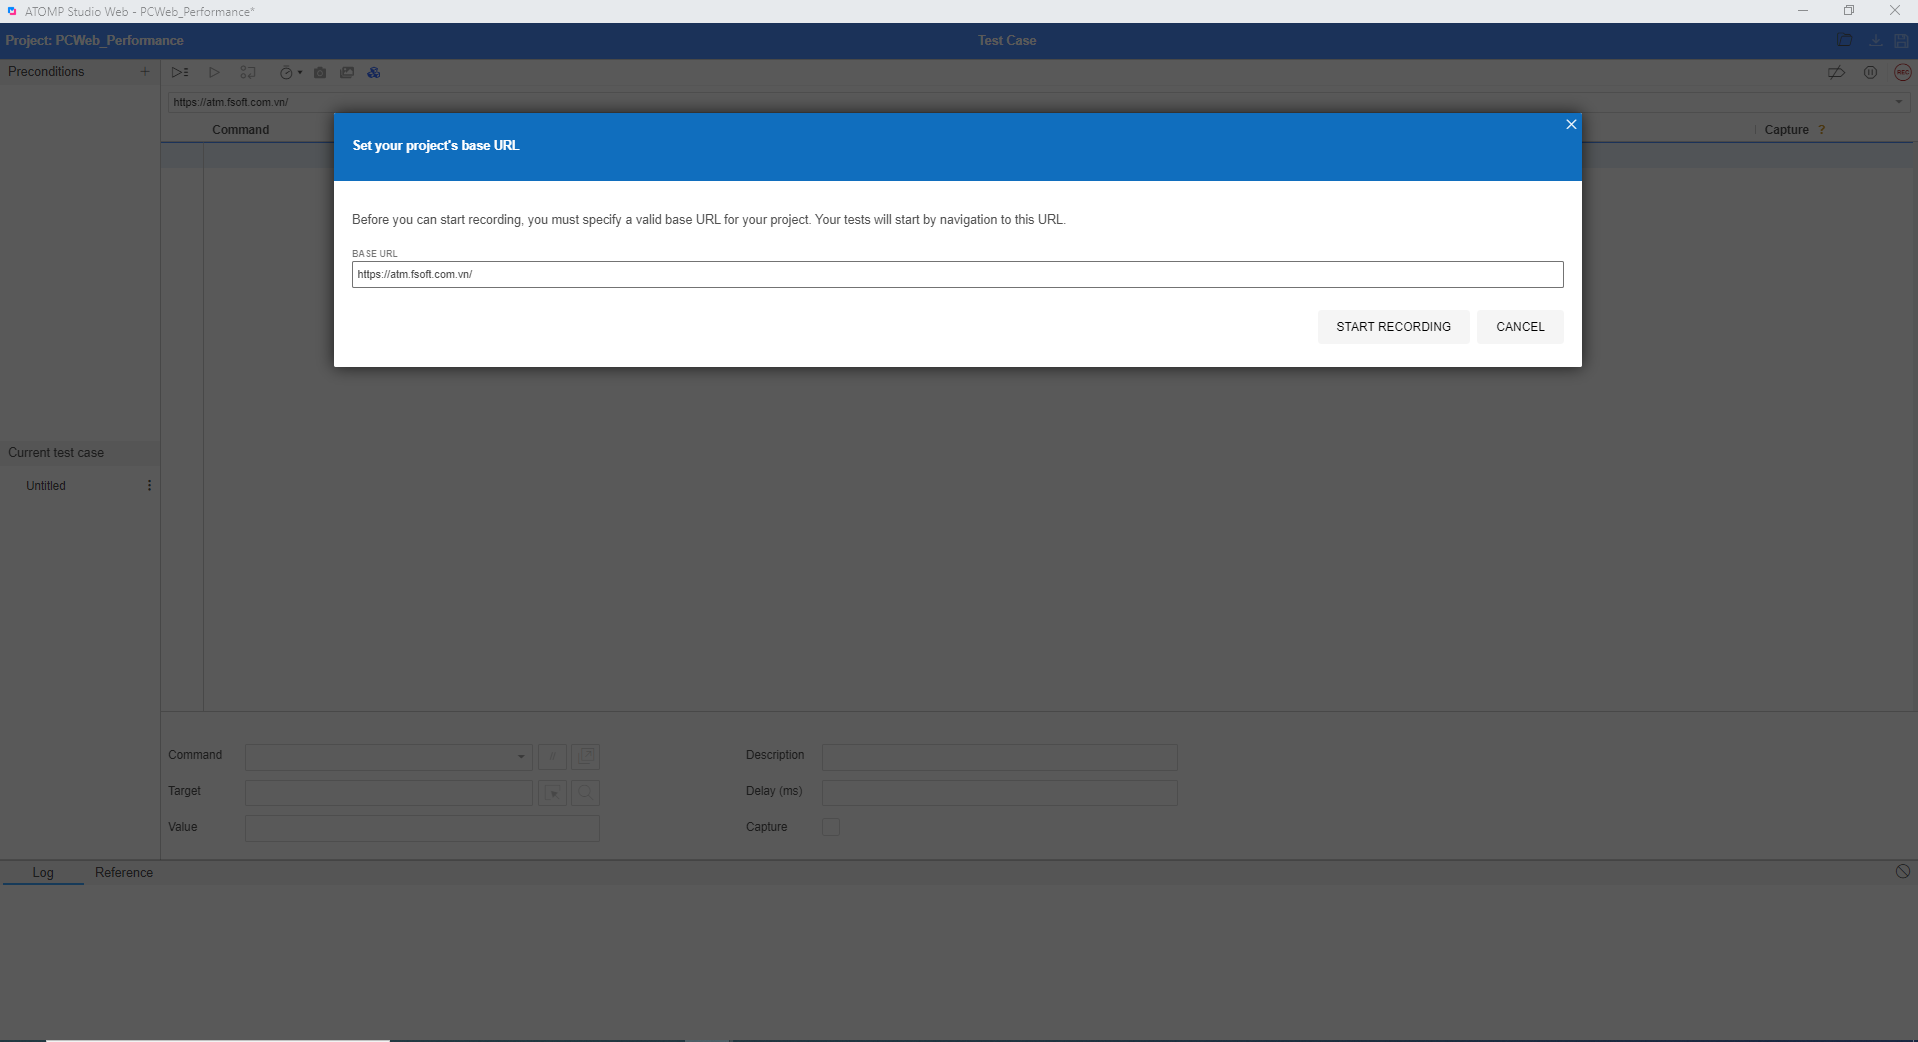
- Before you can start recording, you must specify a valid base URL for your project and click on the [START RECORDING] button to open your URL.
2. Select Precondition(s)
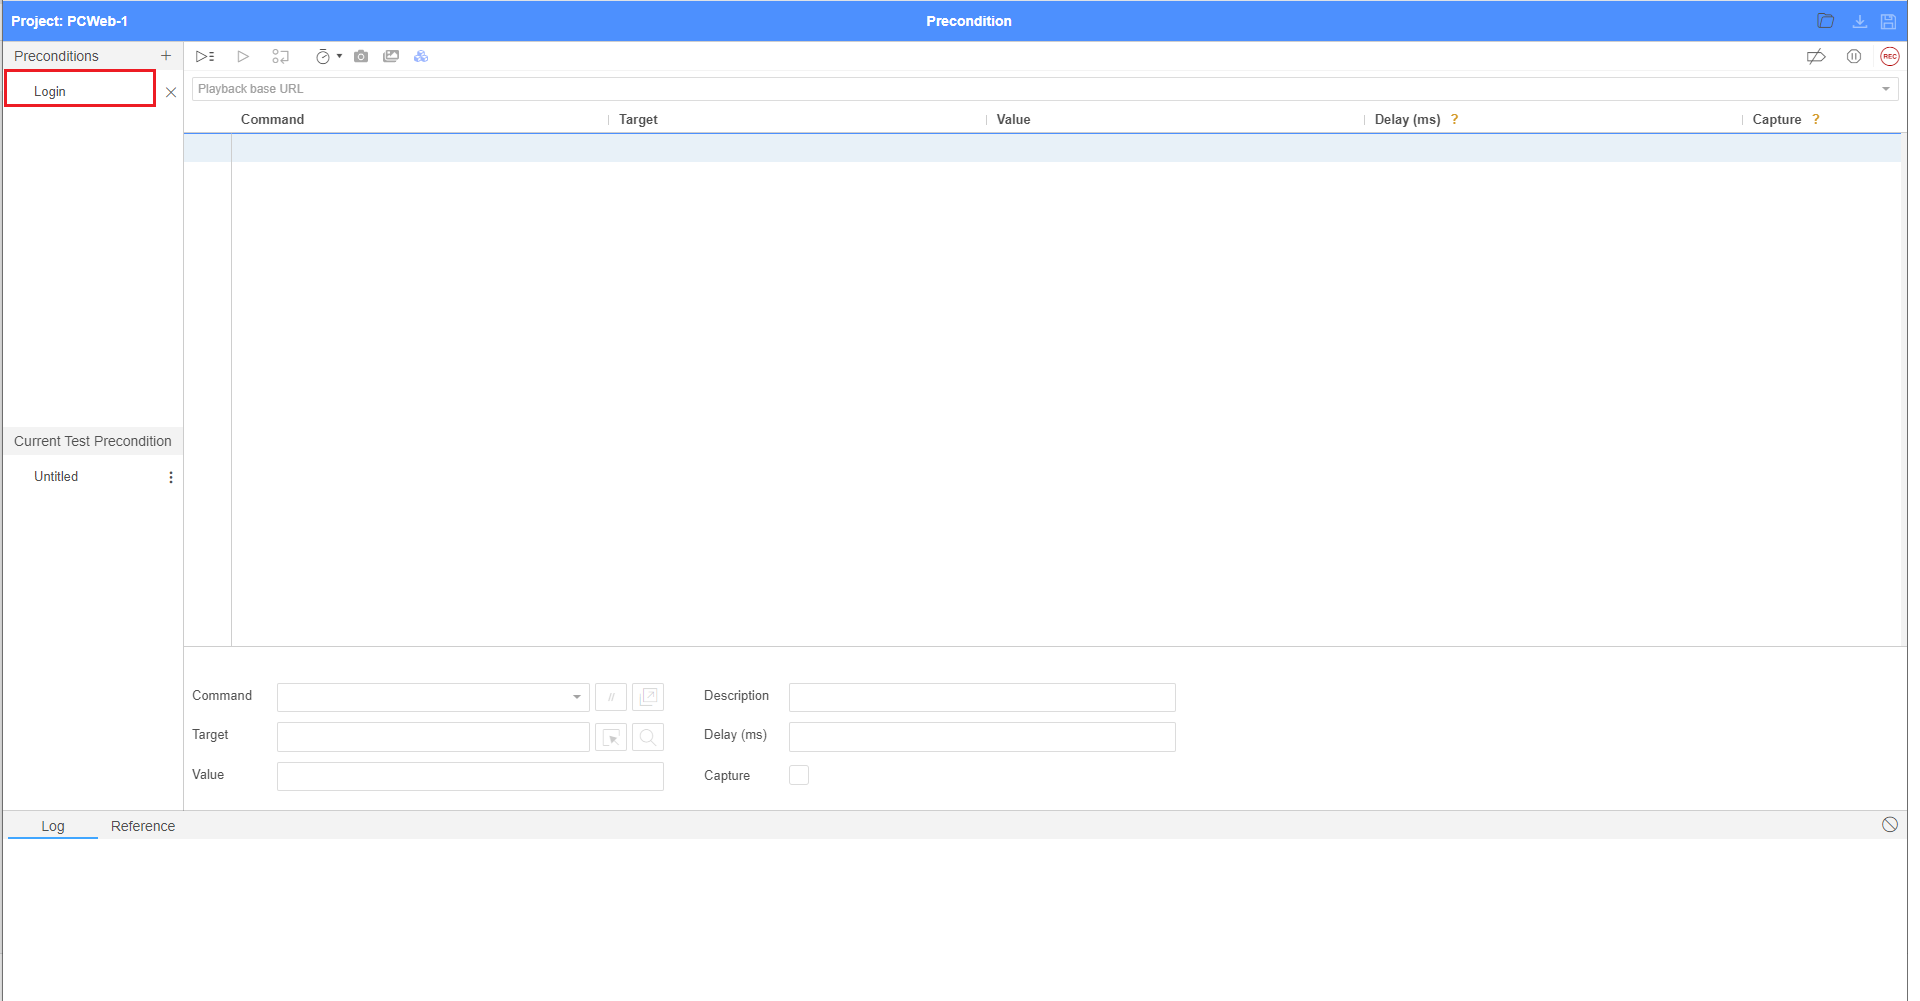
Step 1: On the script creation screen, click on the [+] button beside the [Precondition] text.
Step 2: Select one or more preconditions from the precondition list of the project then click on [Add preconditions] button.
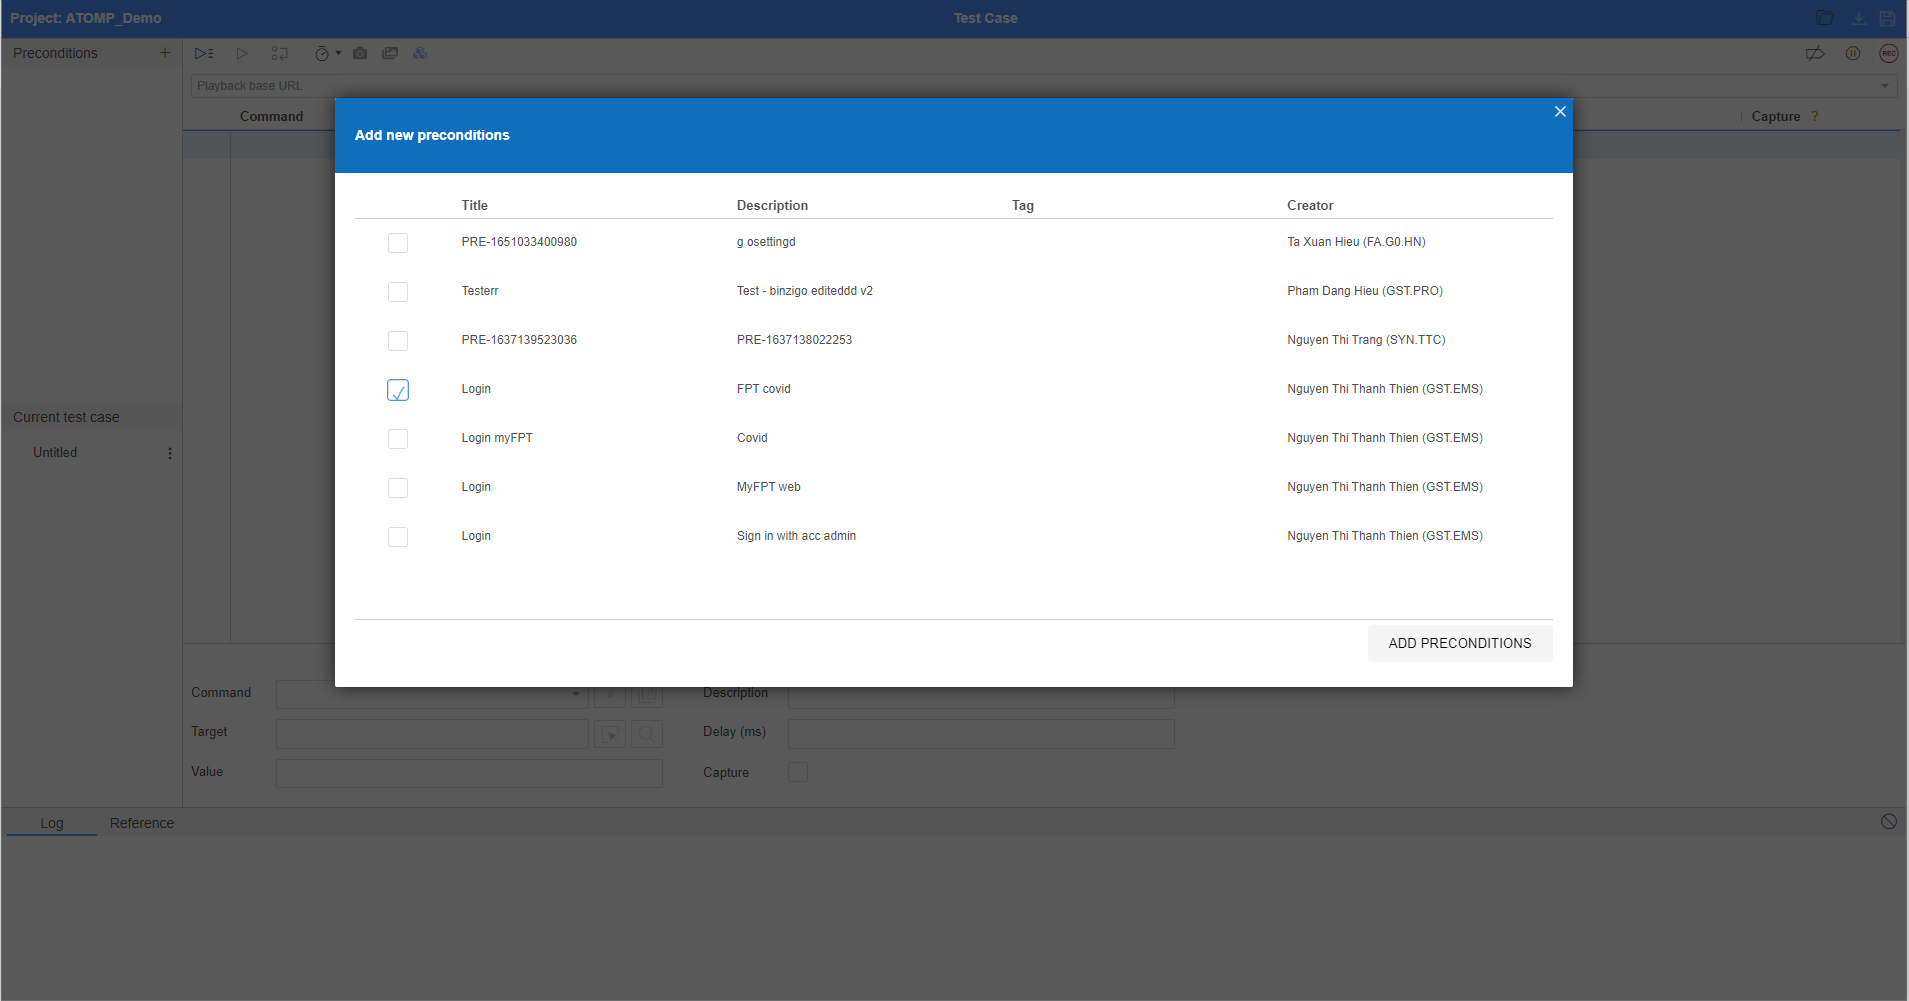
When the script is running, these selected preconditions will run from top to bottom. List of selected preconditions will be displayed as below:
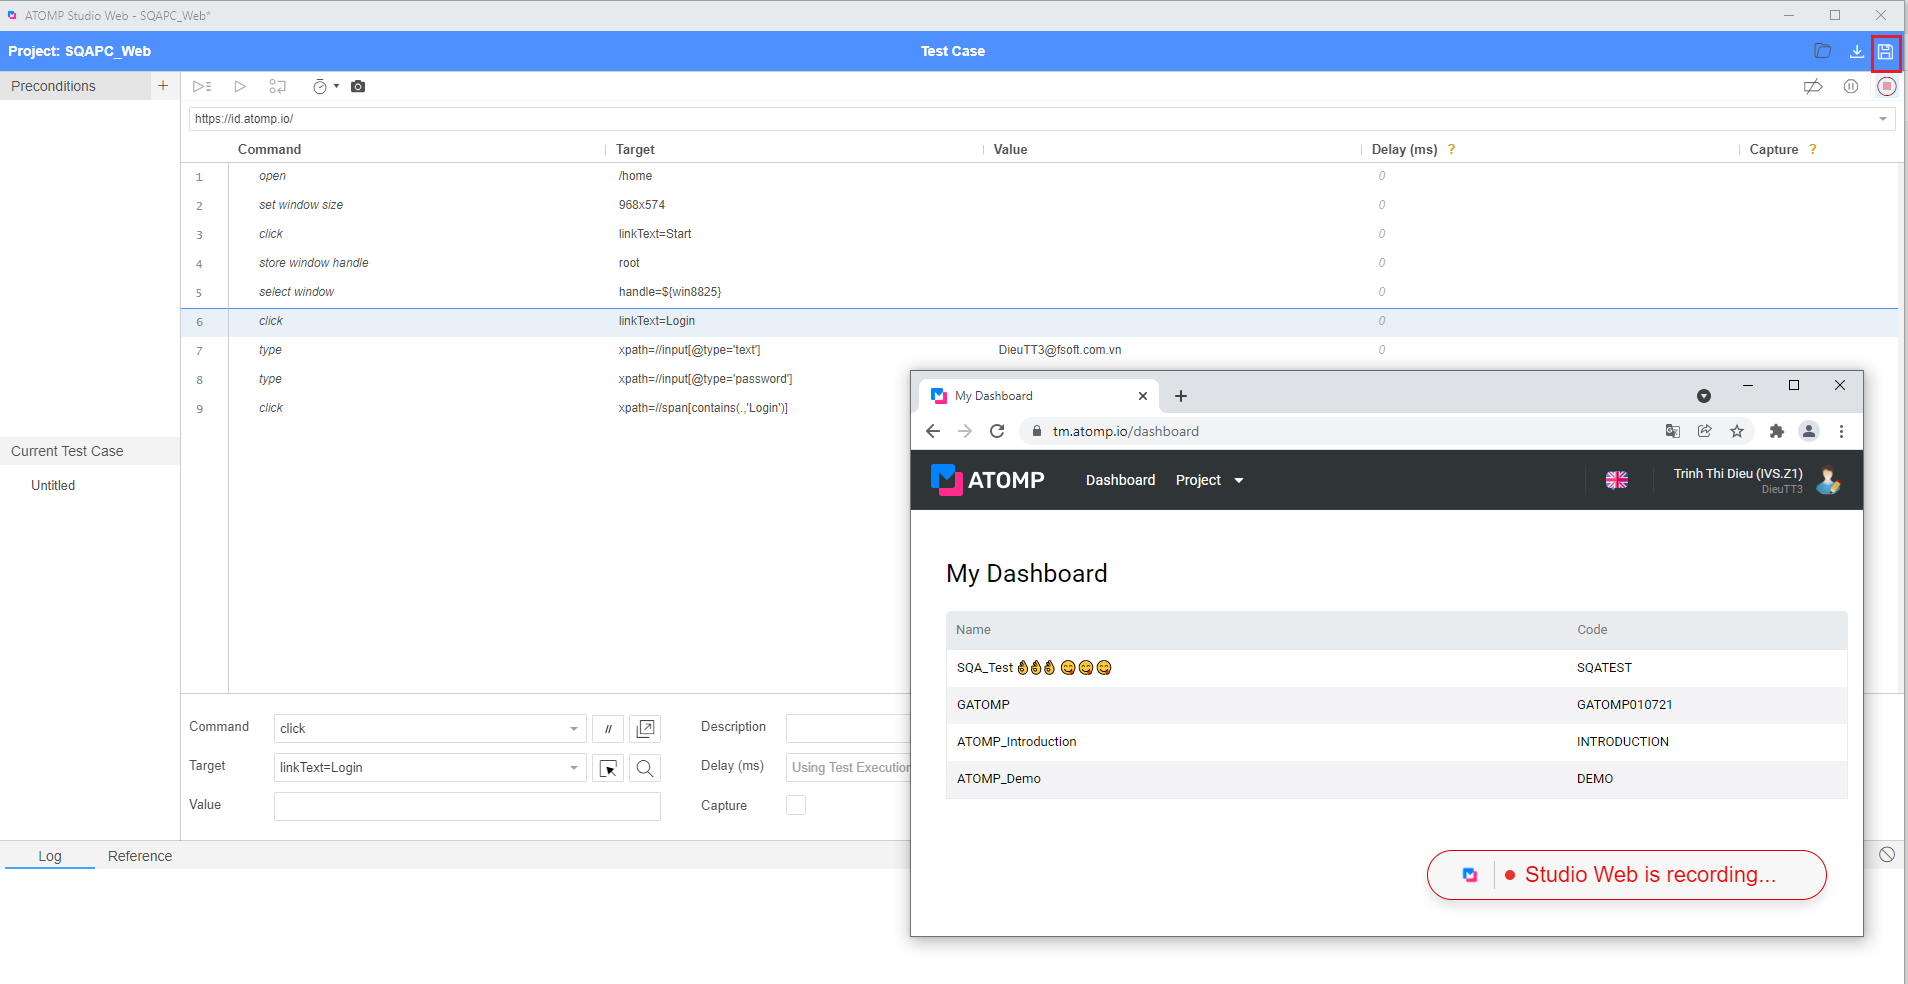
3. Create Test Steps
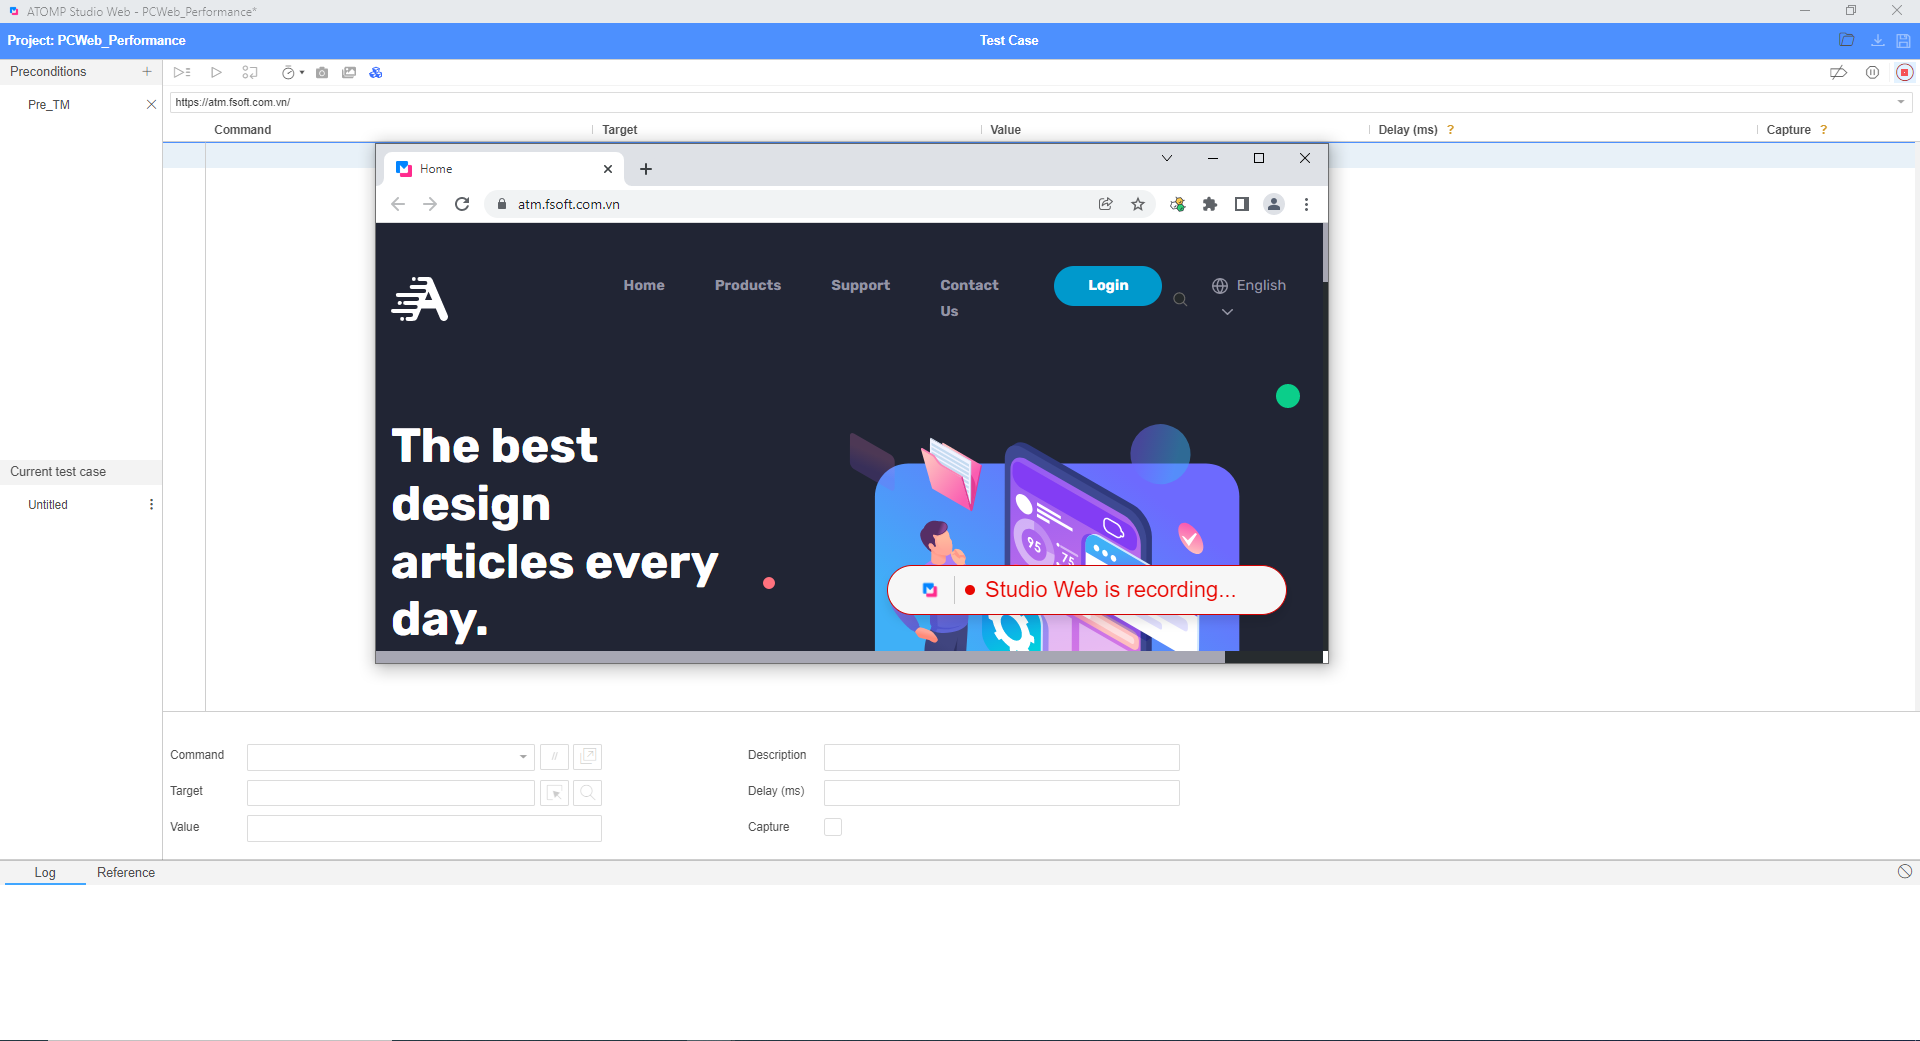
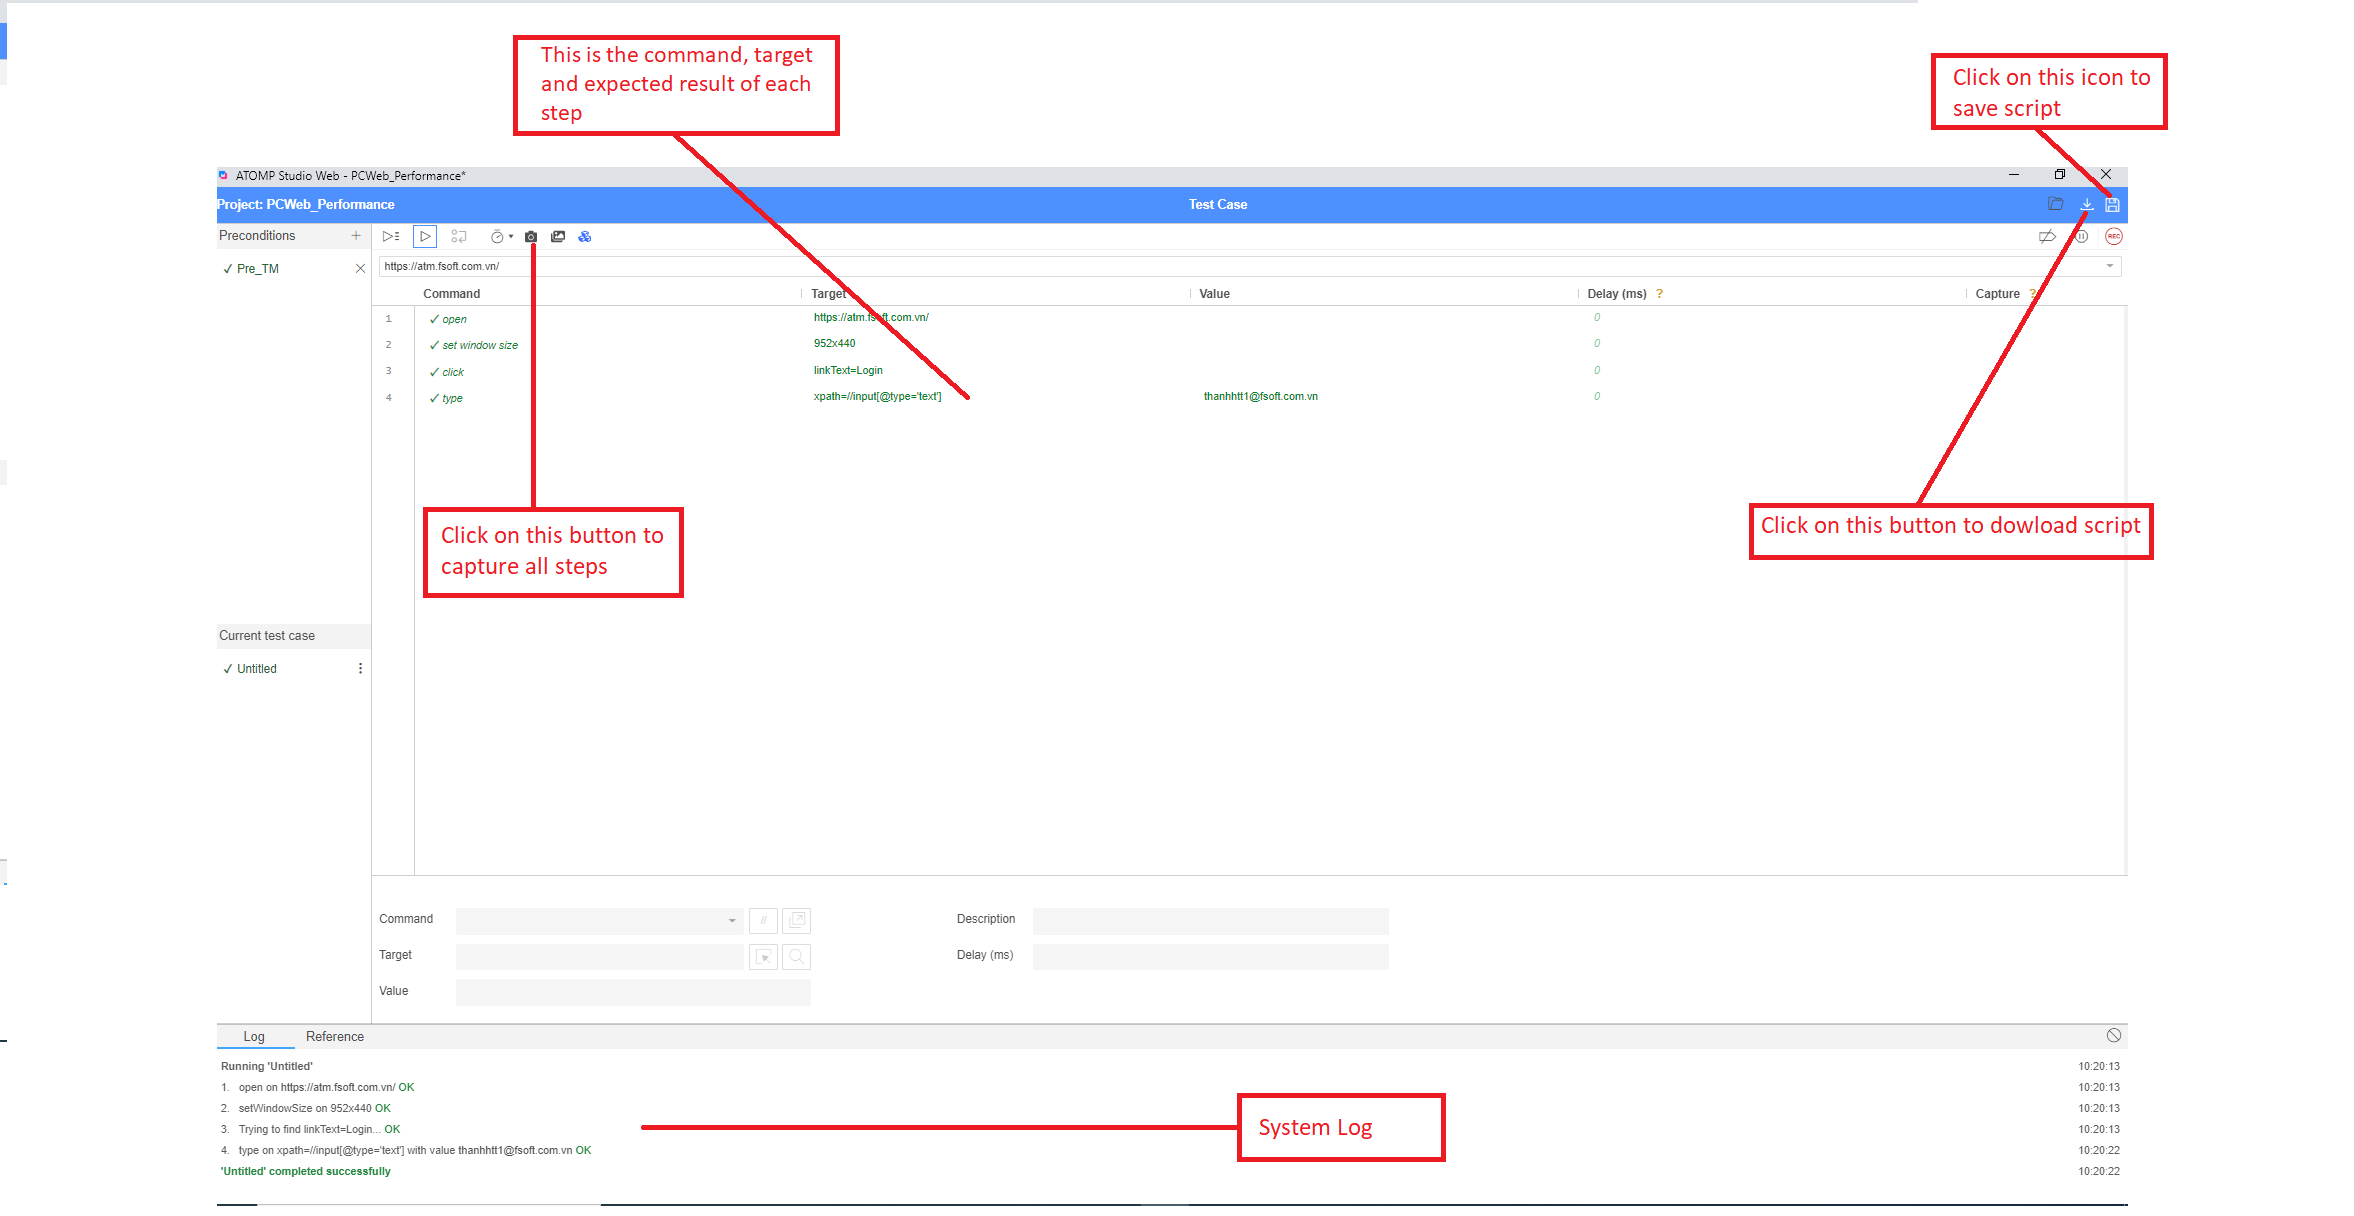
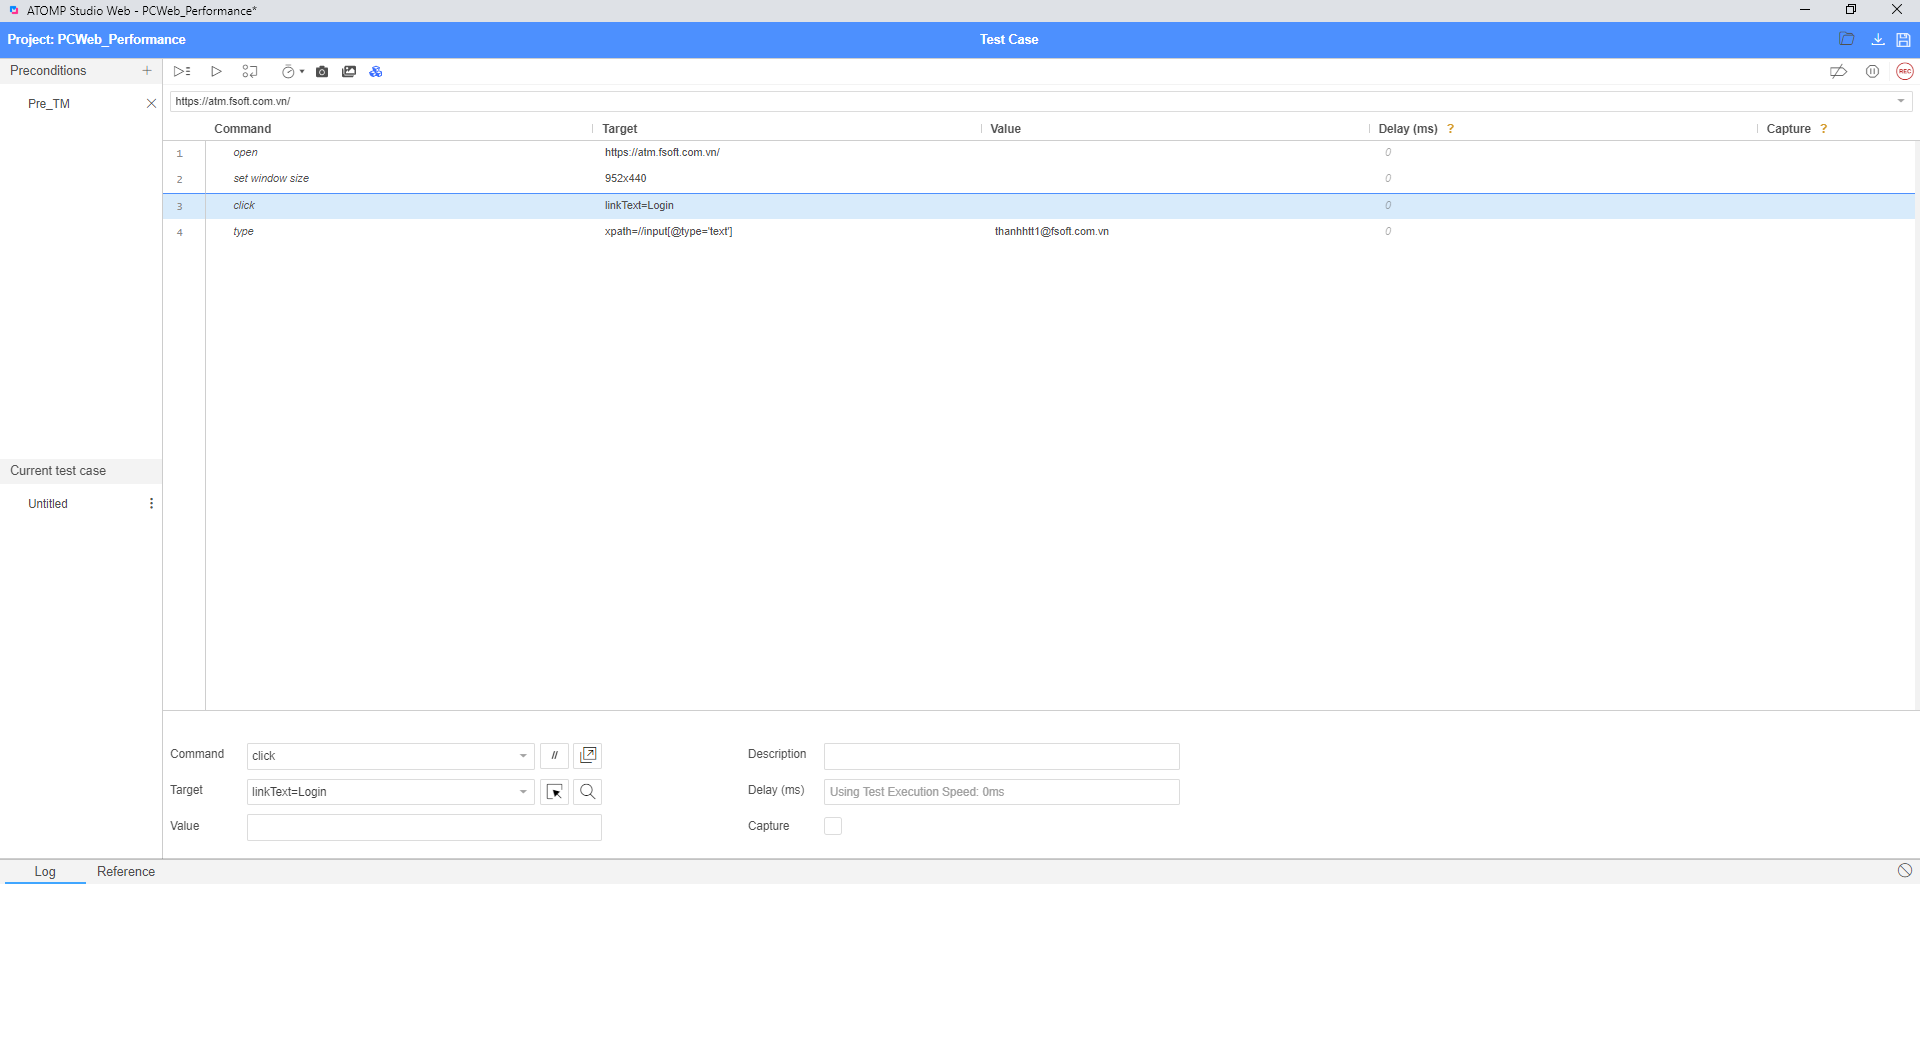
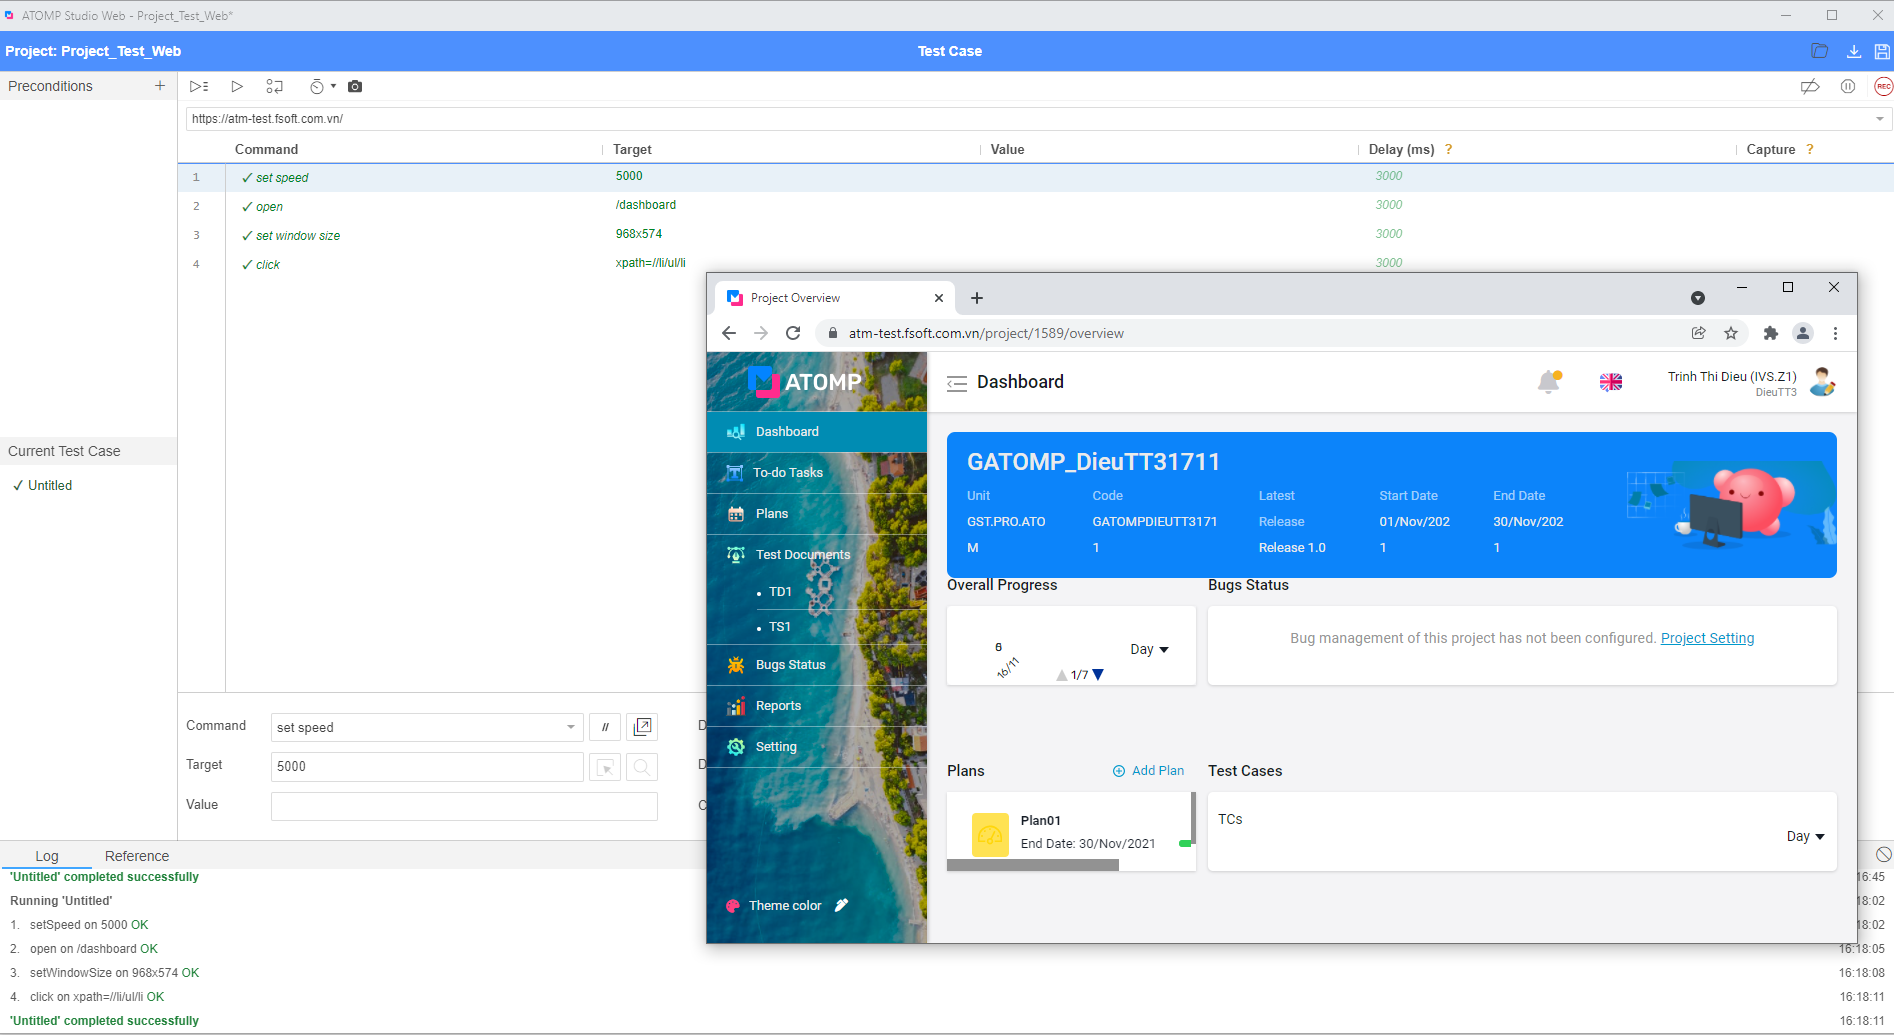
- Once the URL has been opened, after executing 1 action, the tool automatically generates a test script for that action and displays as a step (refer to the picture below).
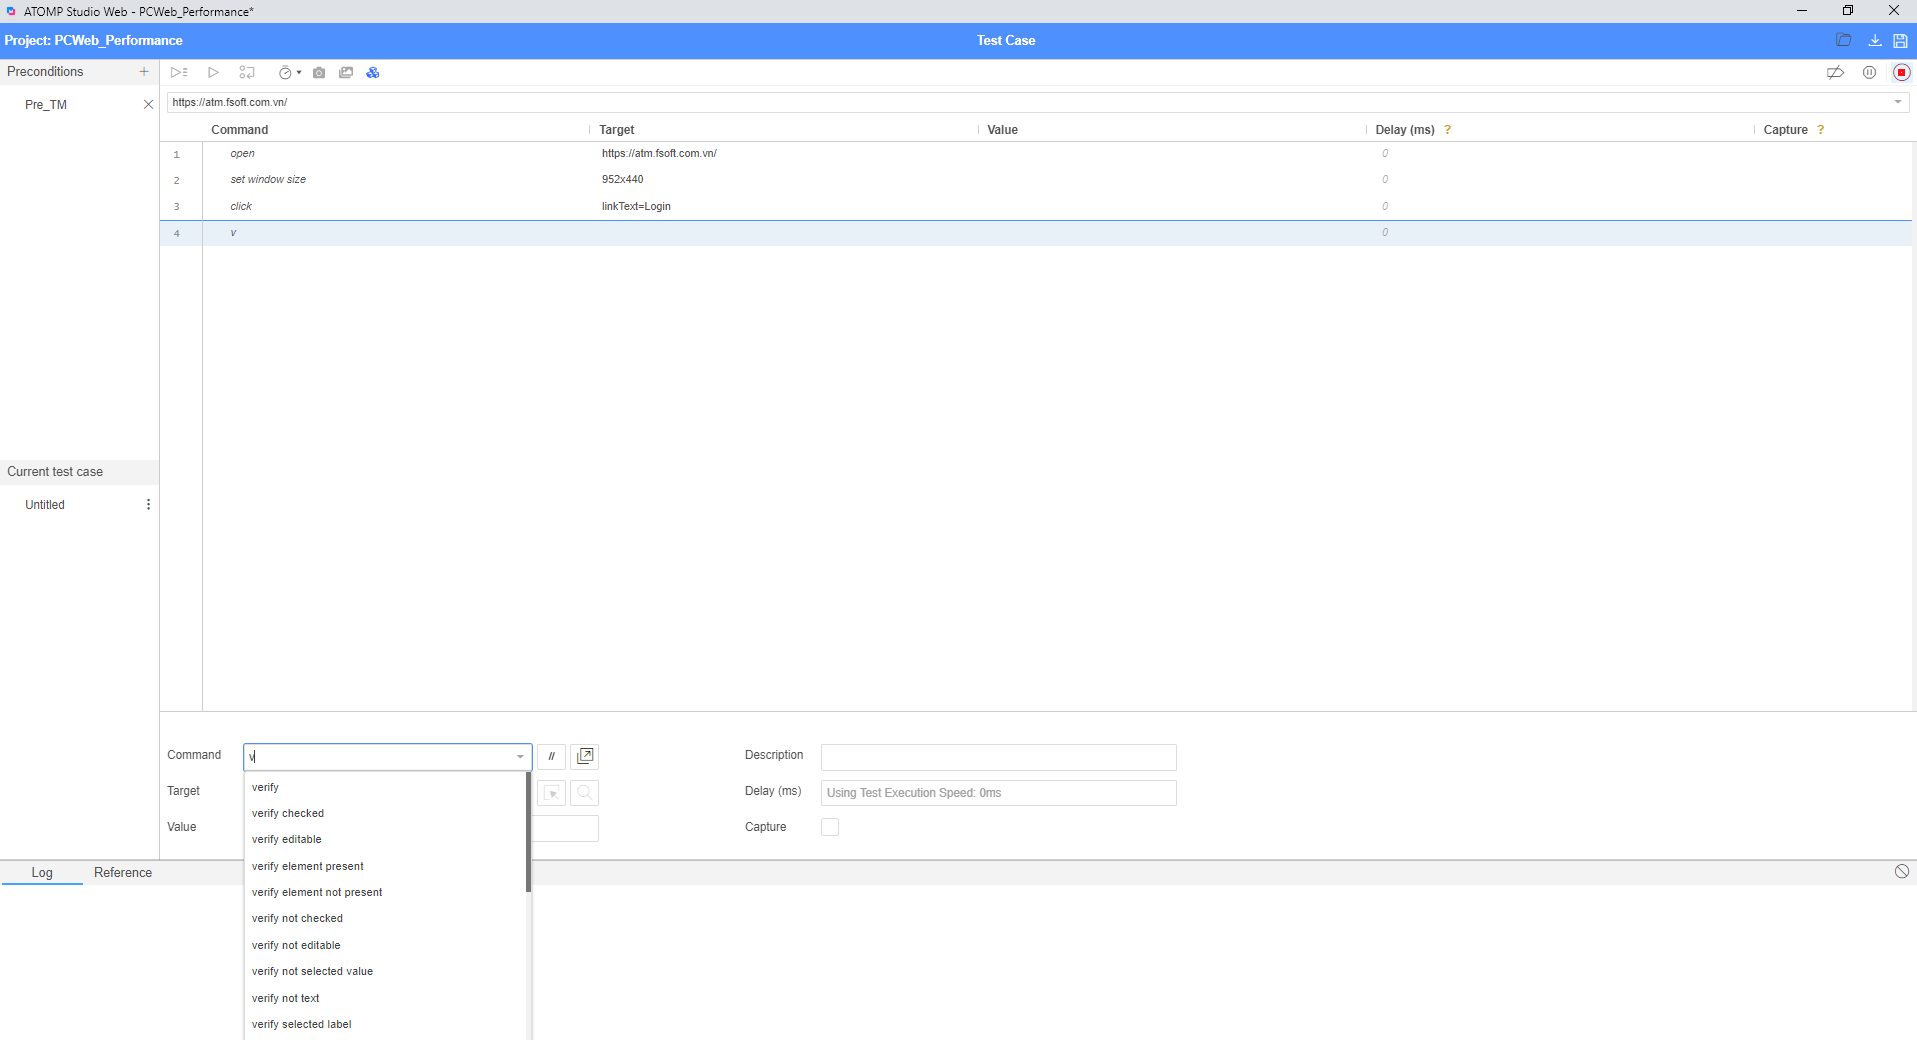
- Additionally, users can create a step manually by utilizing the “Command” input box.
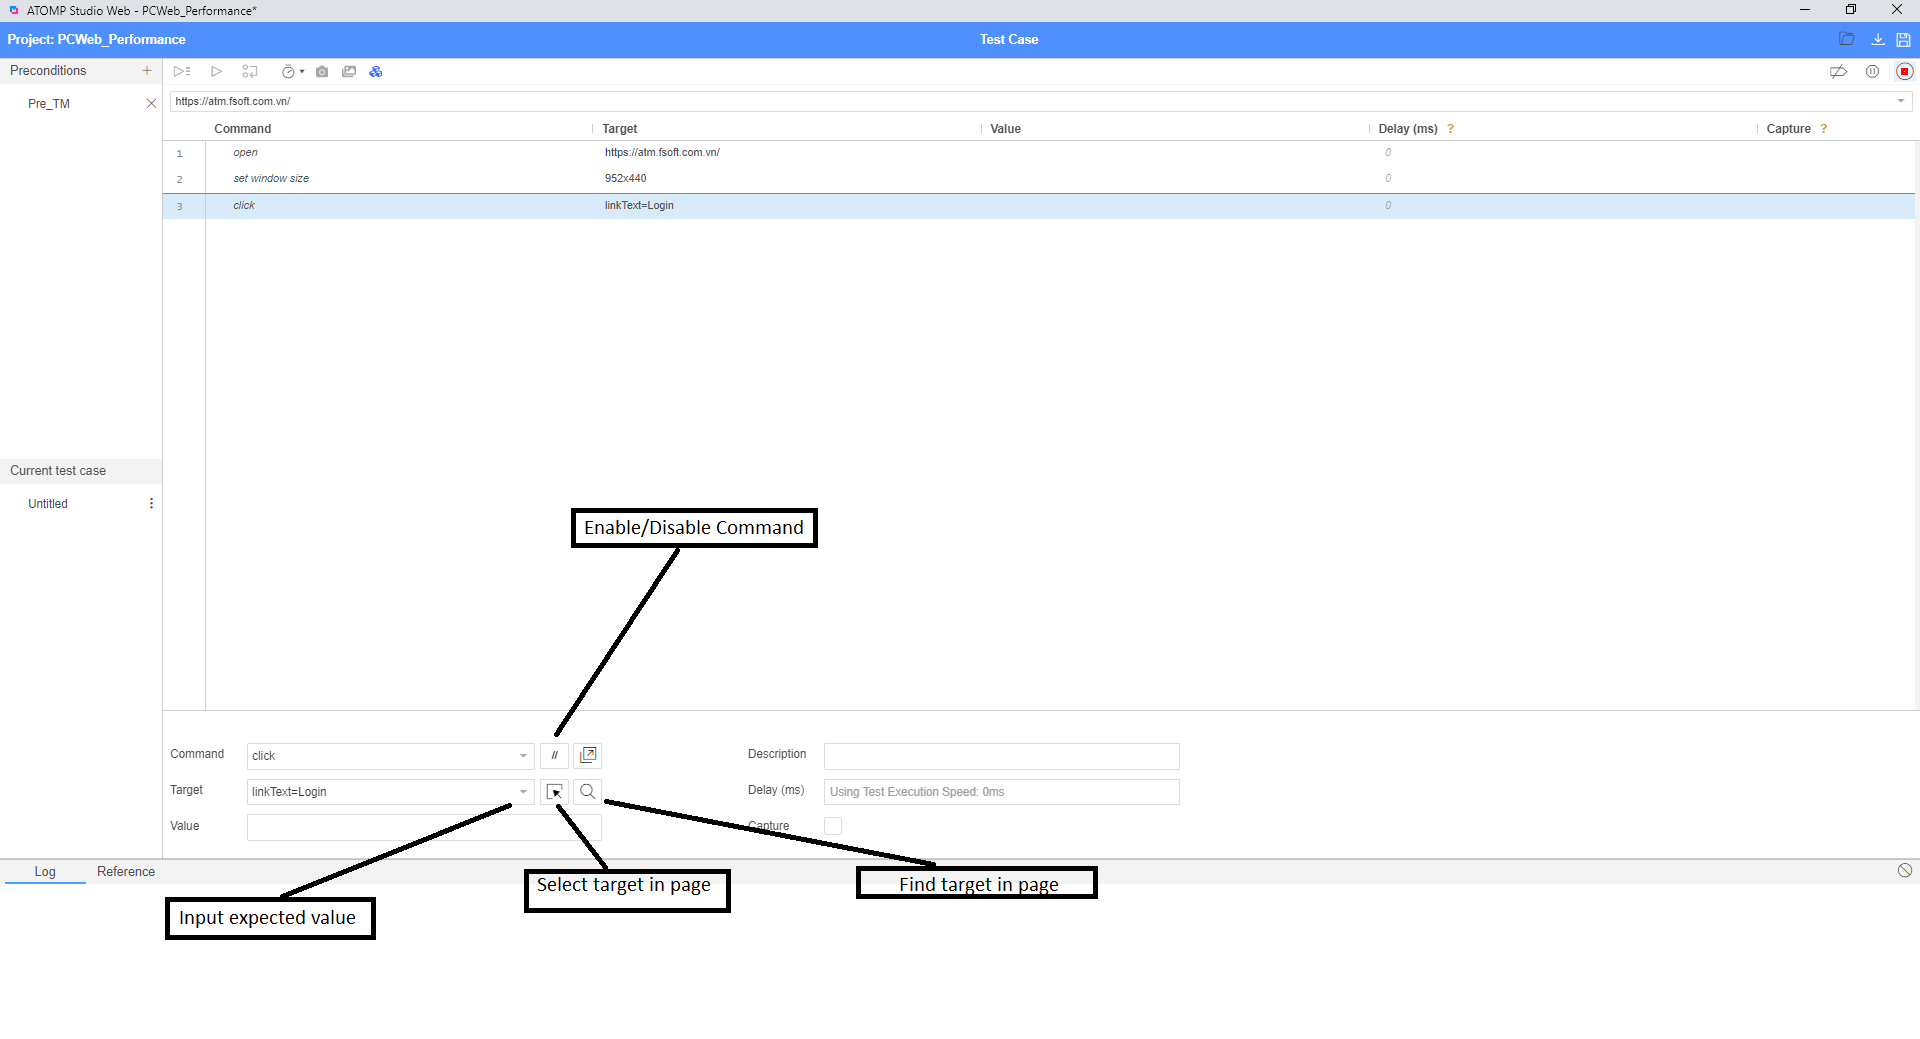
Customize steps
- Command has a series of commands that users can use to interact with the web app.
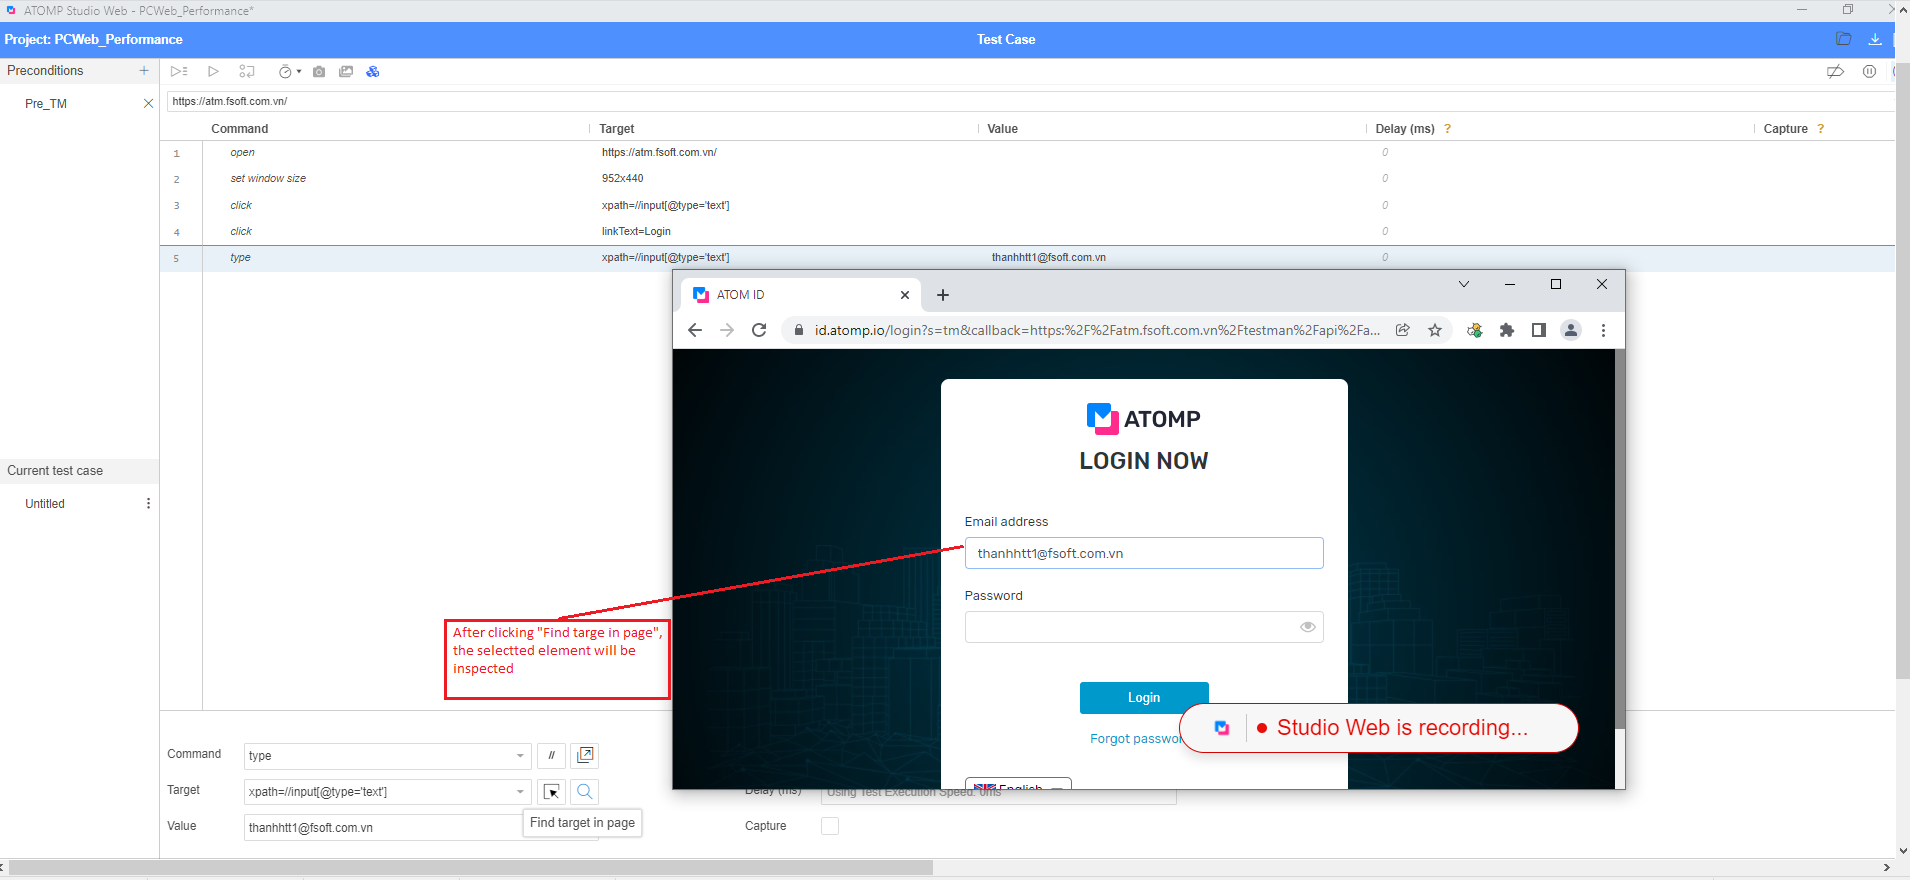
- Target has some element types for users to choose from: (list target to find element).
+ xpath:attributes
+ css
+ xpath: position
- Description: a step description.
- Delay(ms): a delay time before executing the current step.
- Capture: capture web app screen during this current step’s execution.
- Value: input value for each command.
- User can select different element types for the target by clicking this icon

Here are some commands that are commonly used:
3.1. Click command
- The purpose of click command is to click on any UI element in the application.
- While the row is selected, enter the ATOMP Studio command ‘click’ to the Command box field and enter the XPath locating strategy into the Target box field.
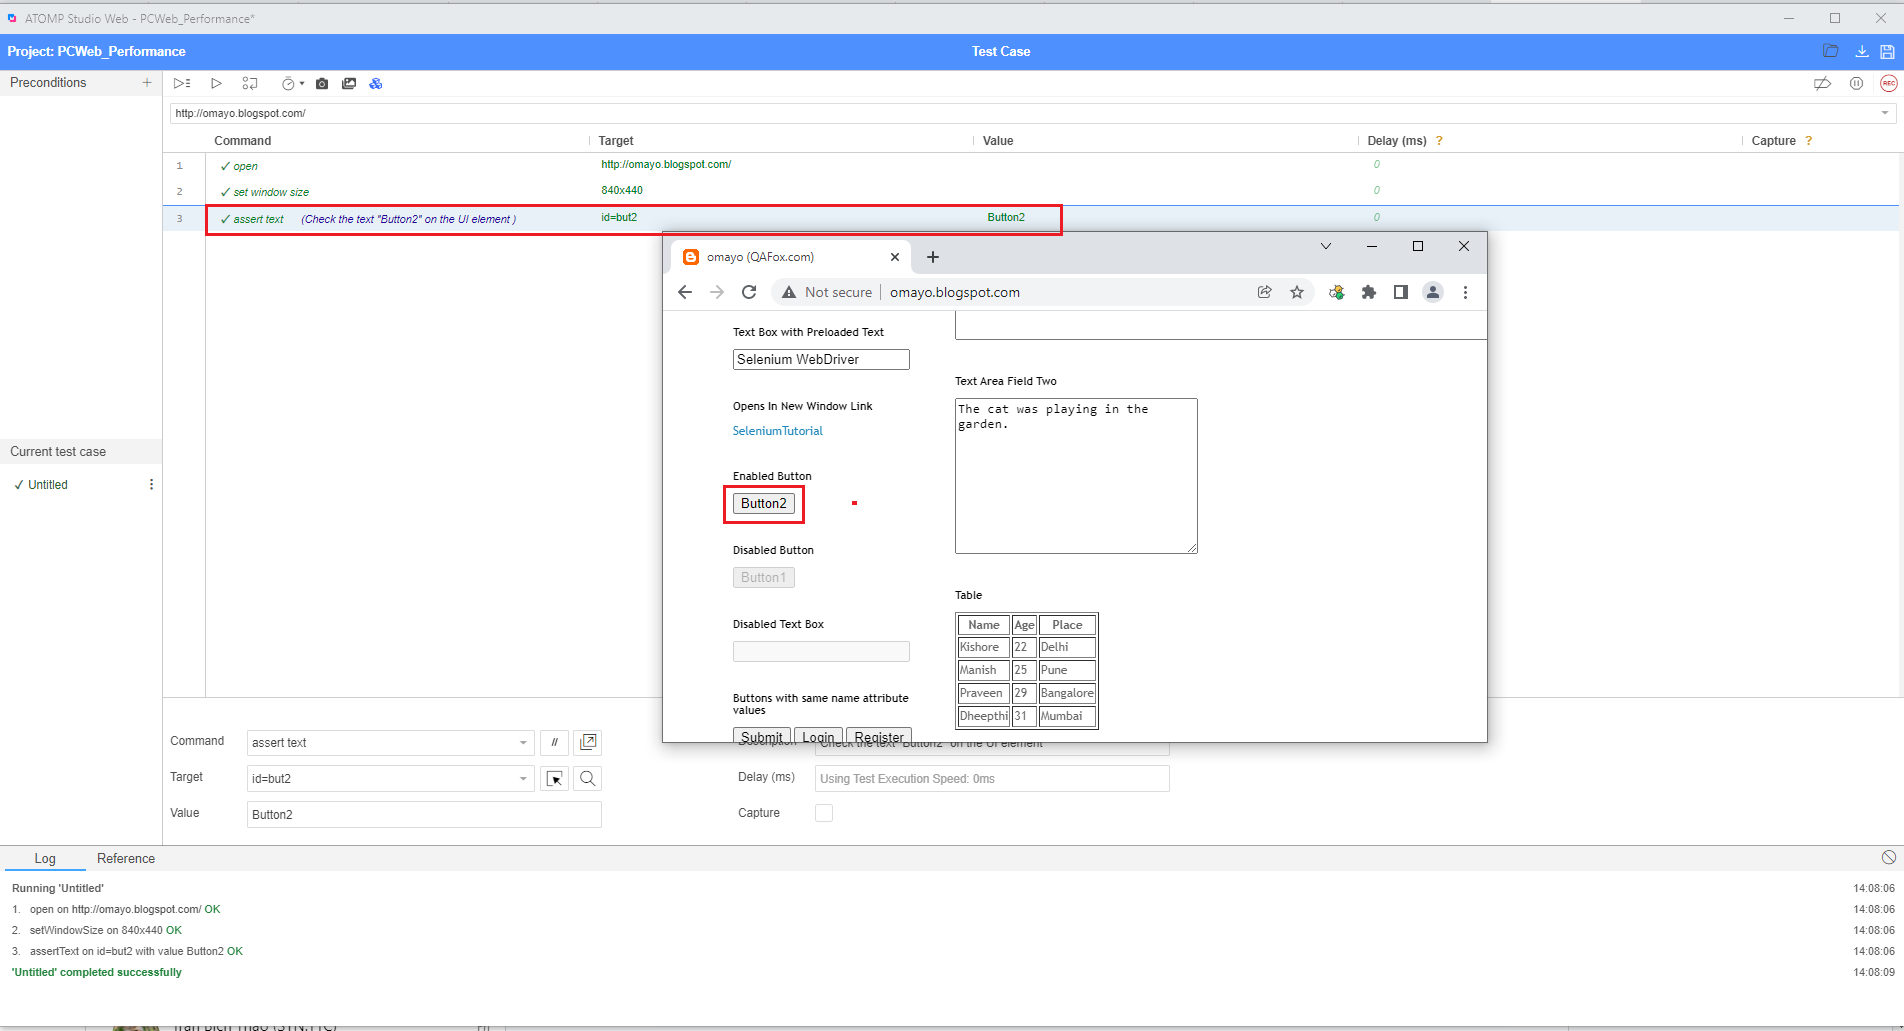
3.2. Assert text command
- The purpose of assert text command is to check the text on the UI element ( Checking the text on this button is a per our requirement)
- While the row is selected, enter the command ‘assert text’ to the Command box field, enter the id locating strategy into the Target box field:

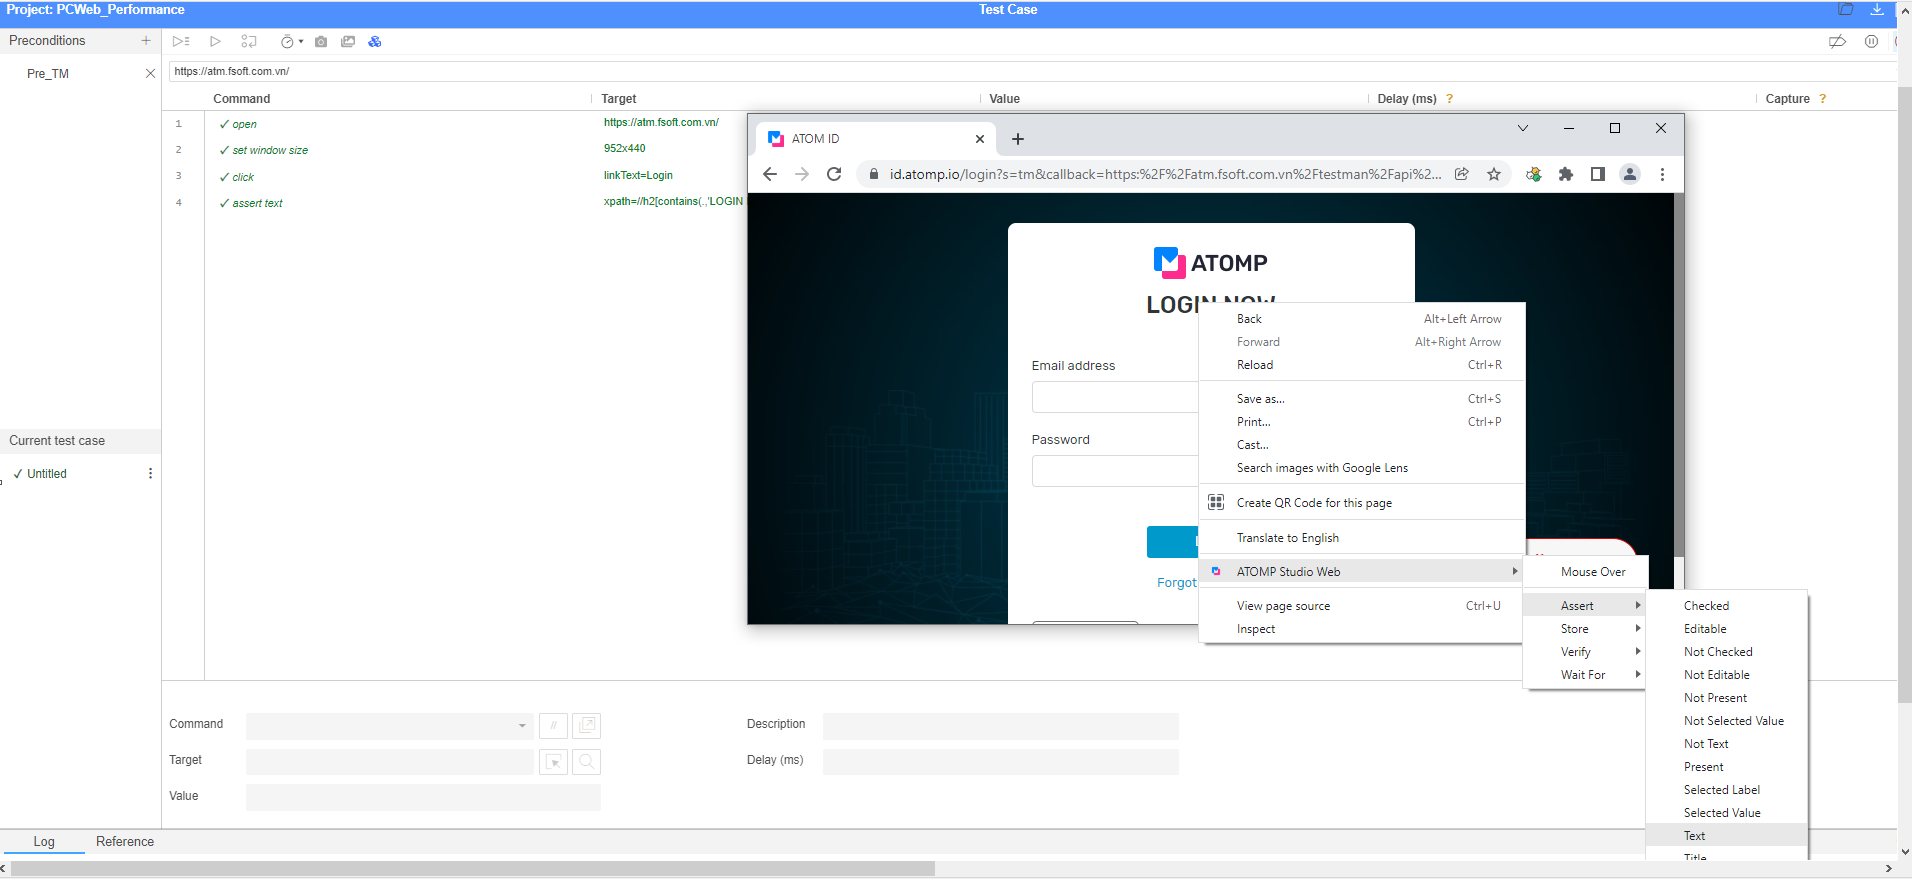
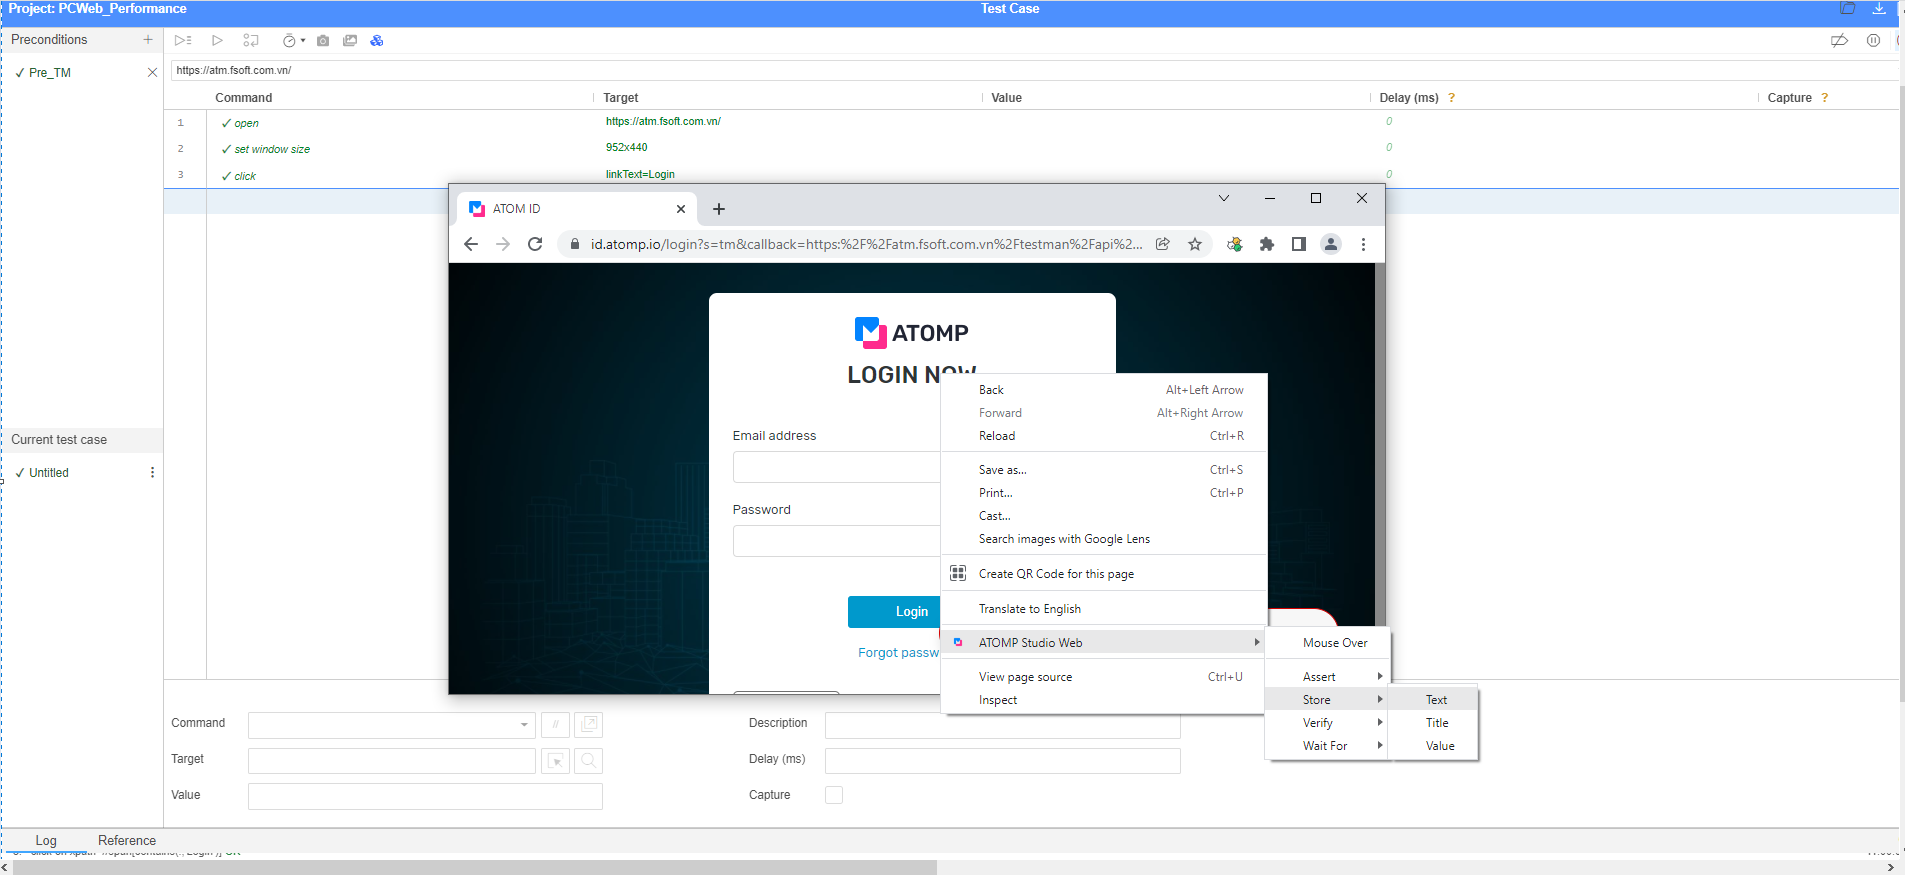
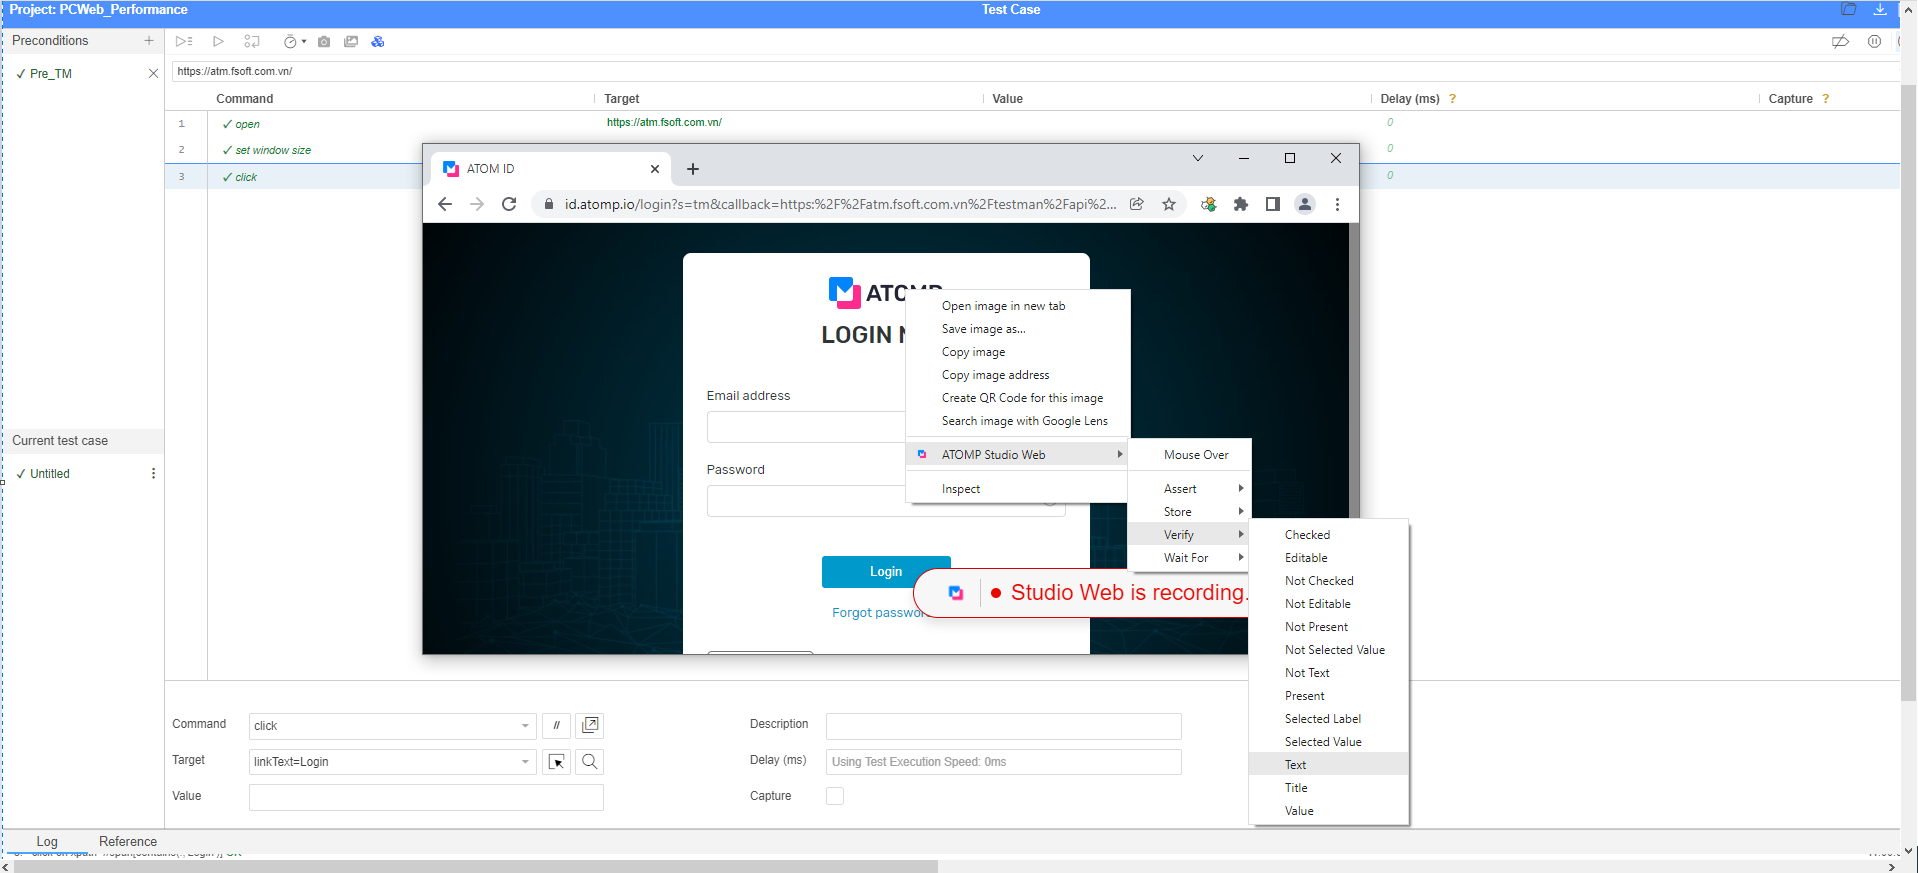
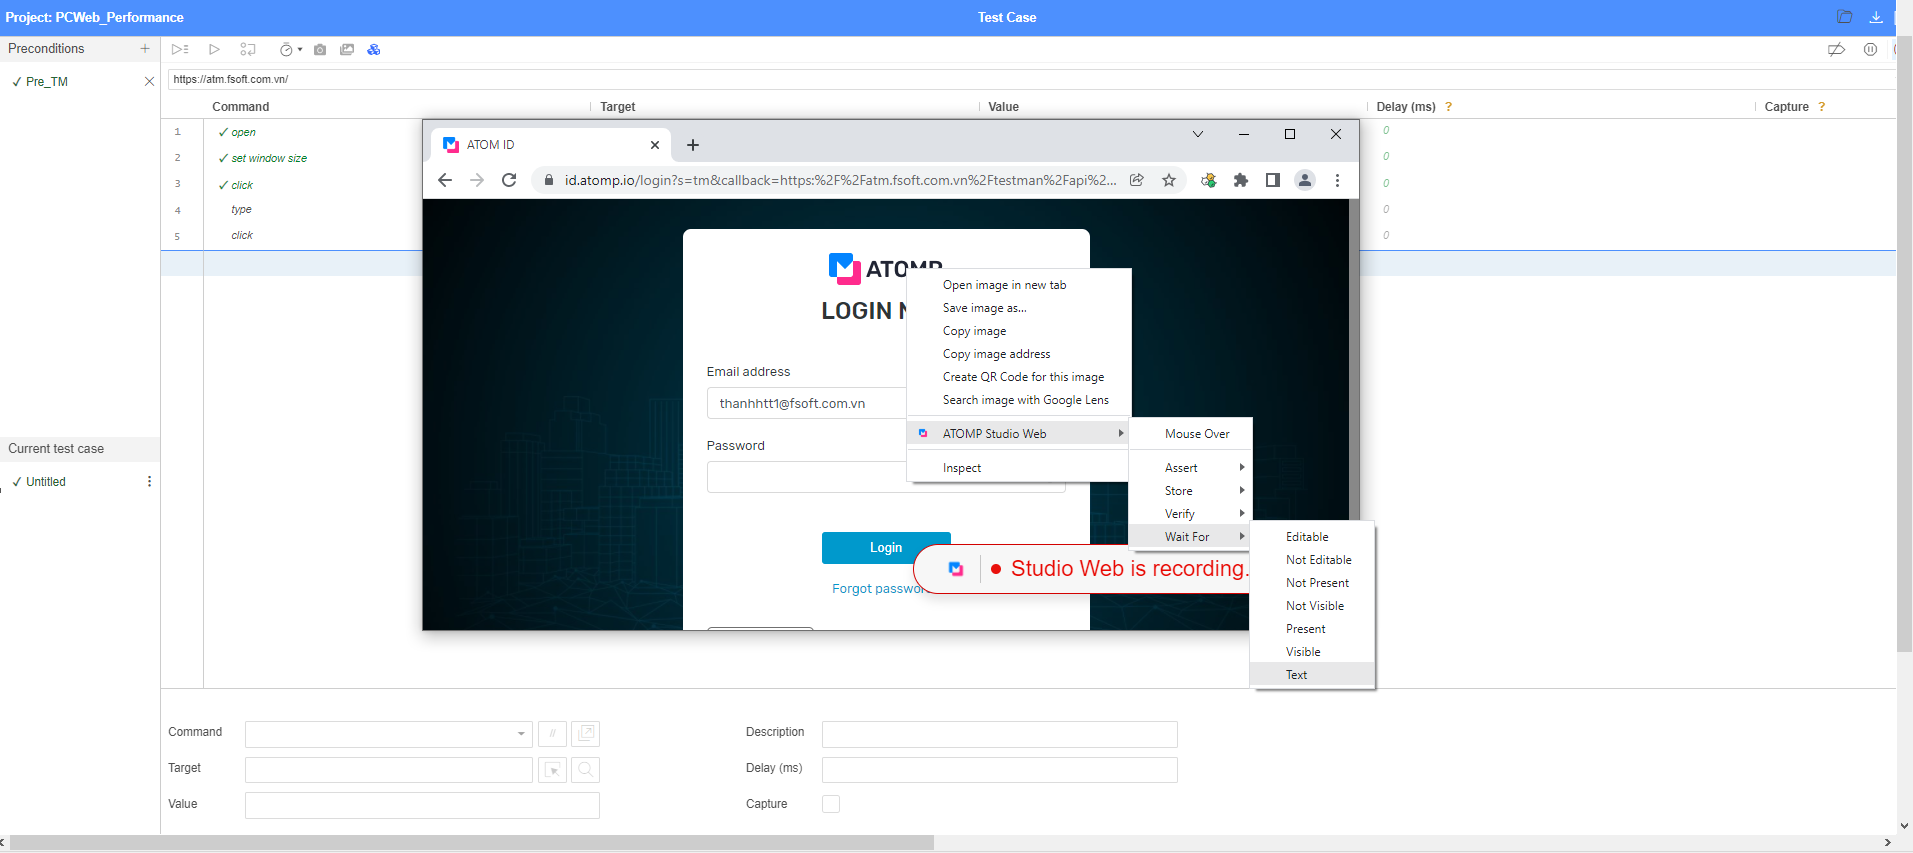
- In addition, the user can select the Mouse Over/Assert/Store/Verify/Wait For command by right clicking on the object that the user wants to check and show as below:
+ Mouse over : The purpose of the mouse over command is to perform mouse the hover action on the given UI element.
+ Assert: The purpose of the assert command is to check the value stored in a variable is according to the expected result. (Ex: assert text, assert not text,…).
+ Store: The purpose of the store command is to store any text into a variable for easy re-use. Follow (Ex: store xpath count, store text,…).
+ Verify: The purpose of the verify command is to check the value stored in a variable. The variable’s value will be converted to a string for comparison. (Ex: verify check, verify not text,…).
+ Wait for element visible: The purpose of the wait for element visible command is to wait for the element to get displayed on the page. (Ex: wait for element not visible, wait for element present,…).
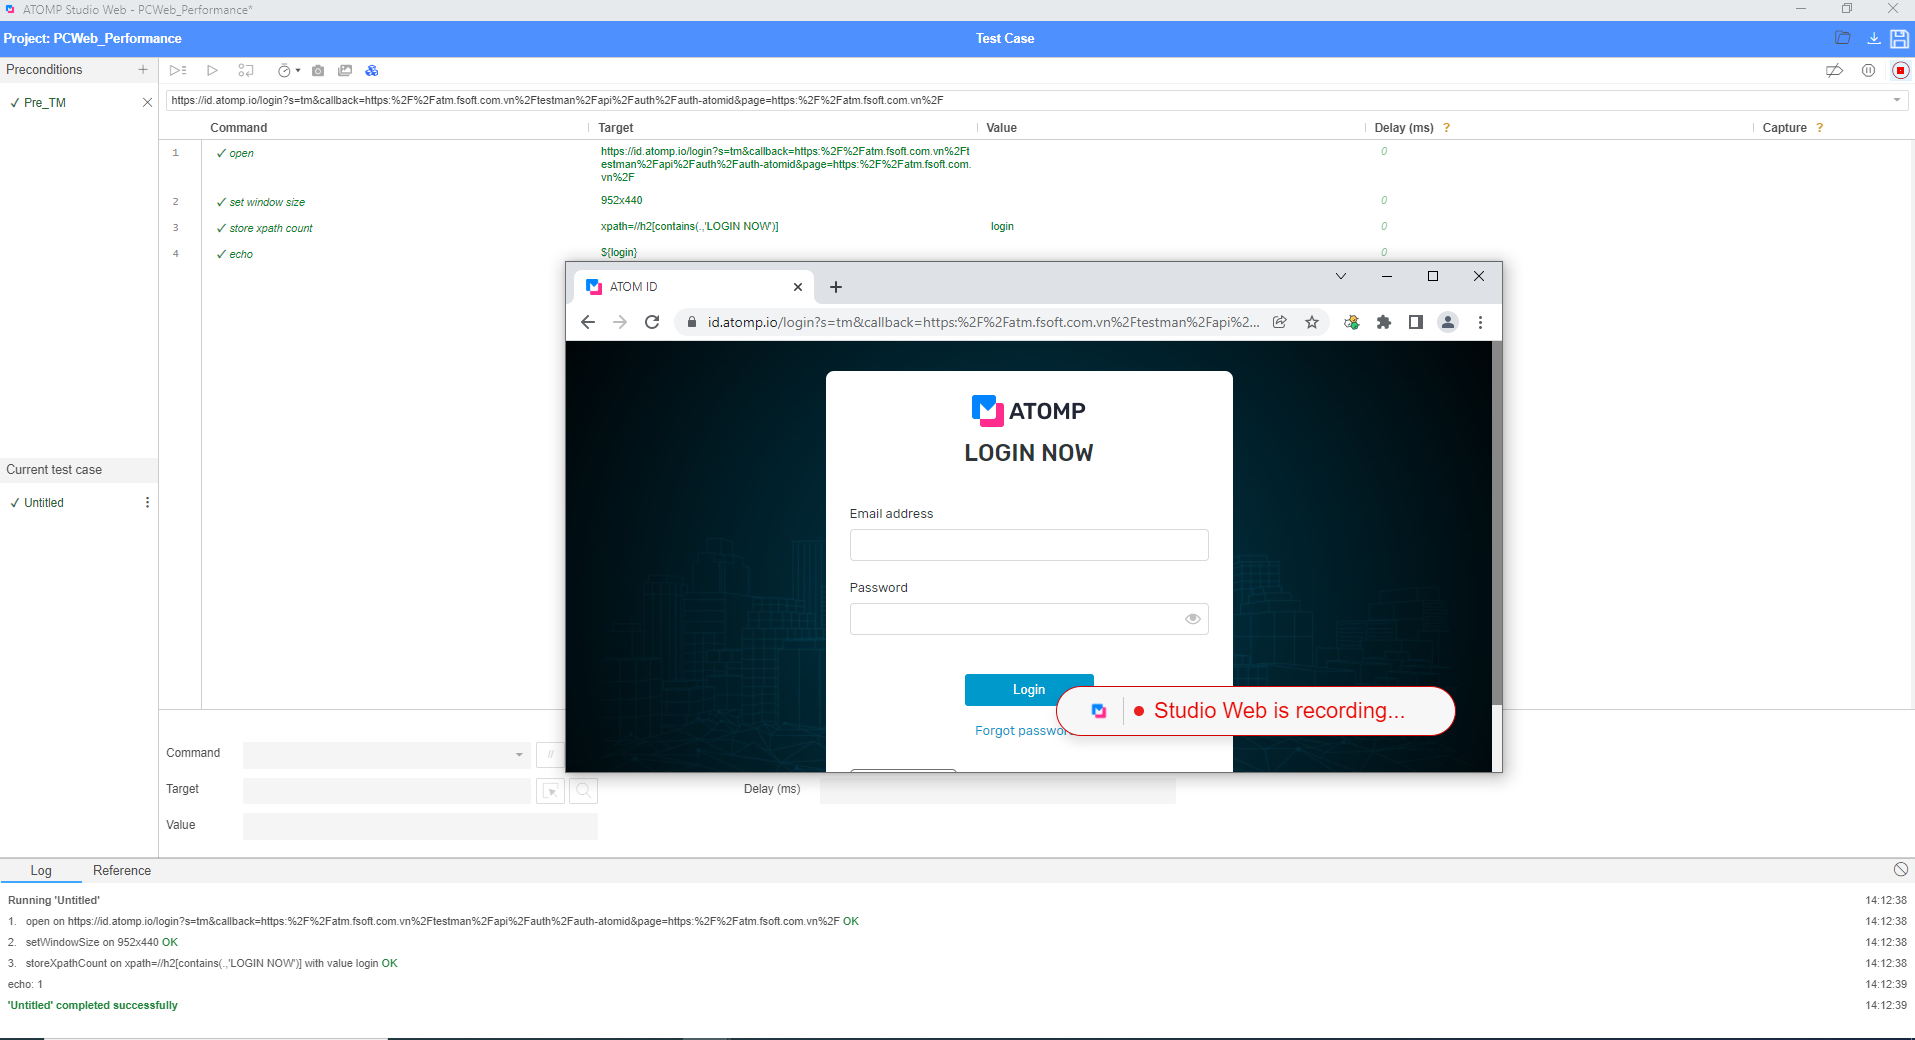
3.3. Store xpath count
The purpose of the store xpath count command is to retrieve and store the count of the UI elements located using the given XPath Locating strategy into a variable in ATOMP Studio
+ Gets the number of nodes that match the specified xpath
3.4. Echo command
- The purpose of echocommand is to print the messages given in ATOMP Studio. Useful for debugging
- The echo command usually comes with the store command (Ex: store attribute/ store xpath count/ store text….)
3.5. If and end command
The purpose of the if command is to check whether the given condition is true or false. If the condition results in true, the ATOMP Studio statements inside the if and end commands will be executed. If the condition results in false, the ATOMP Studio statements inside the if and end commands won’t be executed.
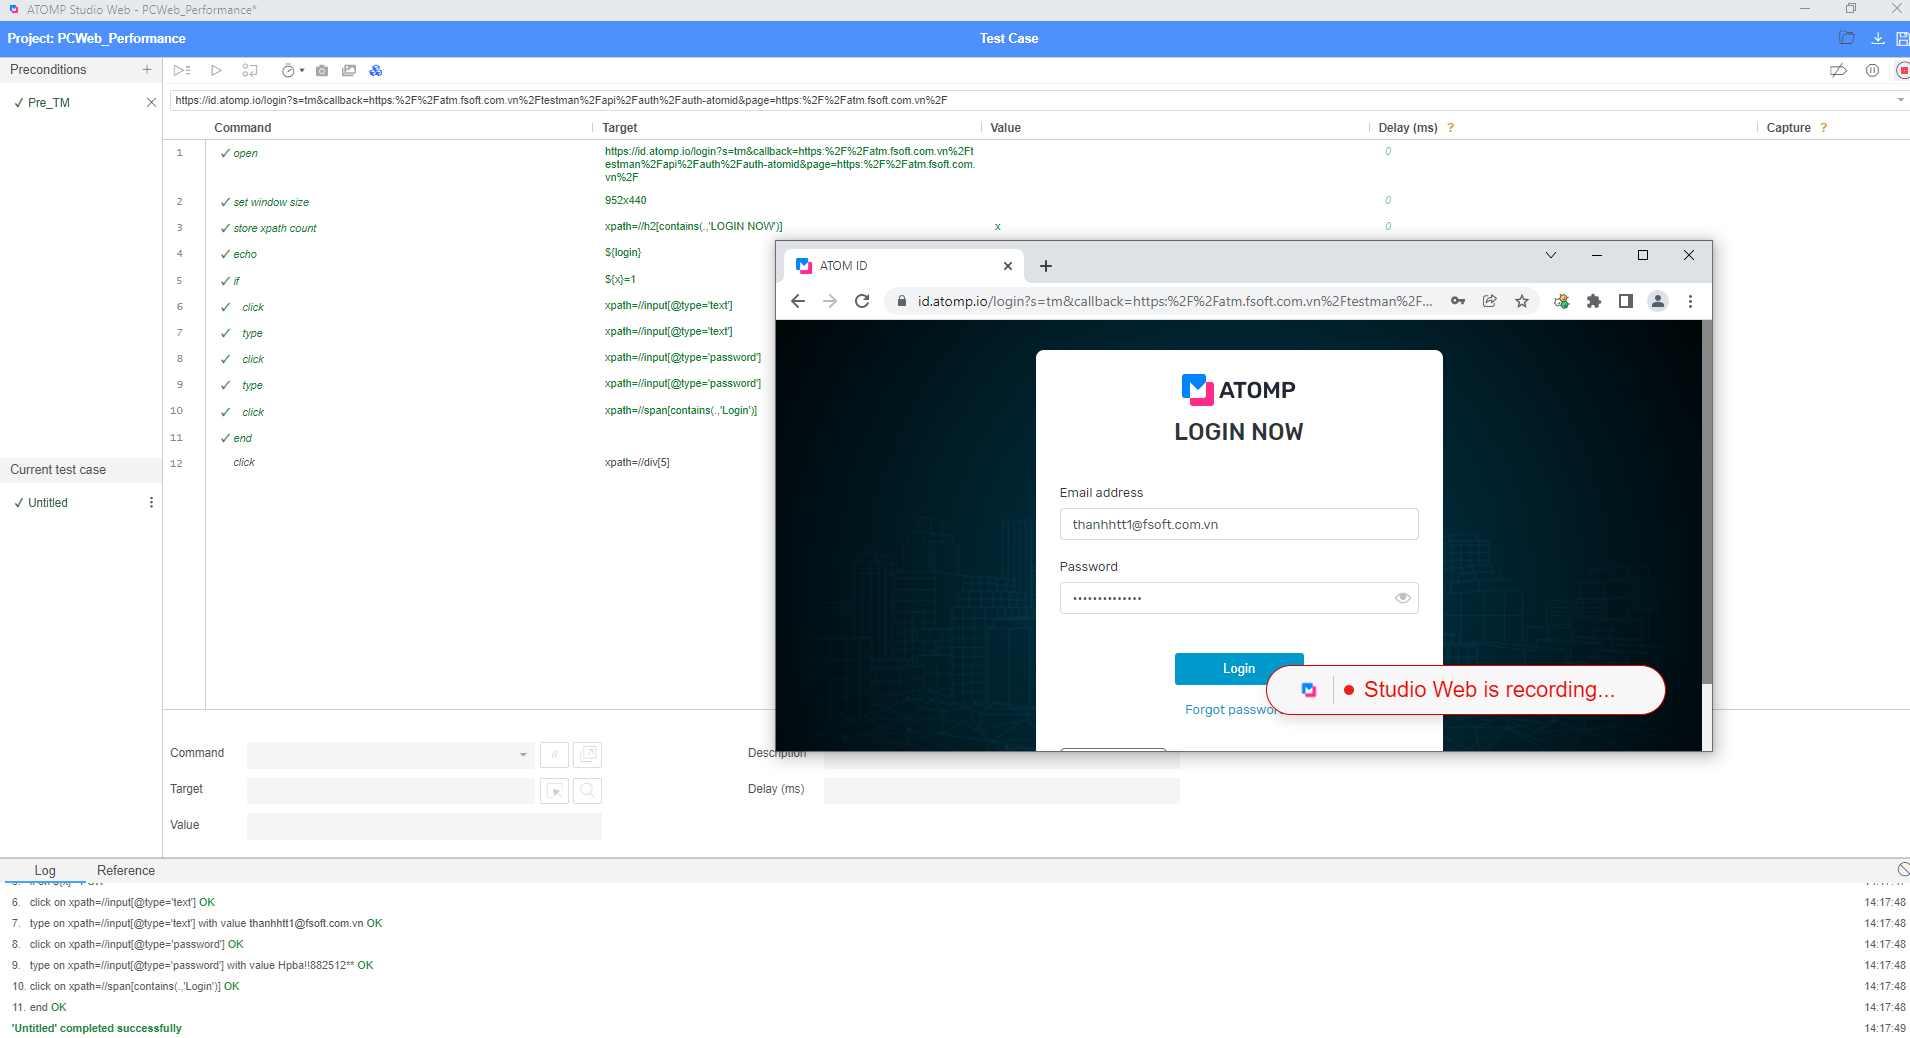
3.6. Else if/ send keys command
- Else if is the command in ATOMP Studio will be executed when the if condition results in false and we have another condition to be validated before going to the else block.
- Simulates keystroke events on the specified element, as though you typed the value key-by-key.

- All if and else/else/else if commands end with “end” command
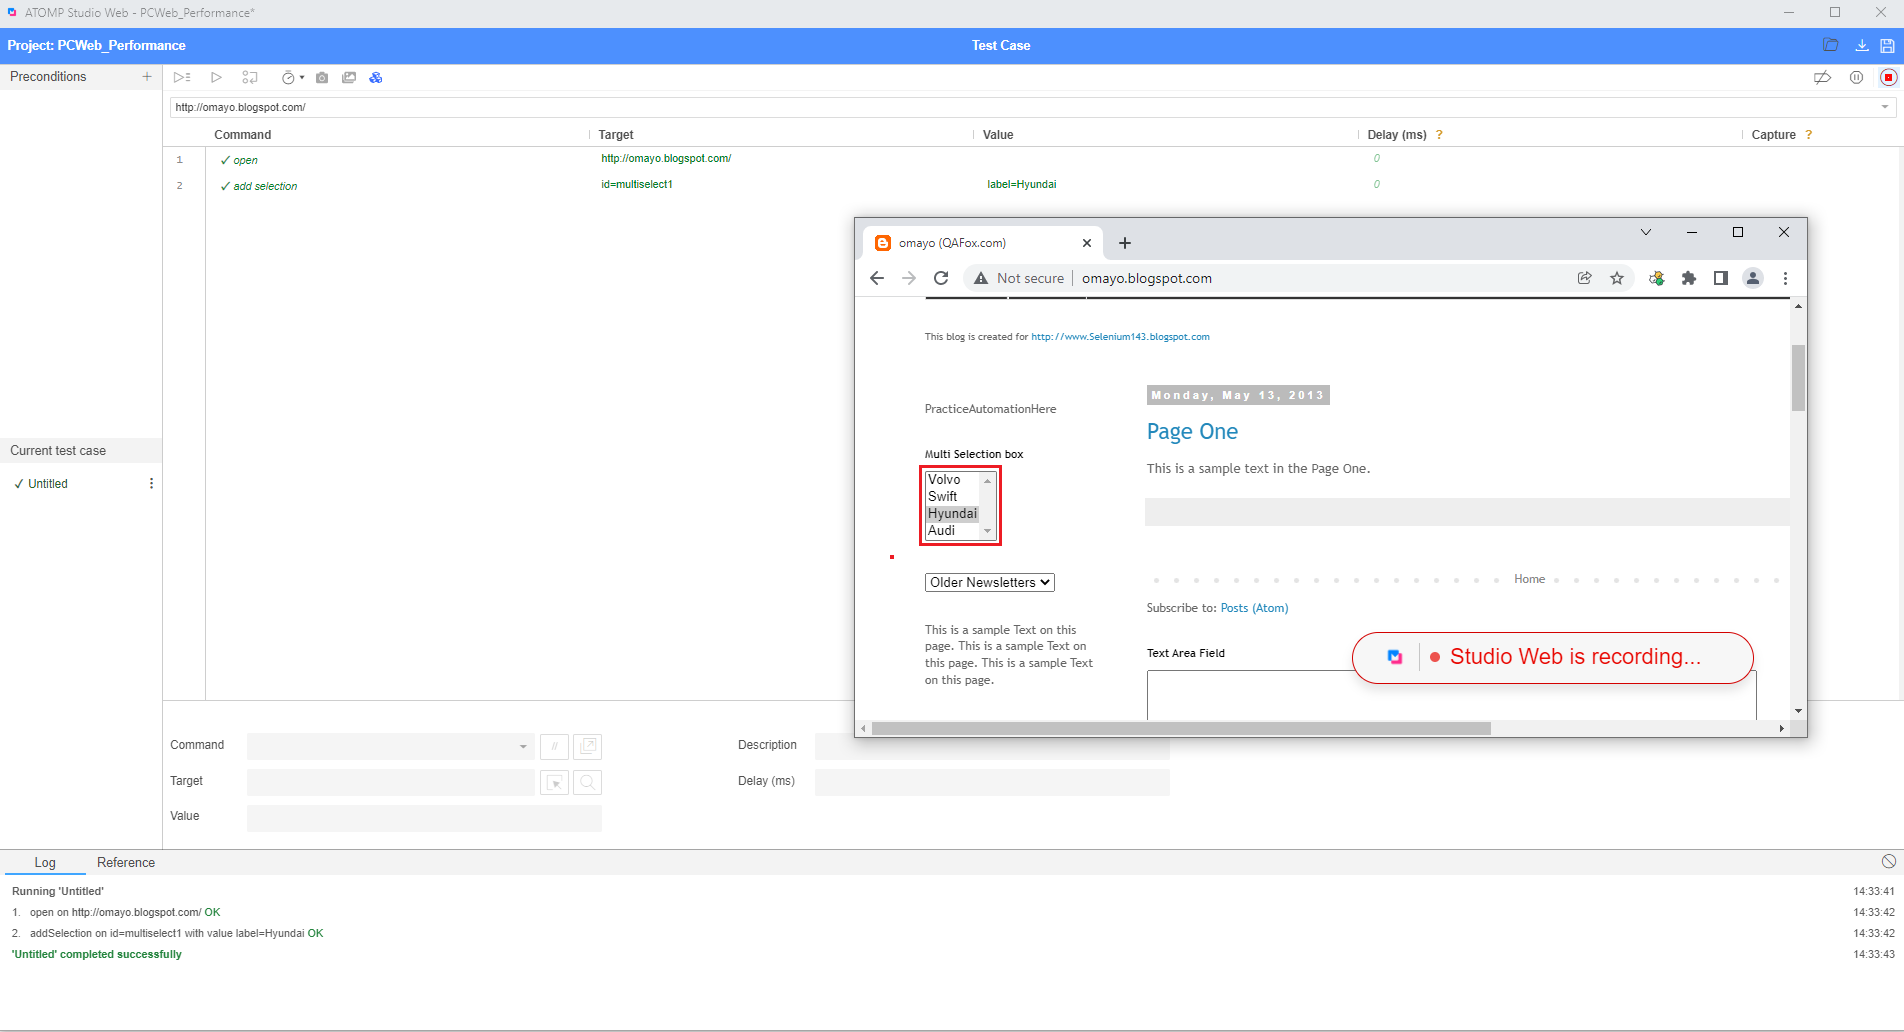
3.7. Add selection
Add a selection to the set of options in a multi-select element.
3.8. Answer on next prompt
Affects the next alert prompt. This command will send the specified answer string to it. If the alert is already present, then use “webdriver answer on visible prompt” instead.

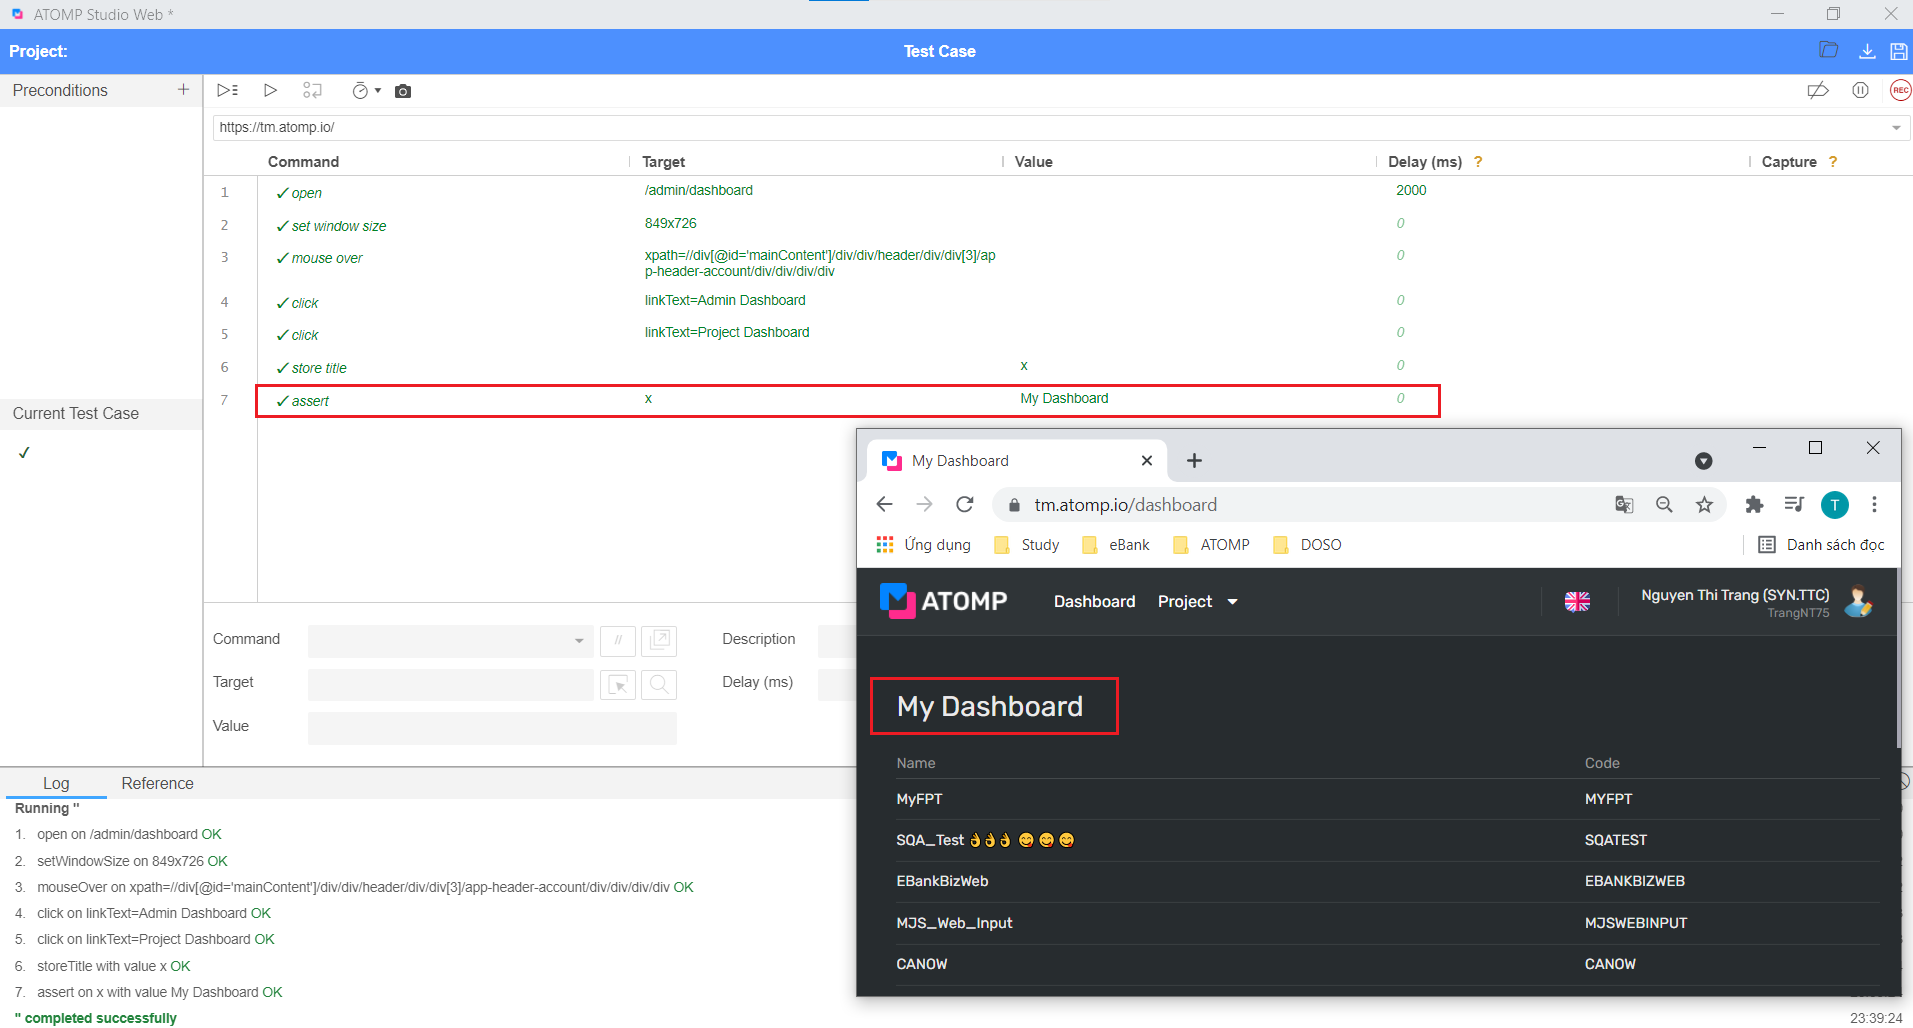
3.9. Assert
Check that a variable is an expected value. The variable’s value will be converted to a string for comparison. The test will stop if the assert fails.
+ Pass: same
+ Fail: different
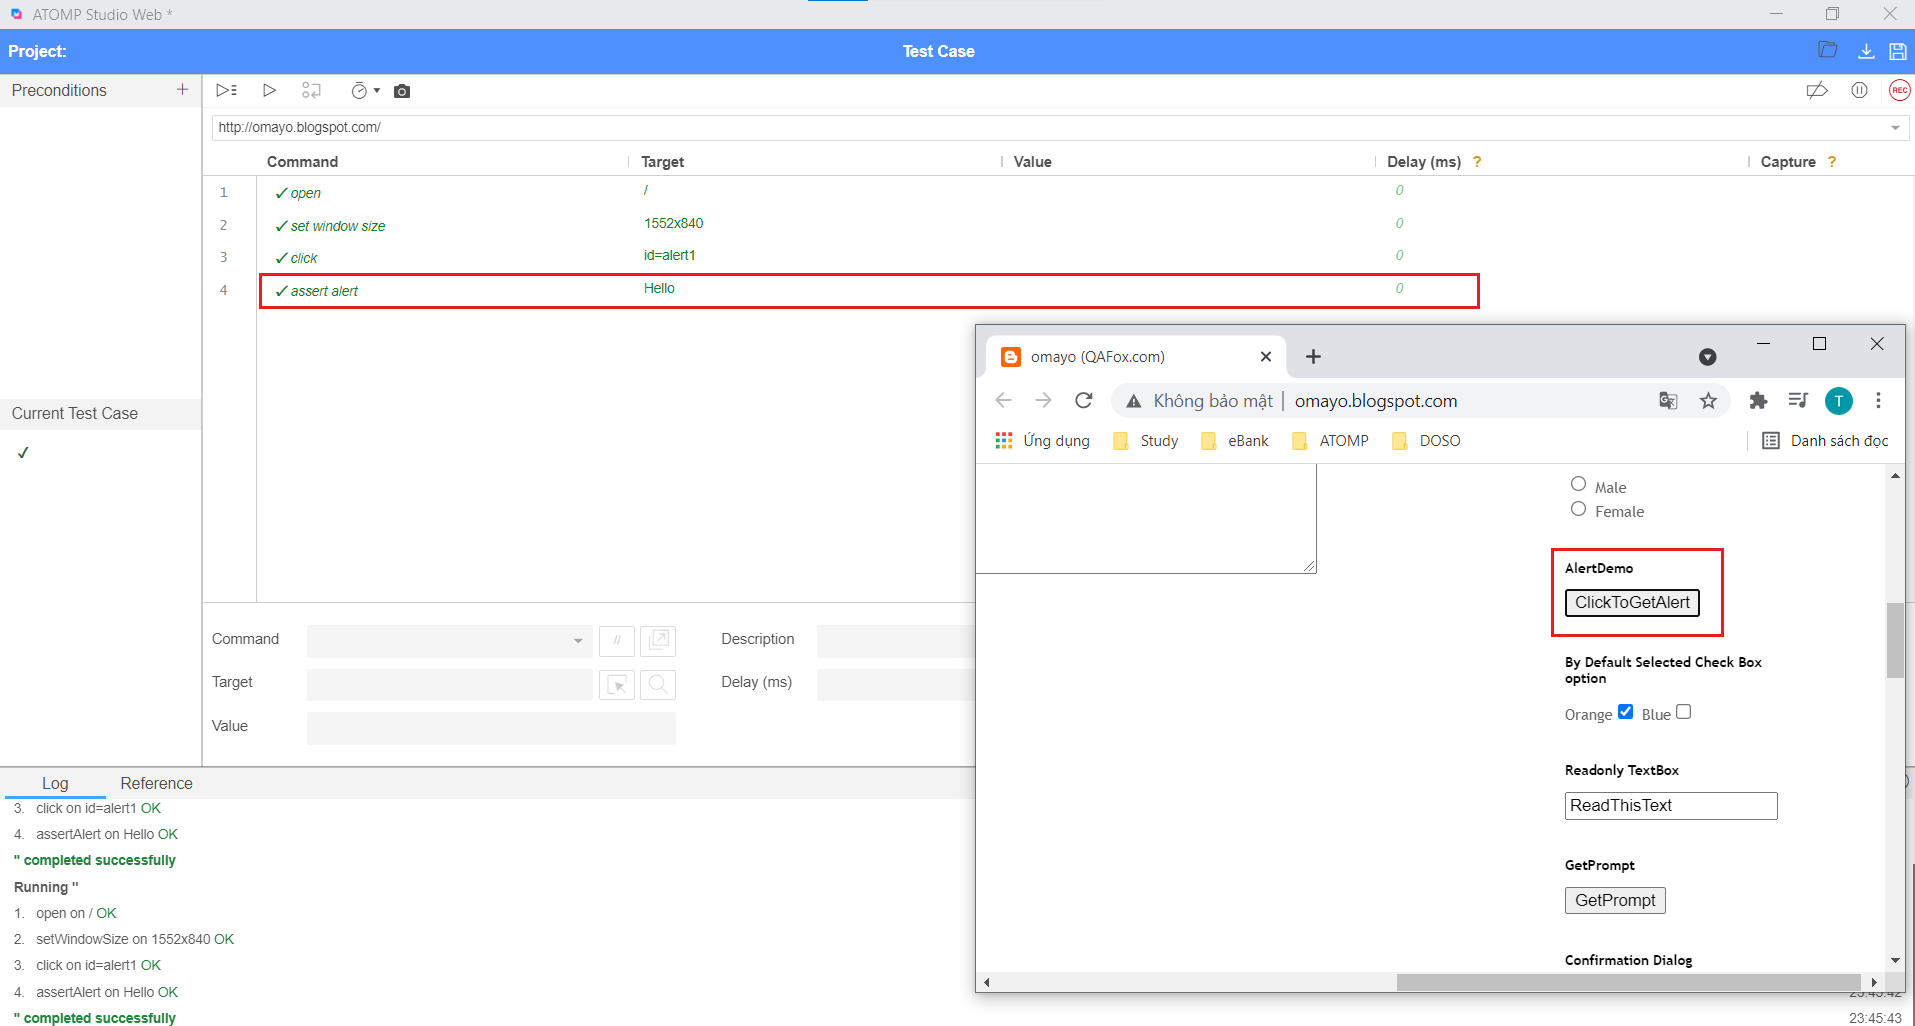
3.10. Assert alert
Confirm that an alert has been rendered with the provided text. The test will stop if the assert fails.
+ Pass: displayed
+ Fail: not displayed
3.11. Assert checked
- Confirm that the target element has been checked. The test will stop if the assert fails.
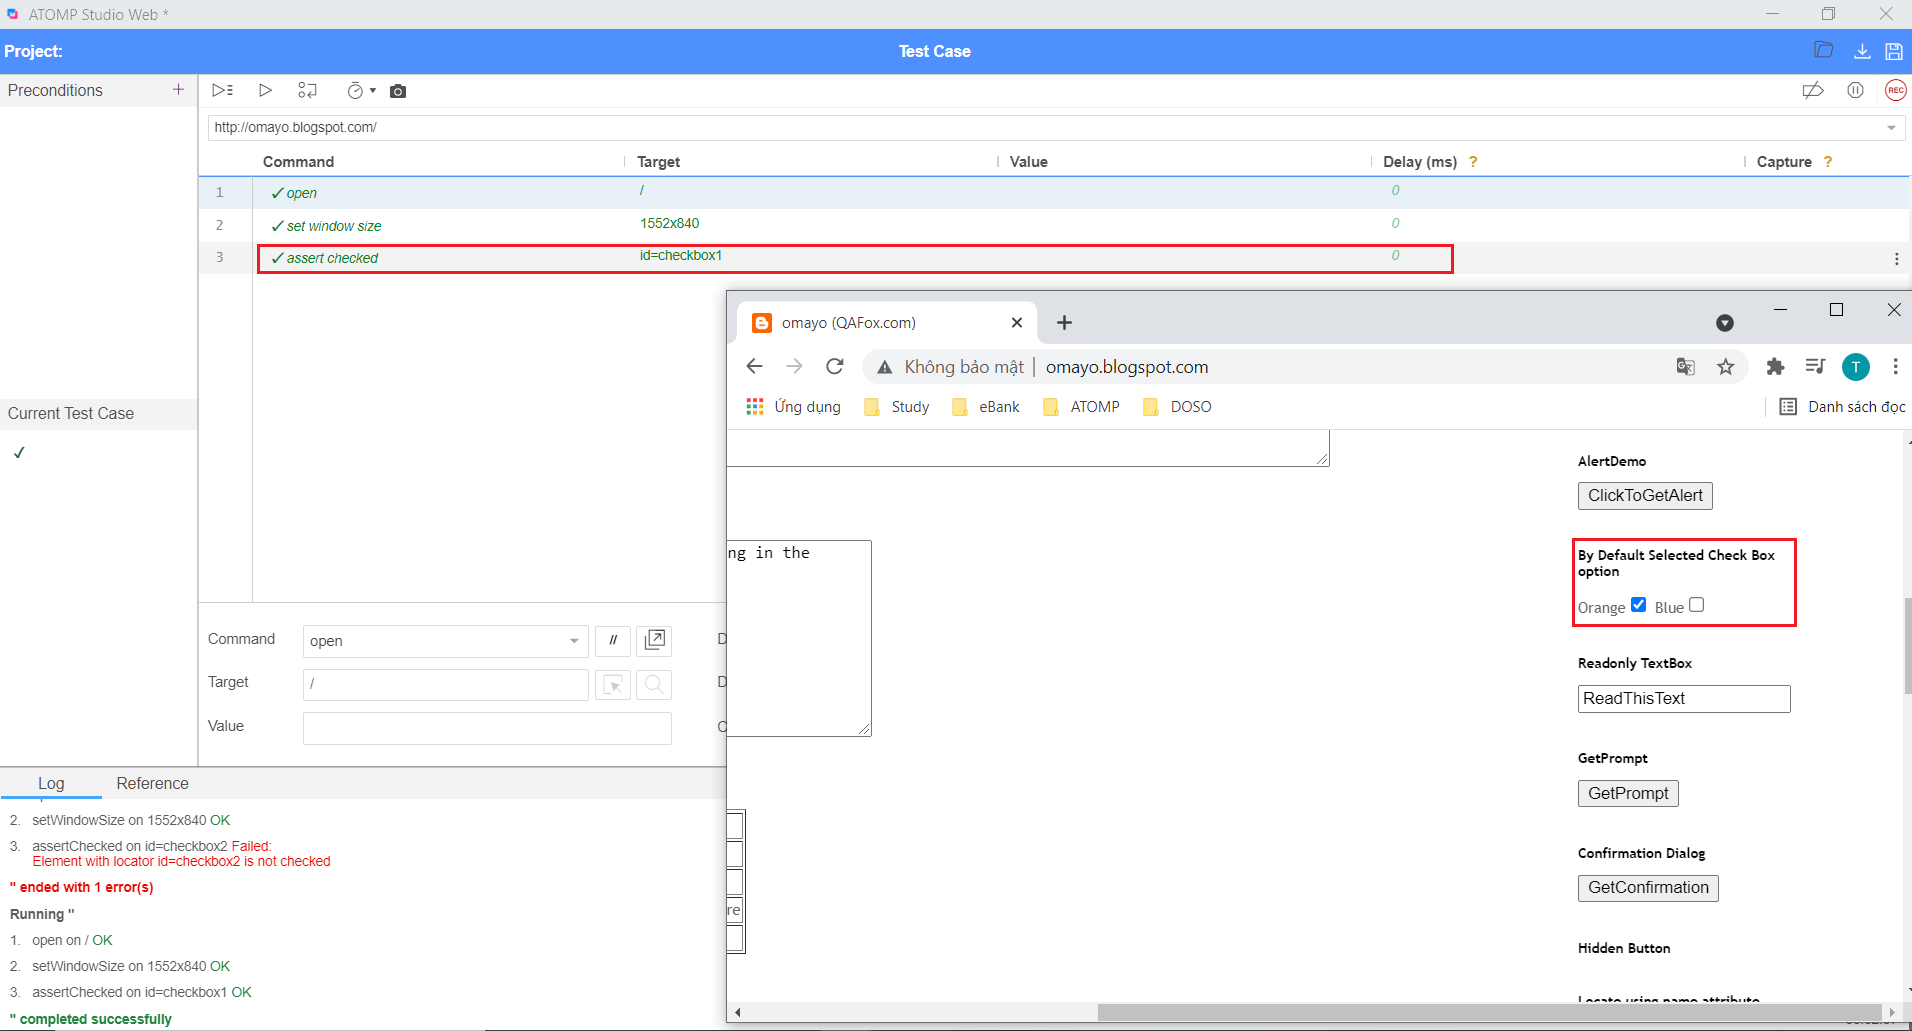
Different from assert checked and verify checked
| assert checked | verify checked |
| Hard assertion | Soft assertion |
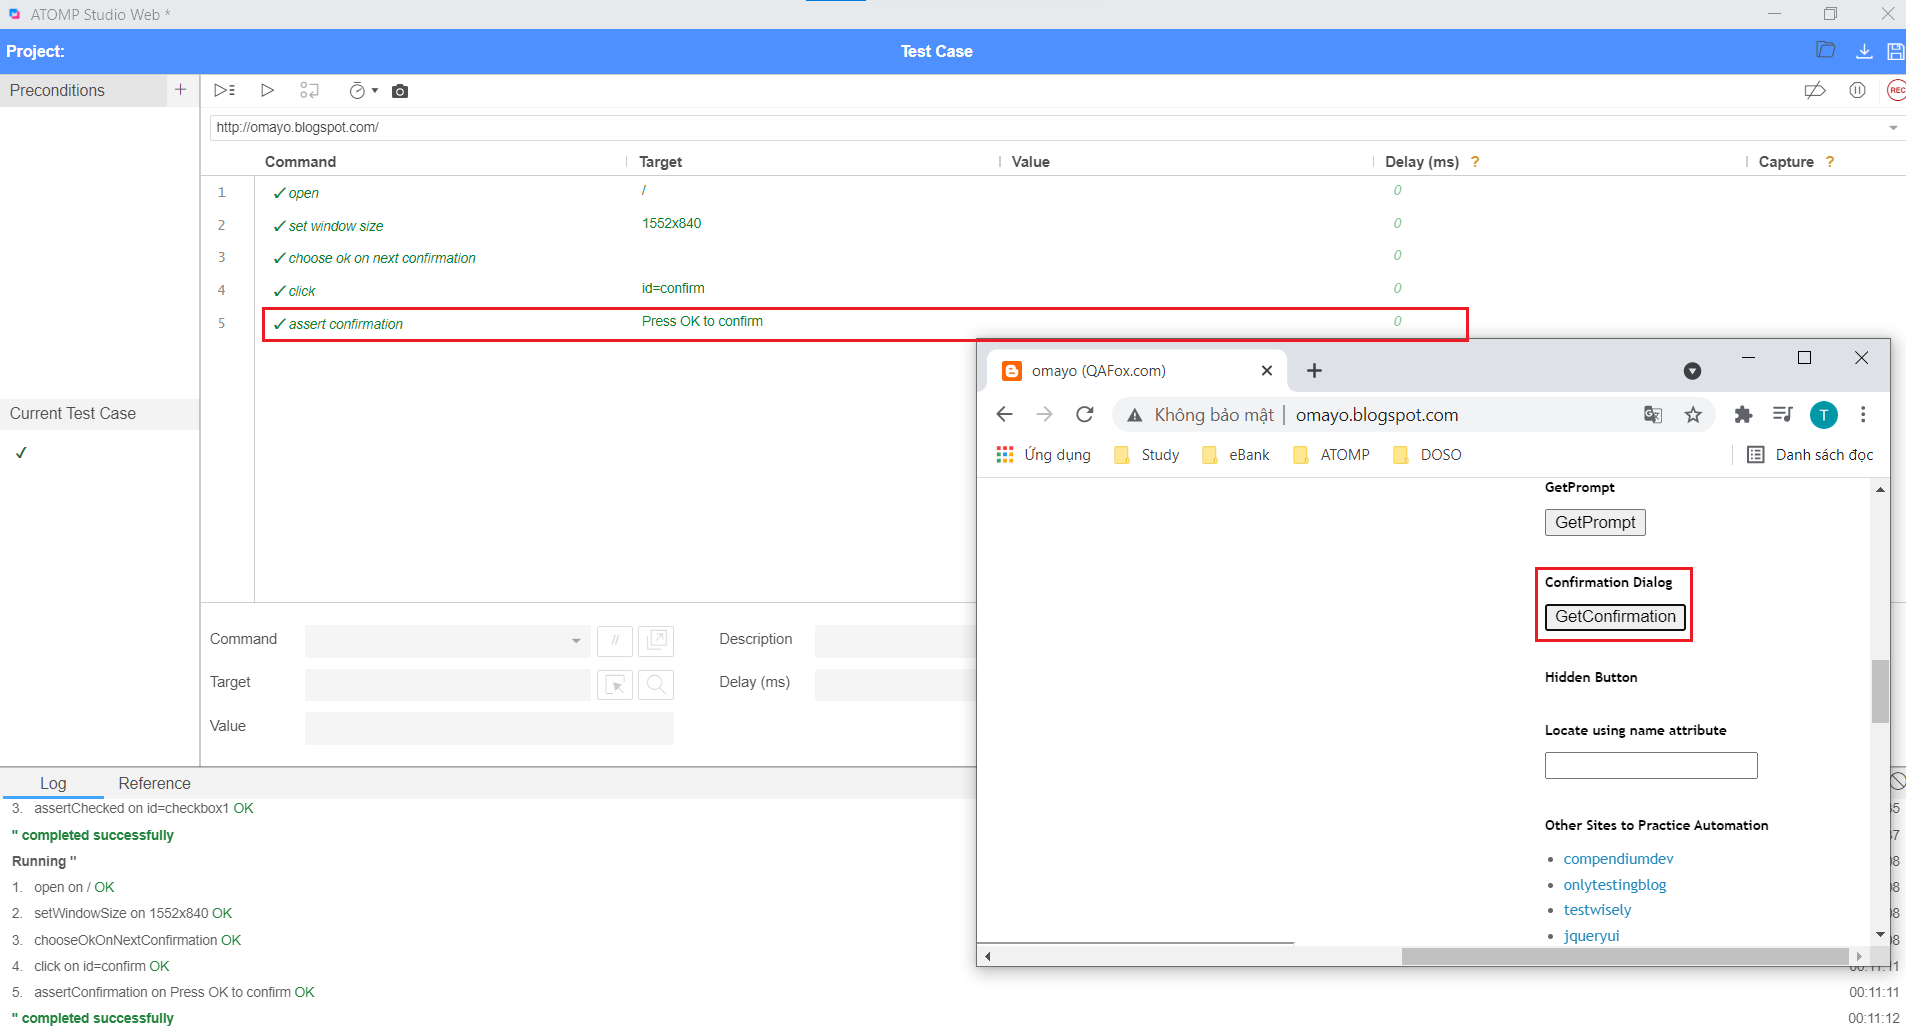
3.12. Assert confirmation
- Confirm that a confirmation has been rendered. The test will stop if the assert fails.
+ Pass: displayed
+ Fail: not displayed
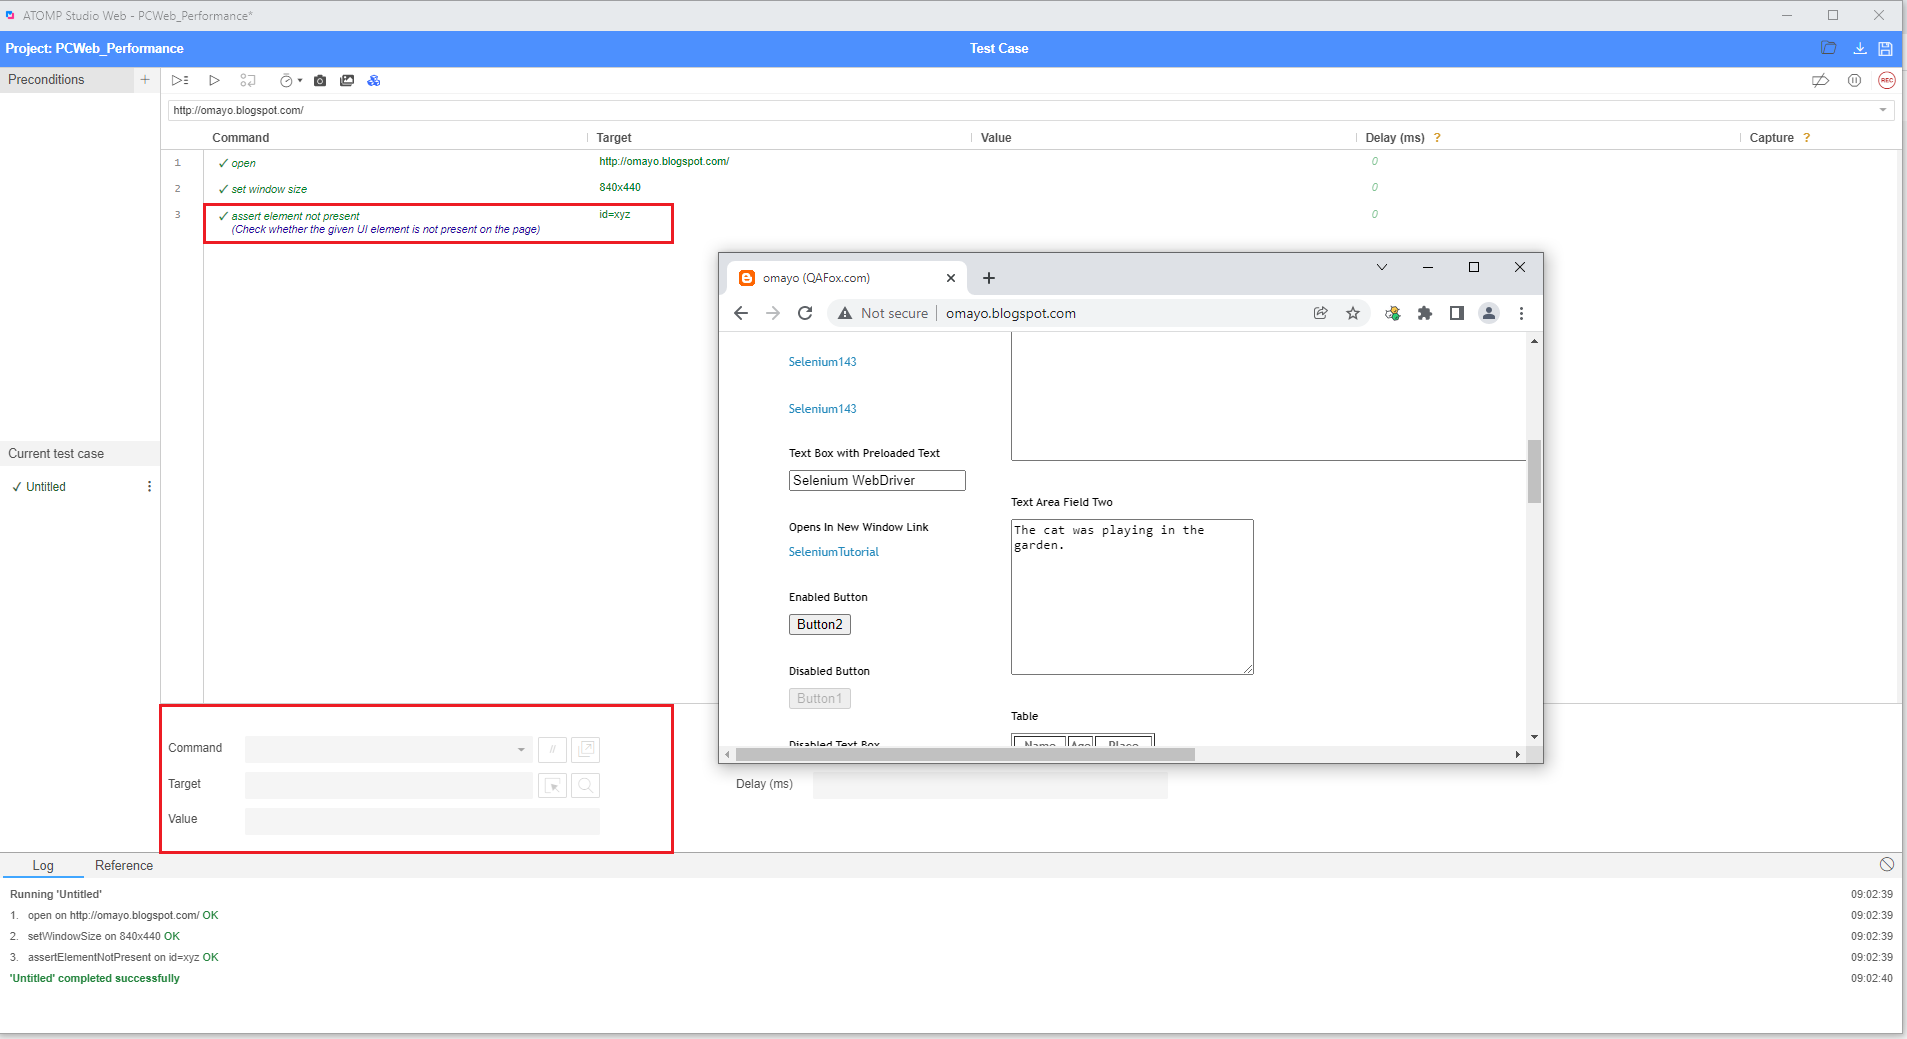
3.13. Assert element not present command
Assert element not present is one of the commands in ATOMP Studio web.
The purpose of assert element not present command in ATOMP Studio web, is to check whether the given UI element is not present on the page.
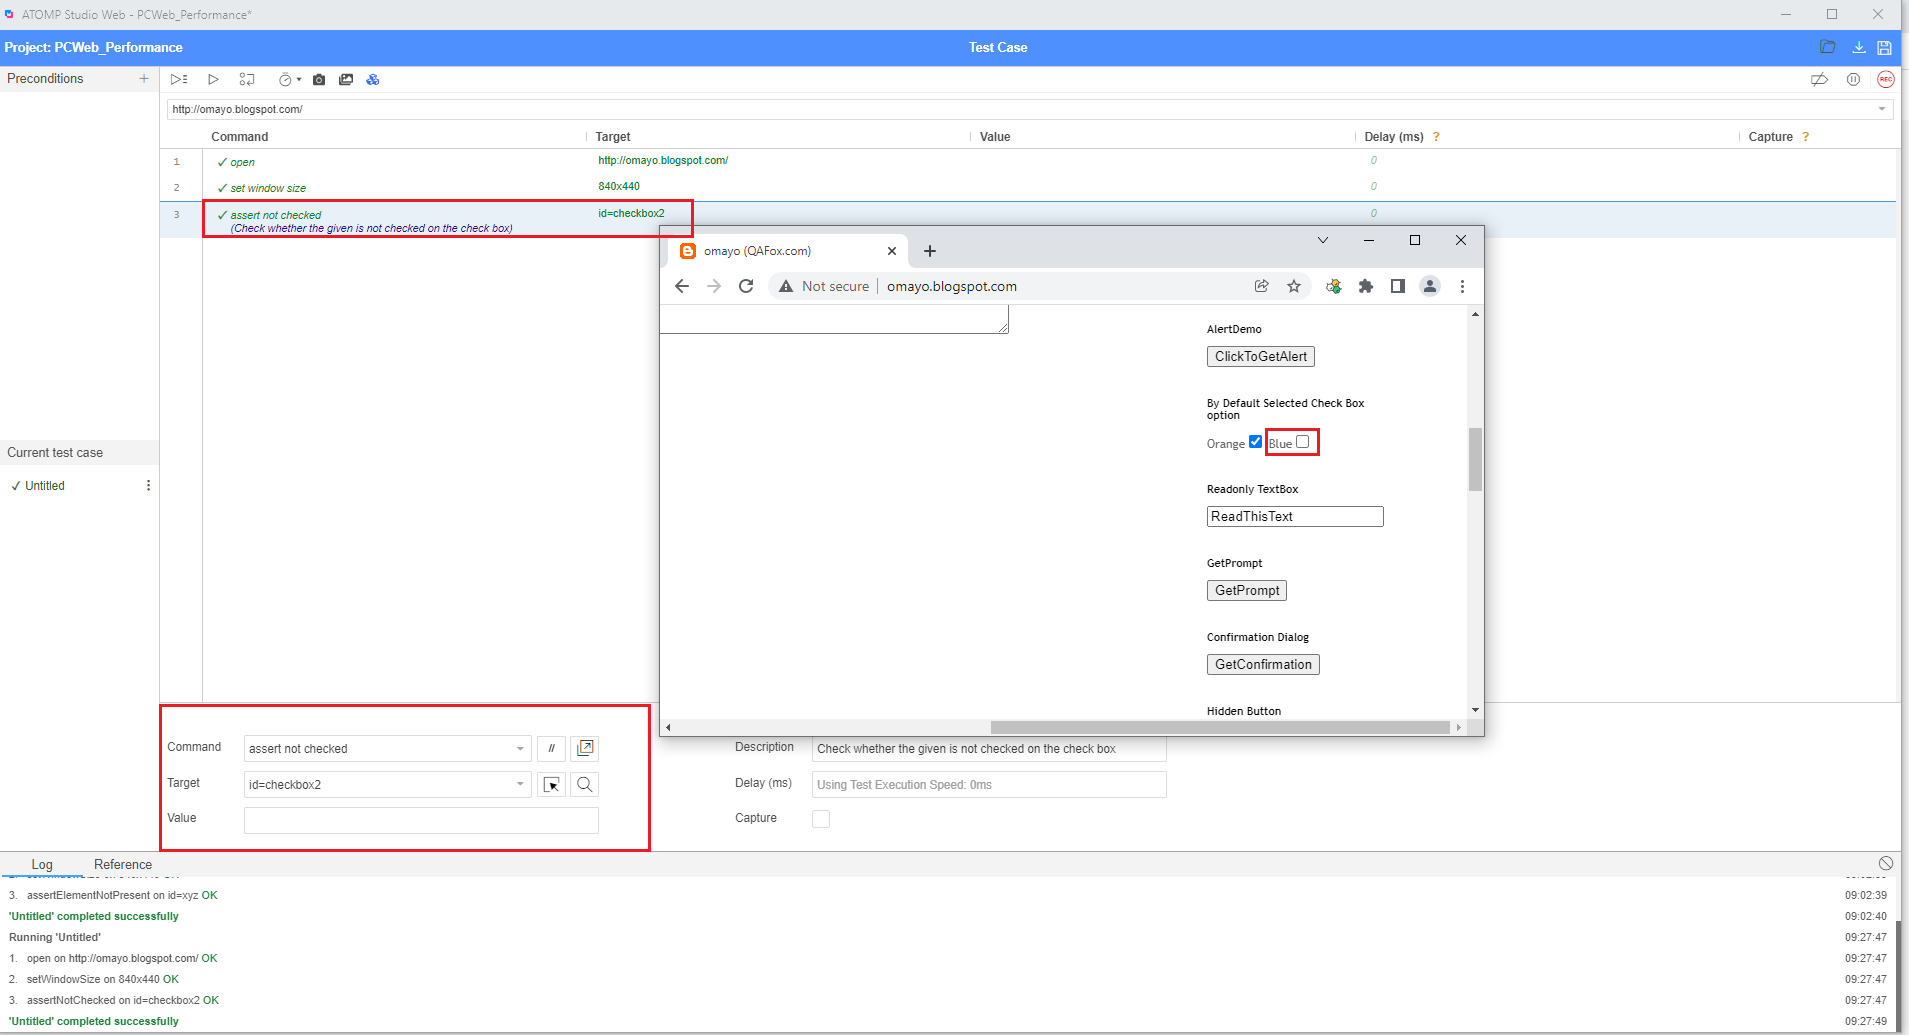
3.14. Assert not checked command
Assert not checked is one of the commands in ATOMP Studio web.
The purpose of assert not checked command in ATOMP Studio web, is to check whether the given checkbox option is not selected.
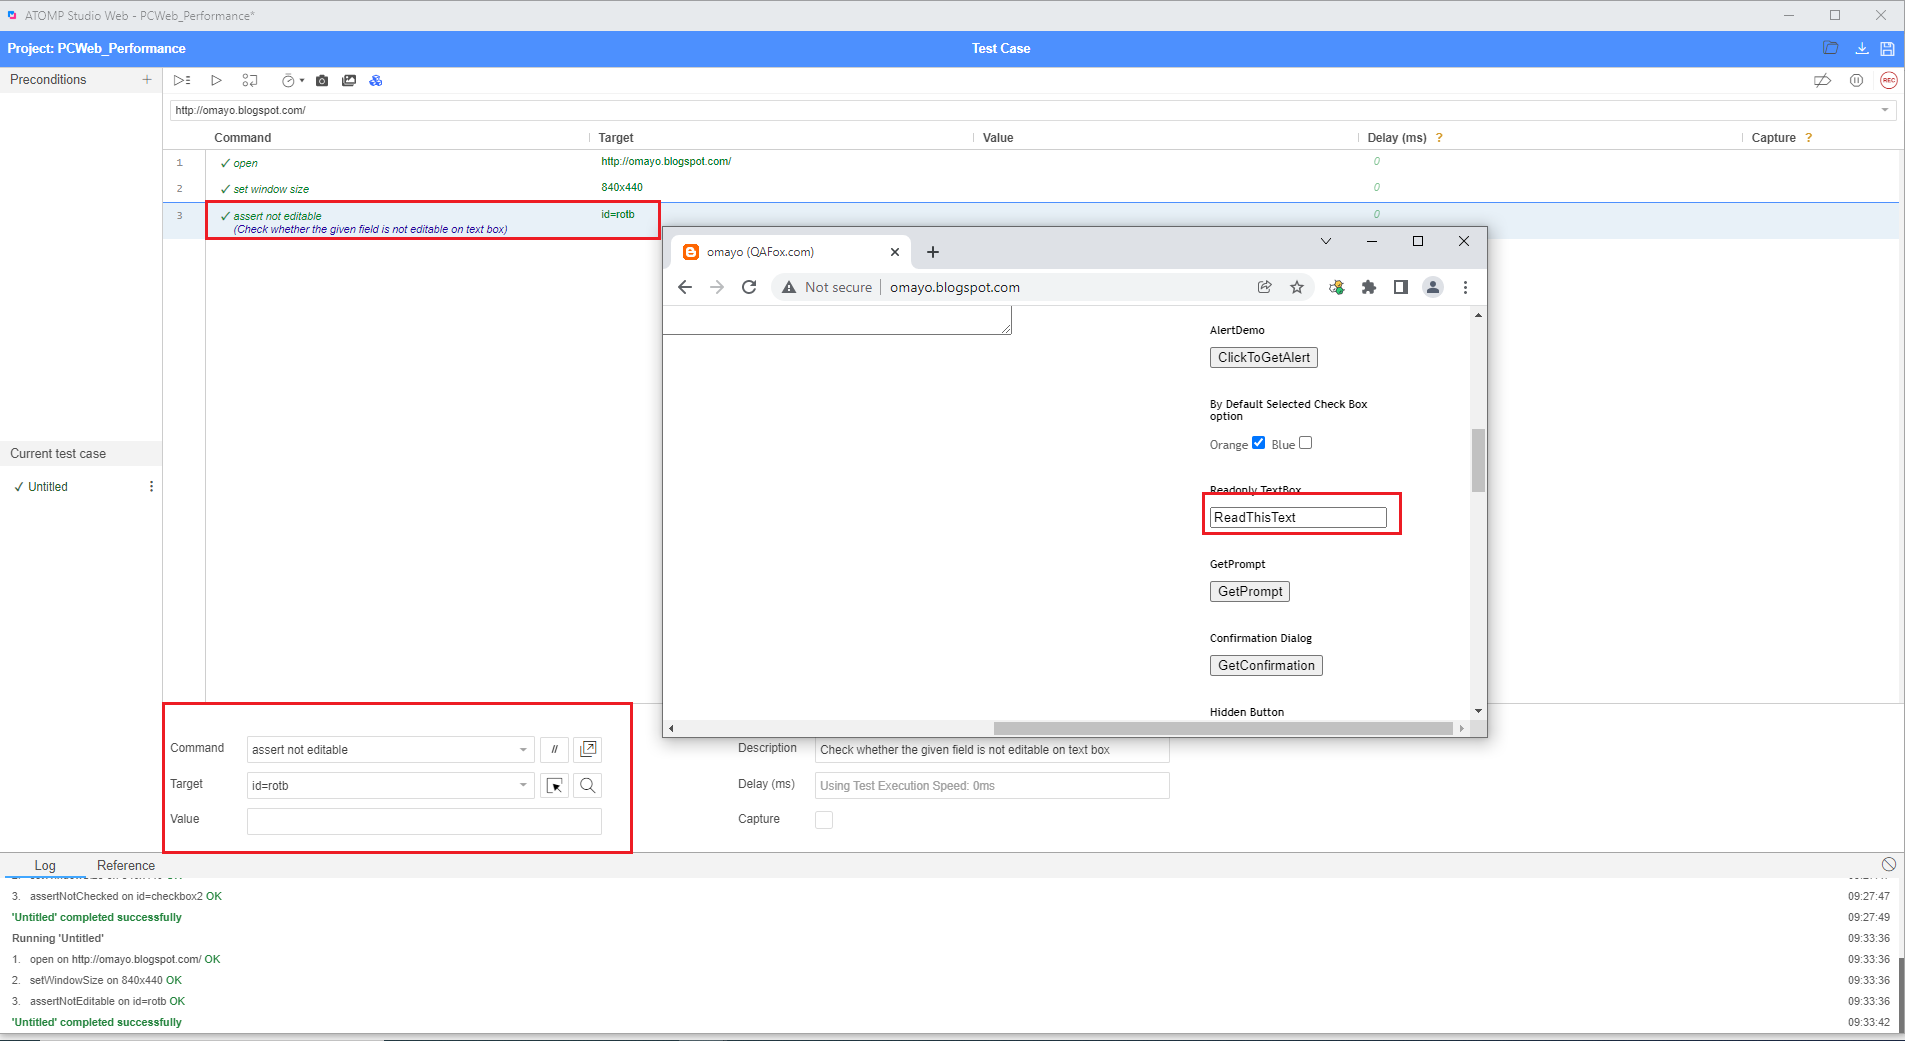
3.15. Assert not editable command
Assert not editable is one of the commands in ATOMP Studio web.
The purpose of assert not editable command in ATOMP Studio web, is to check whether the given field is in a non-editable state.
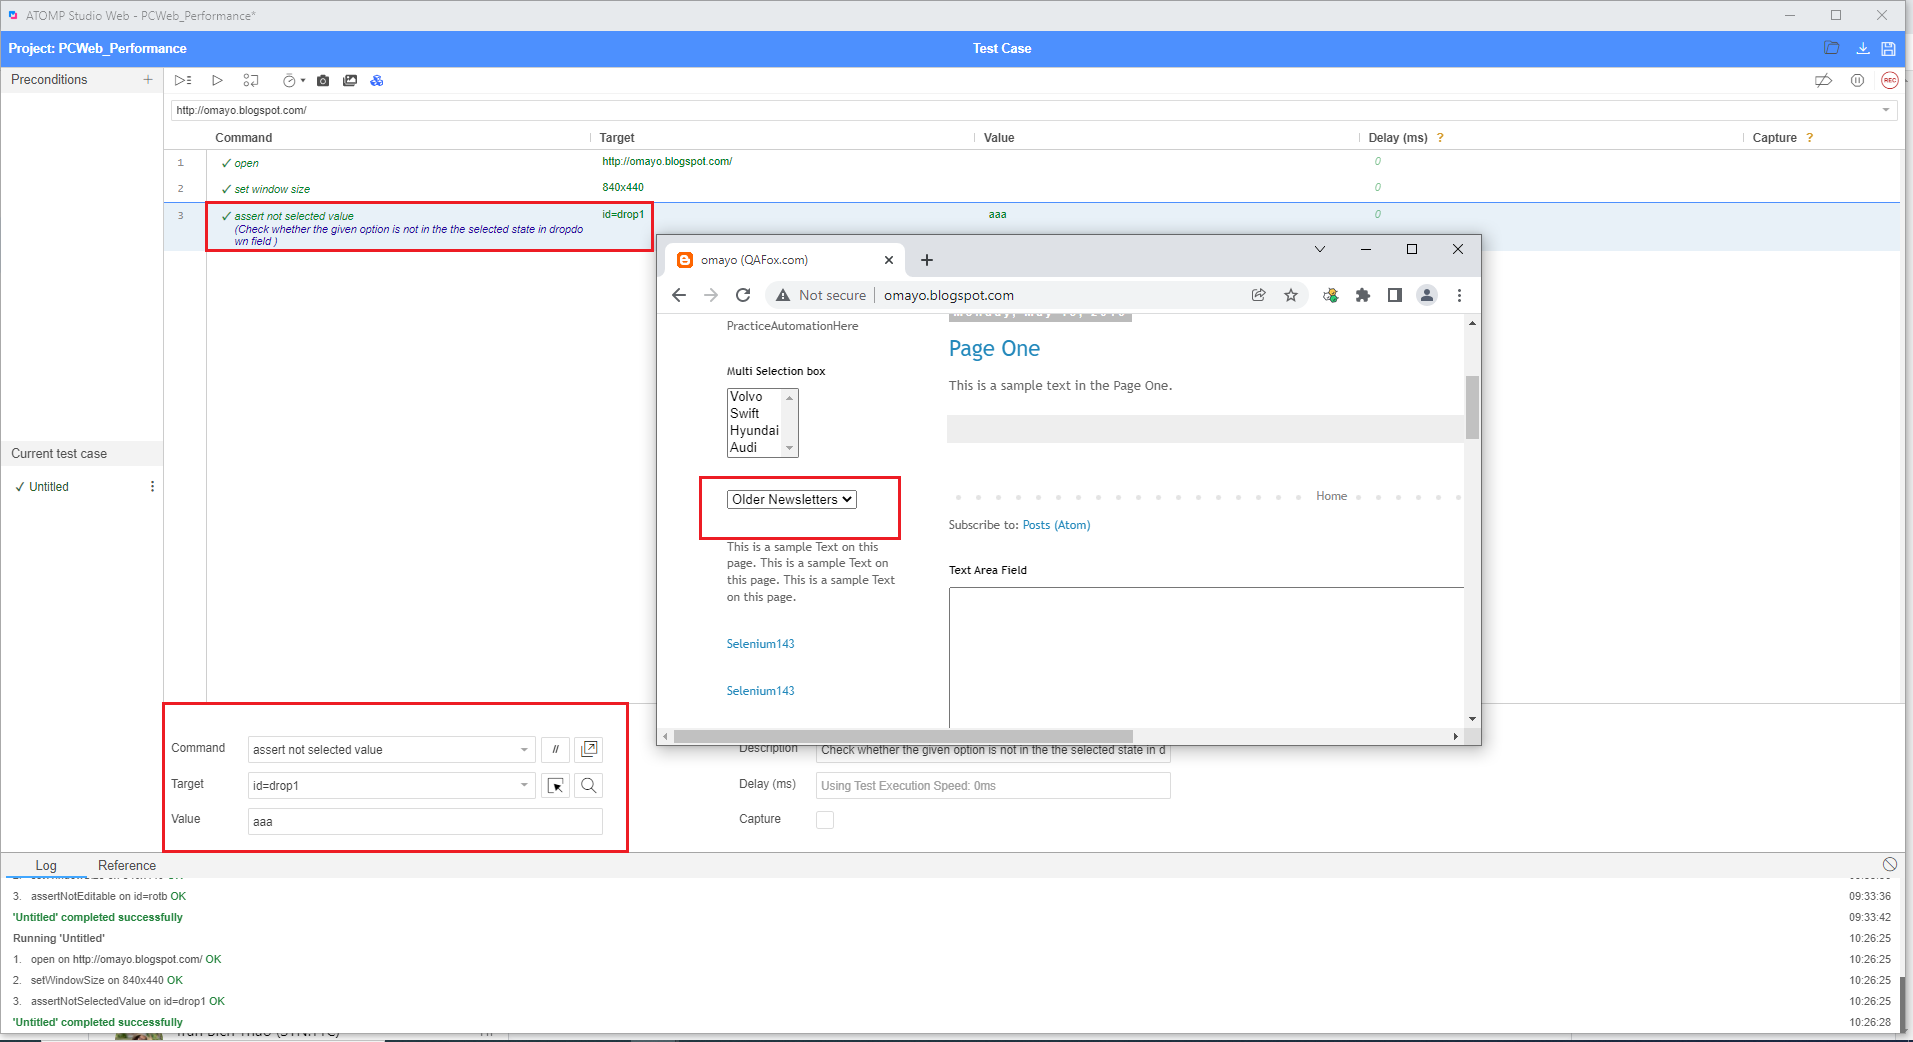
3.16. Assert not selected value command
Assert not selected value is one of the commands in ATOMP Studio web. This option works in opposite to the assert selected value command.
The purpose of assert not selected value command in ATOMP Studio web, is to check whether the given option is not in the selected state in dropdown field.
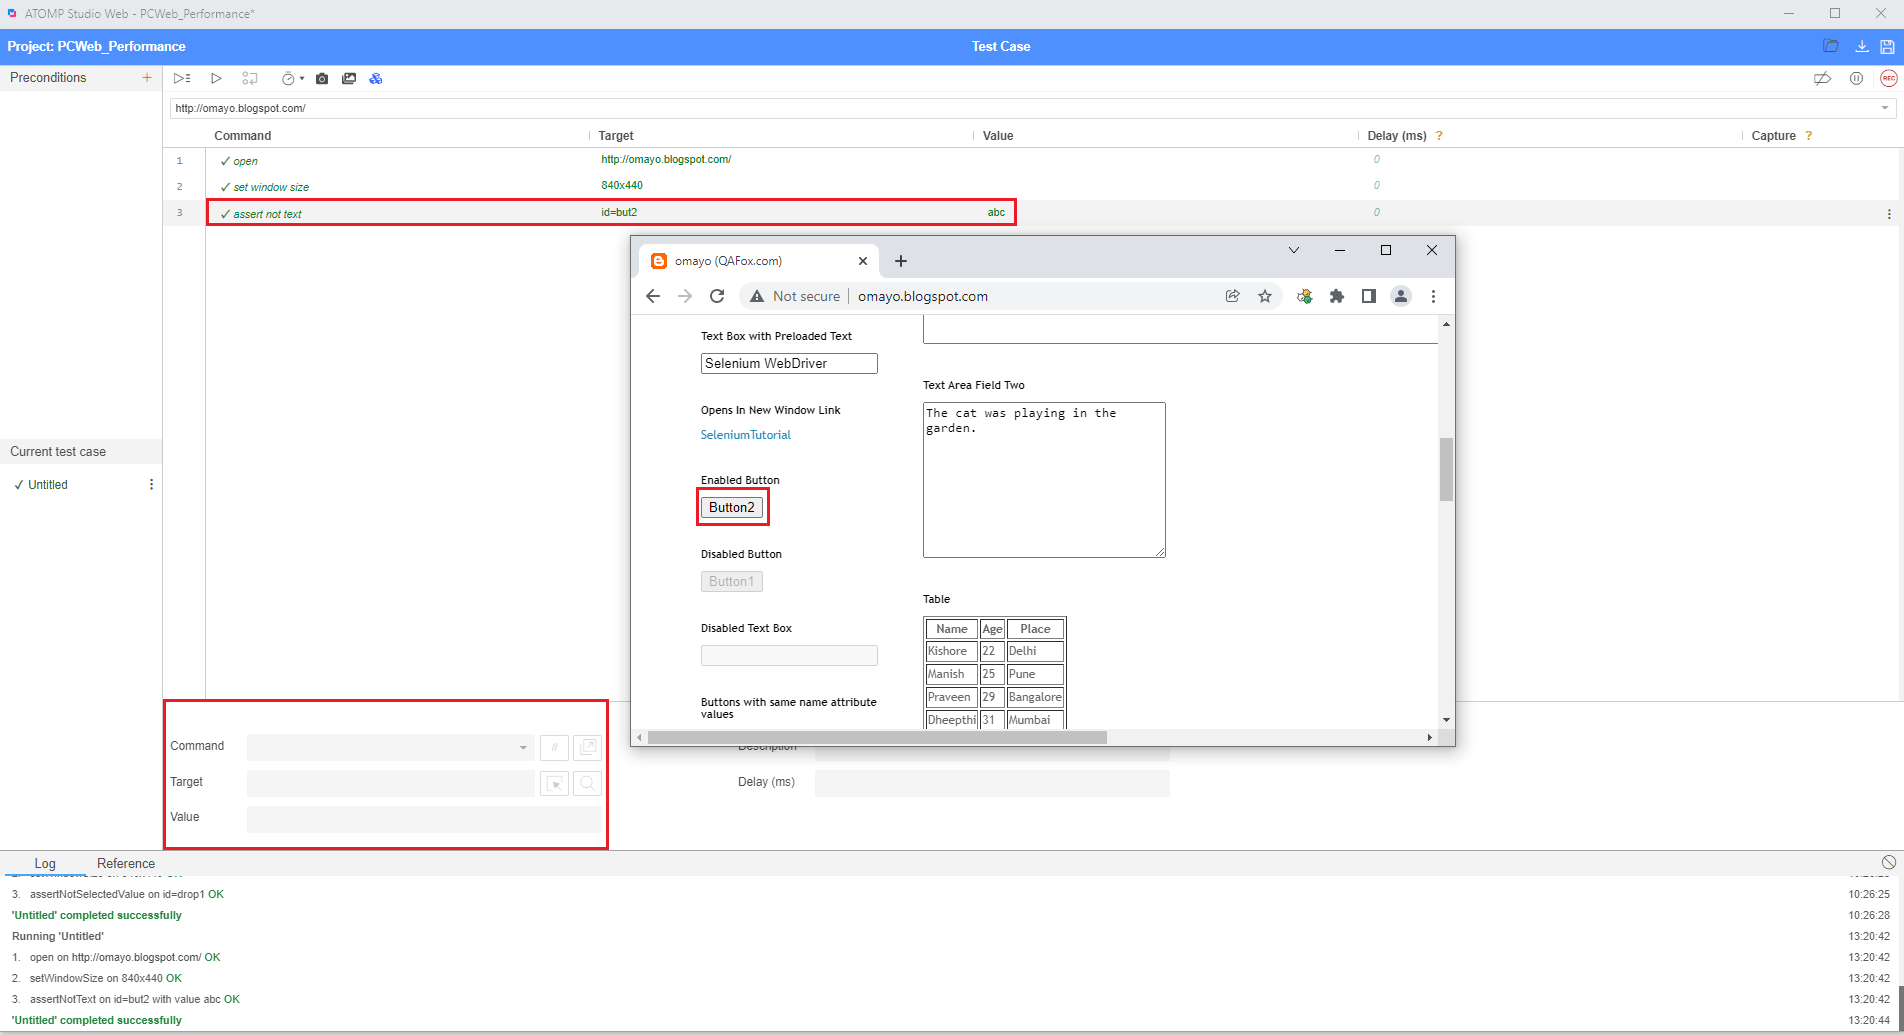
3.17. Assert not text command
Assert not text is one of the commands in ATOMP Studio web and is the opposite of assert text command.
The purpose of assert not text command in ATOMP Studio web, is to check that the given text is not available on the UI element. (i.e. The text between the HTML tags of the located UI element)
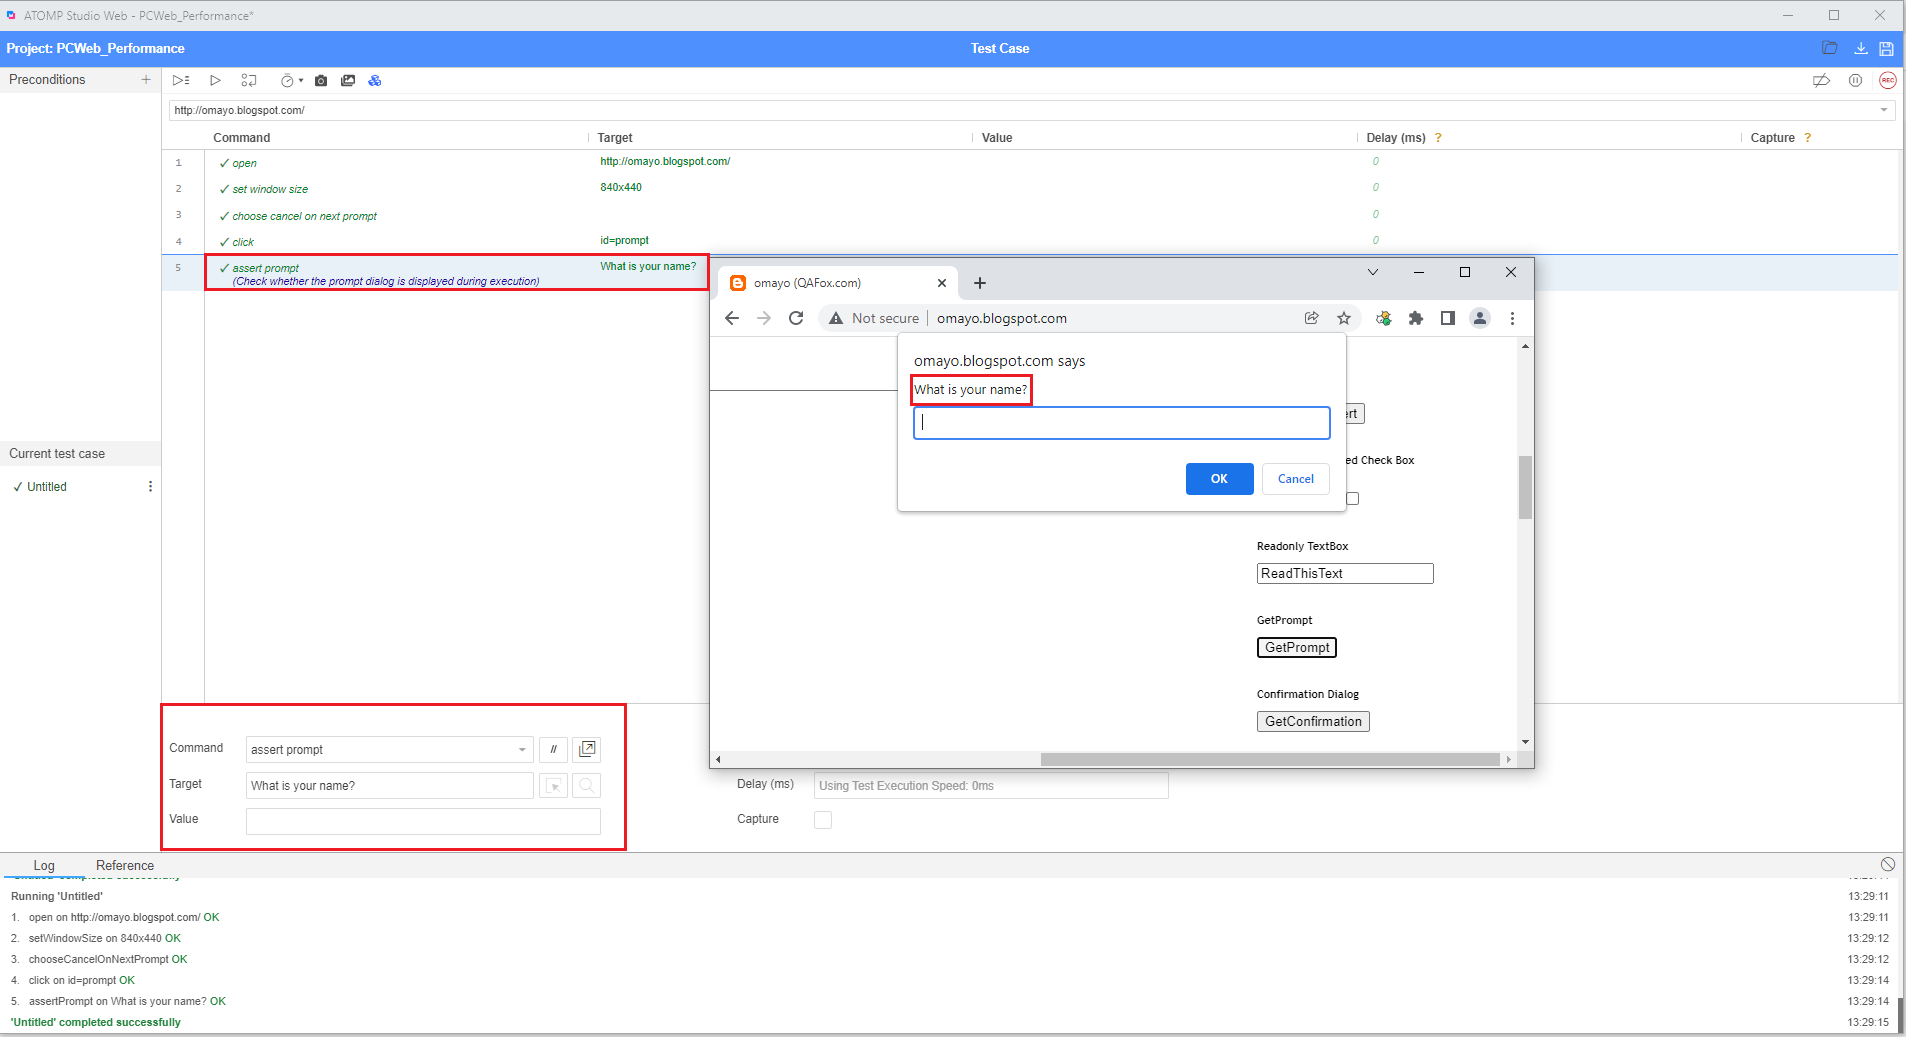
3.18. Assert prompt command
Assert prompt is one of the commands in ATOMP Studio web.
The purpose of assert prompt command in ATOMP Studio web, is to check whether the prompt dialog is displayed during execution.
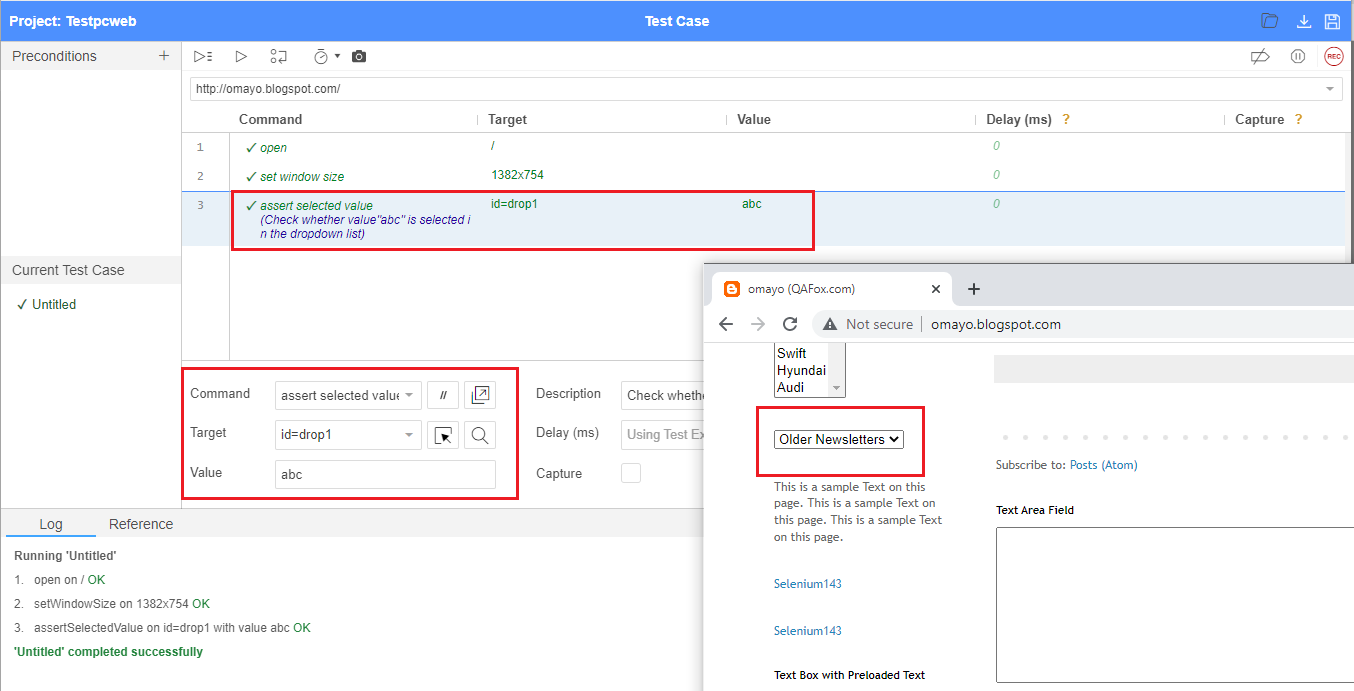
3.19. Assert selected value command
Assert selected value is one of the commands in ATOMP Studio web.
The purpose of assert selected value command in ATOMP Studio web, is to check whether the given option is selected in the dropdown field.
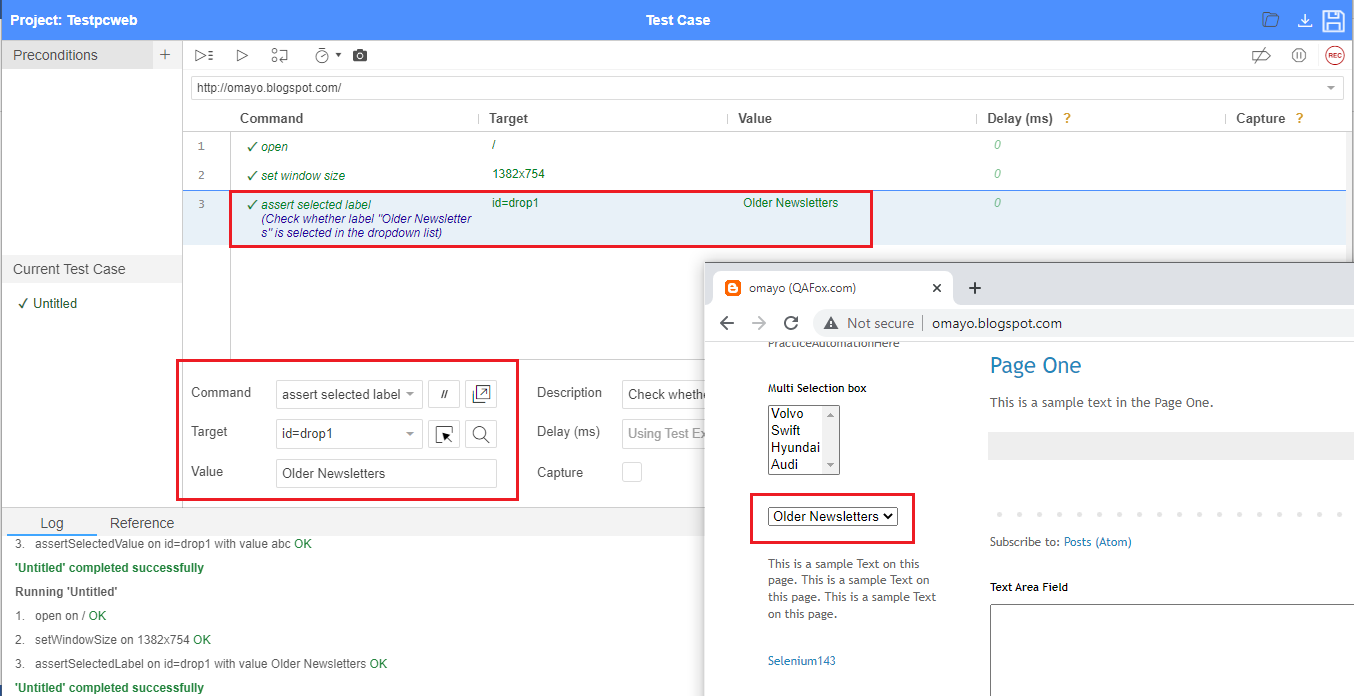
3.20. Assert selected label command
Assert selected label is one of the commands in ATOMP Studio web.
The purpose of assert selected label command in ATOMP Studio web, is to check whether the given option is selected in the dropdown field using its label text or display text.
3.21. Assert text command
Assert text is one of the commands in ATOMP Studio web.
The purpose of assert text command in ATOMP Studio web, is to check the text on the UI element (i.e. The text between the HTML tags of the located UI element)
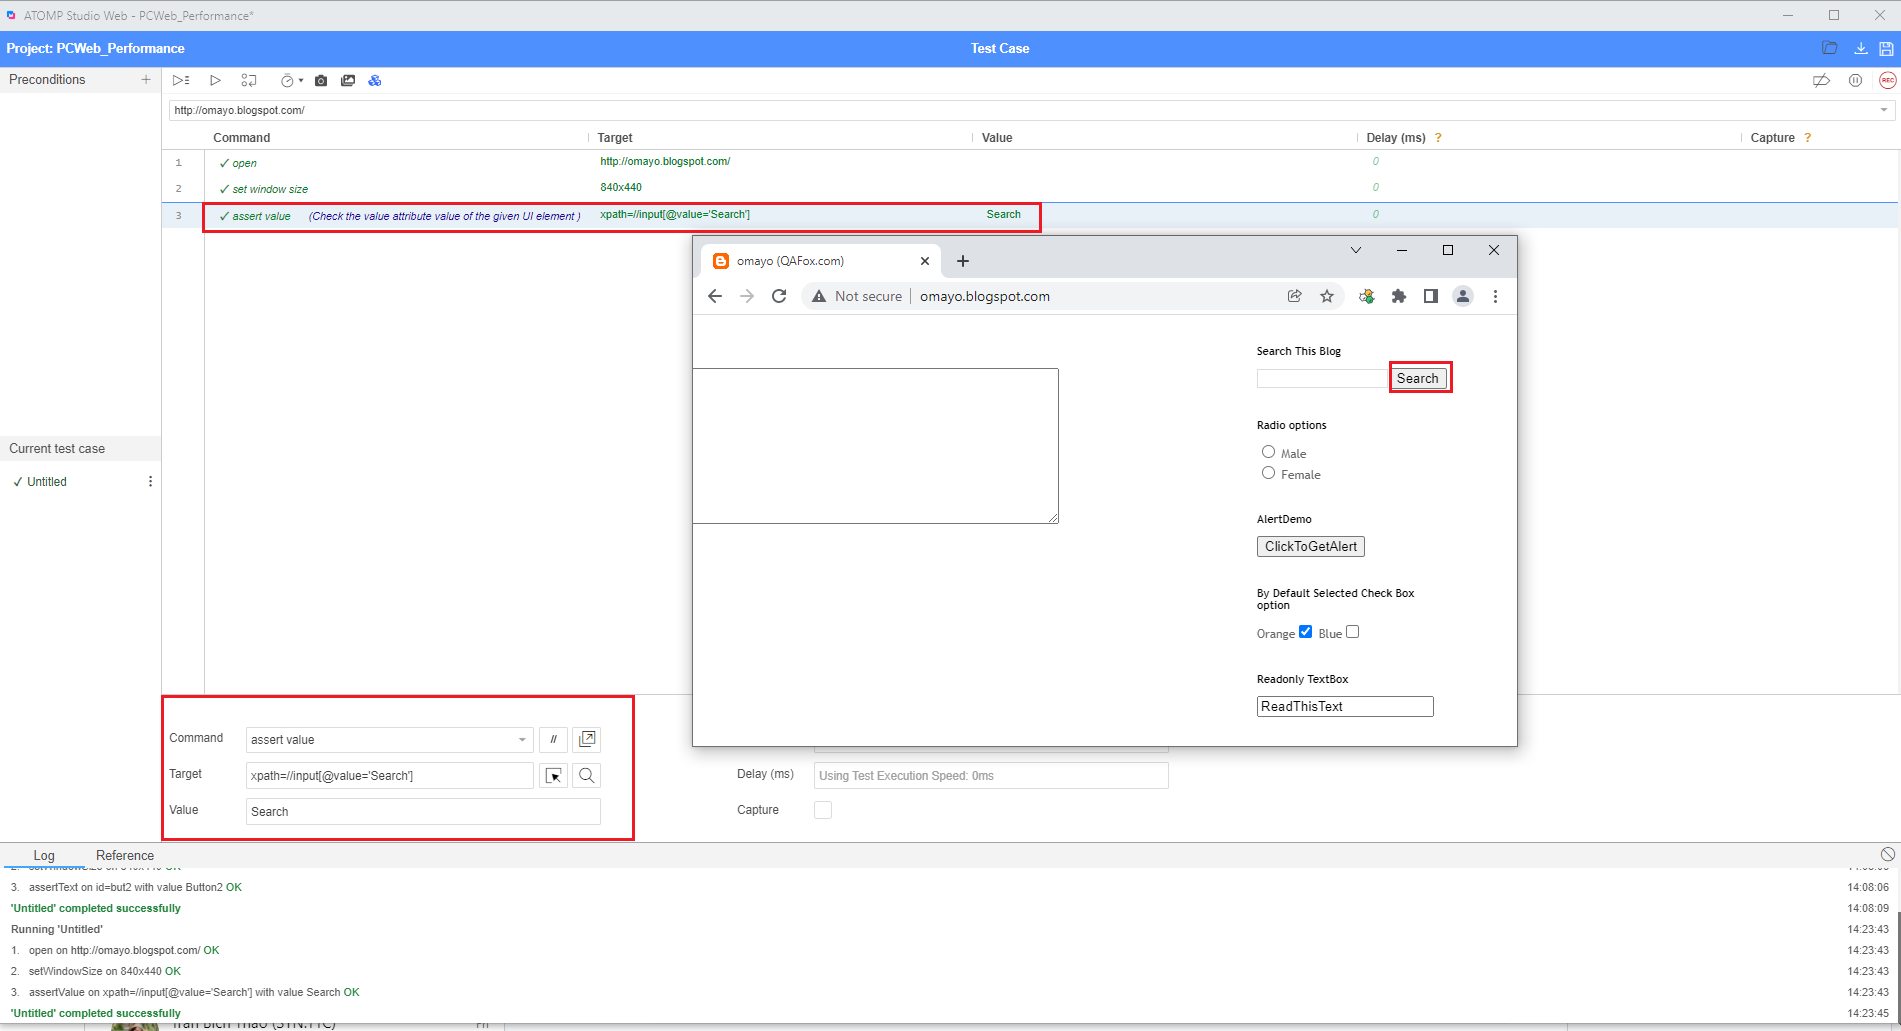
3.22. Assert value command
Assert value is one of the commands in ATOMP Studio web.
The purpose of assert value command in ATOMP Studio web, is to check that the value attribute value of the given UI element.
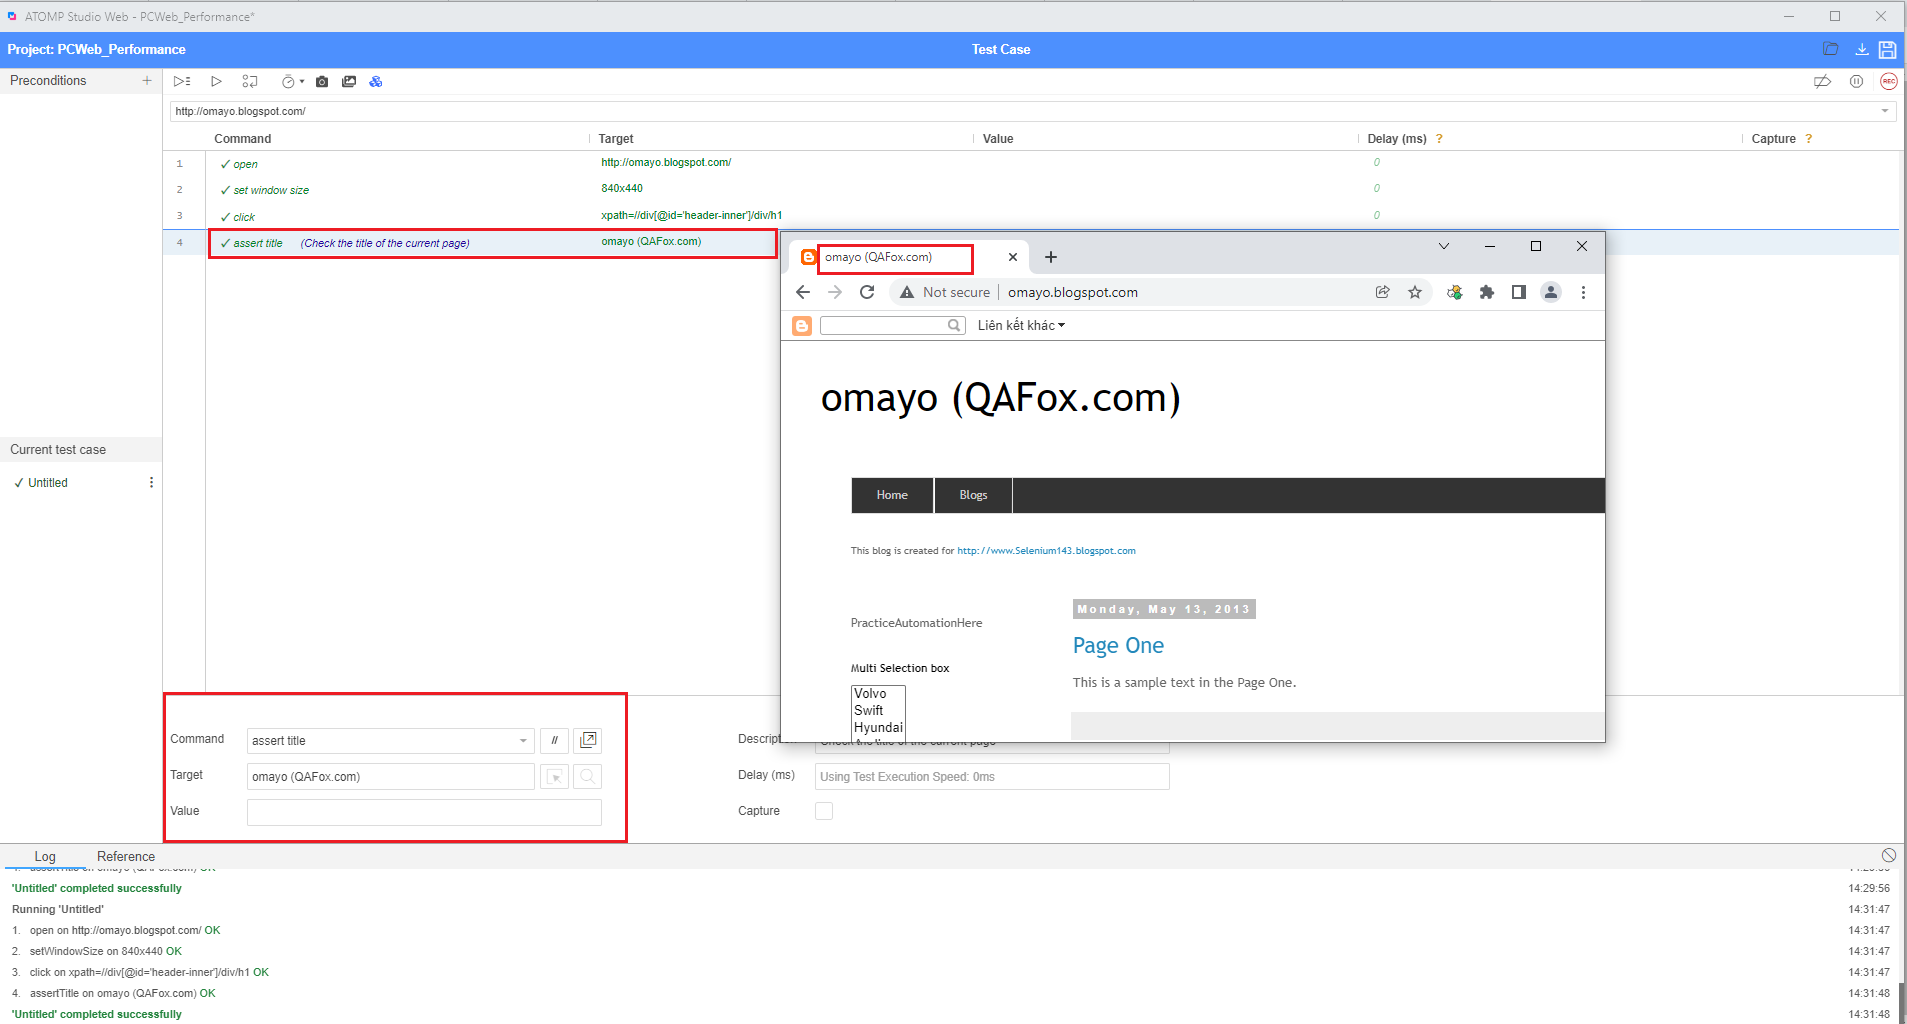
3.23. Assert title command
Assert title is one of the commands in ATOMP Studio web.
The purpose of assert title command in ATOMP Studio web, is to check the title of the current page.
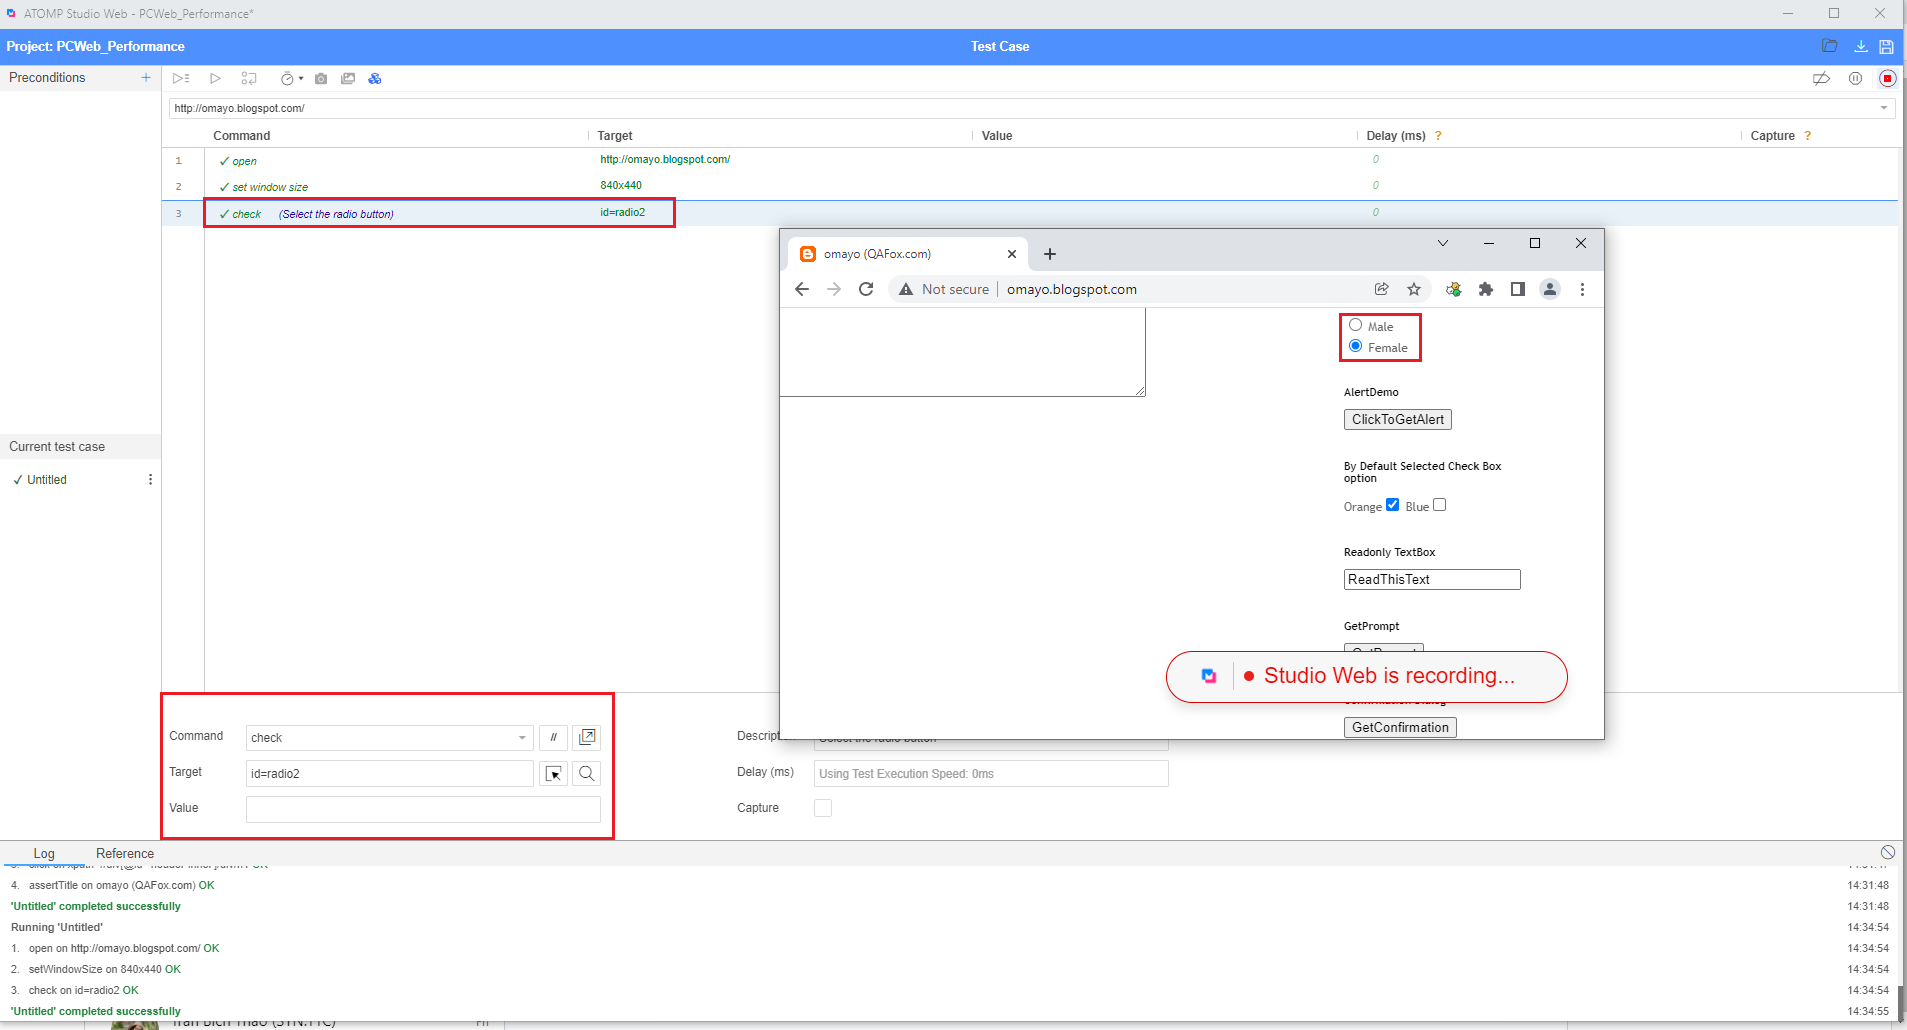
3.24. Check command
Check is one of the commands in ATOMP Studio web.
The purpose of check command in ATOMP Studio web, is to select the radio button.
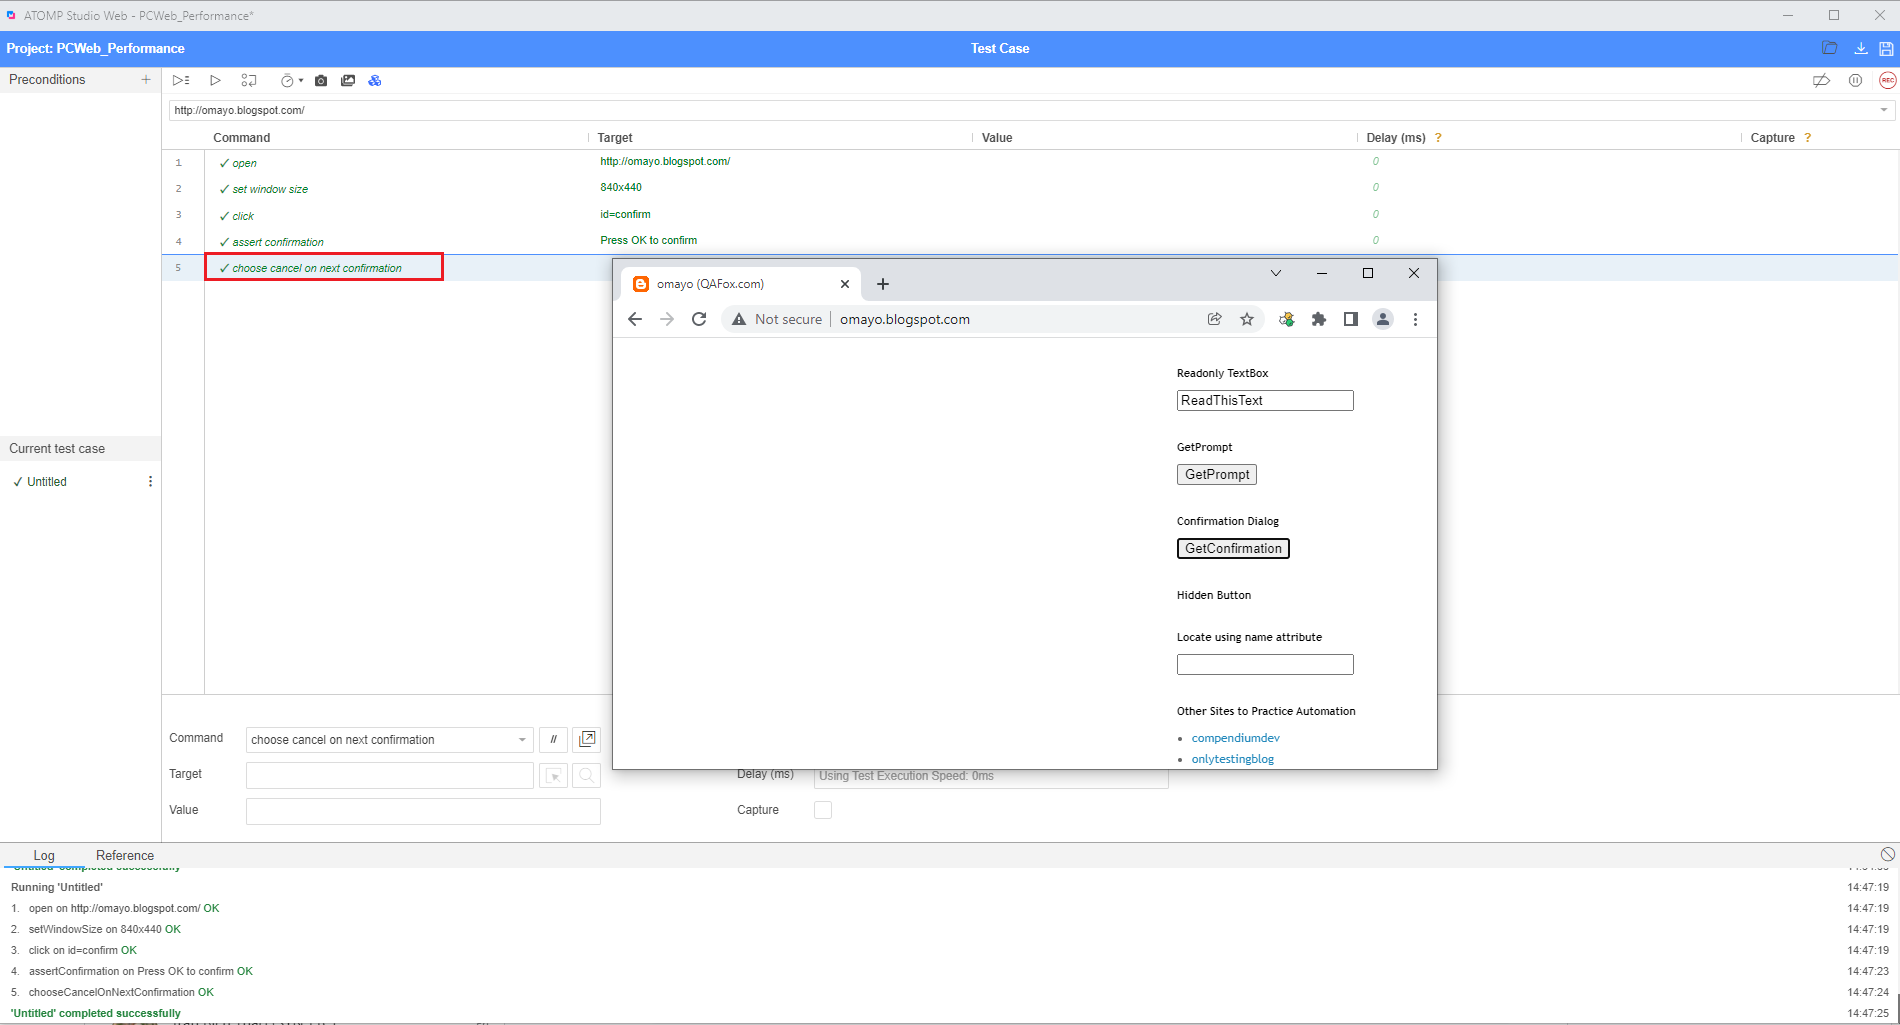
3.25. Choose cancel on next confirmation command
Choose cancel on next confirmation is one of the commands in ATOMP Studio web.
The purpose of choose cancel on next confirmation command in ATOMP Studio web, is to plan for cancelling the confirmation dialog before it is displayed. i.e. Once the confirmation dialog is displayed on the page, it will be cancelled.
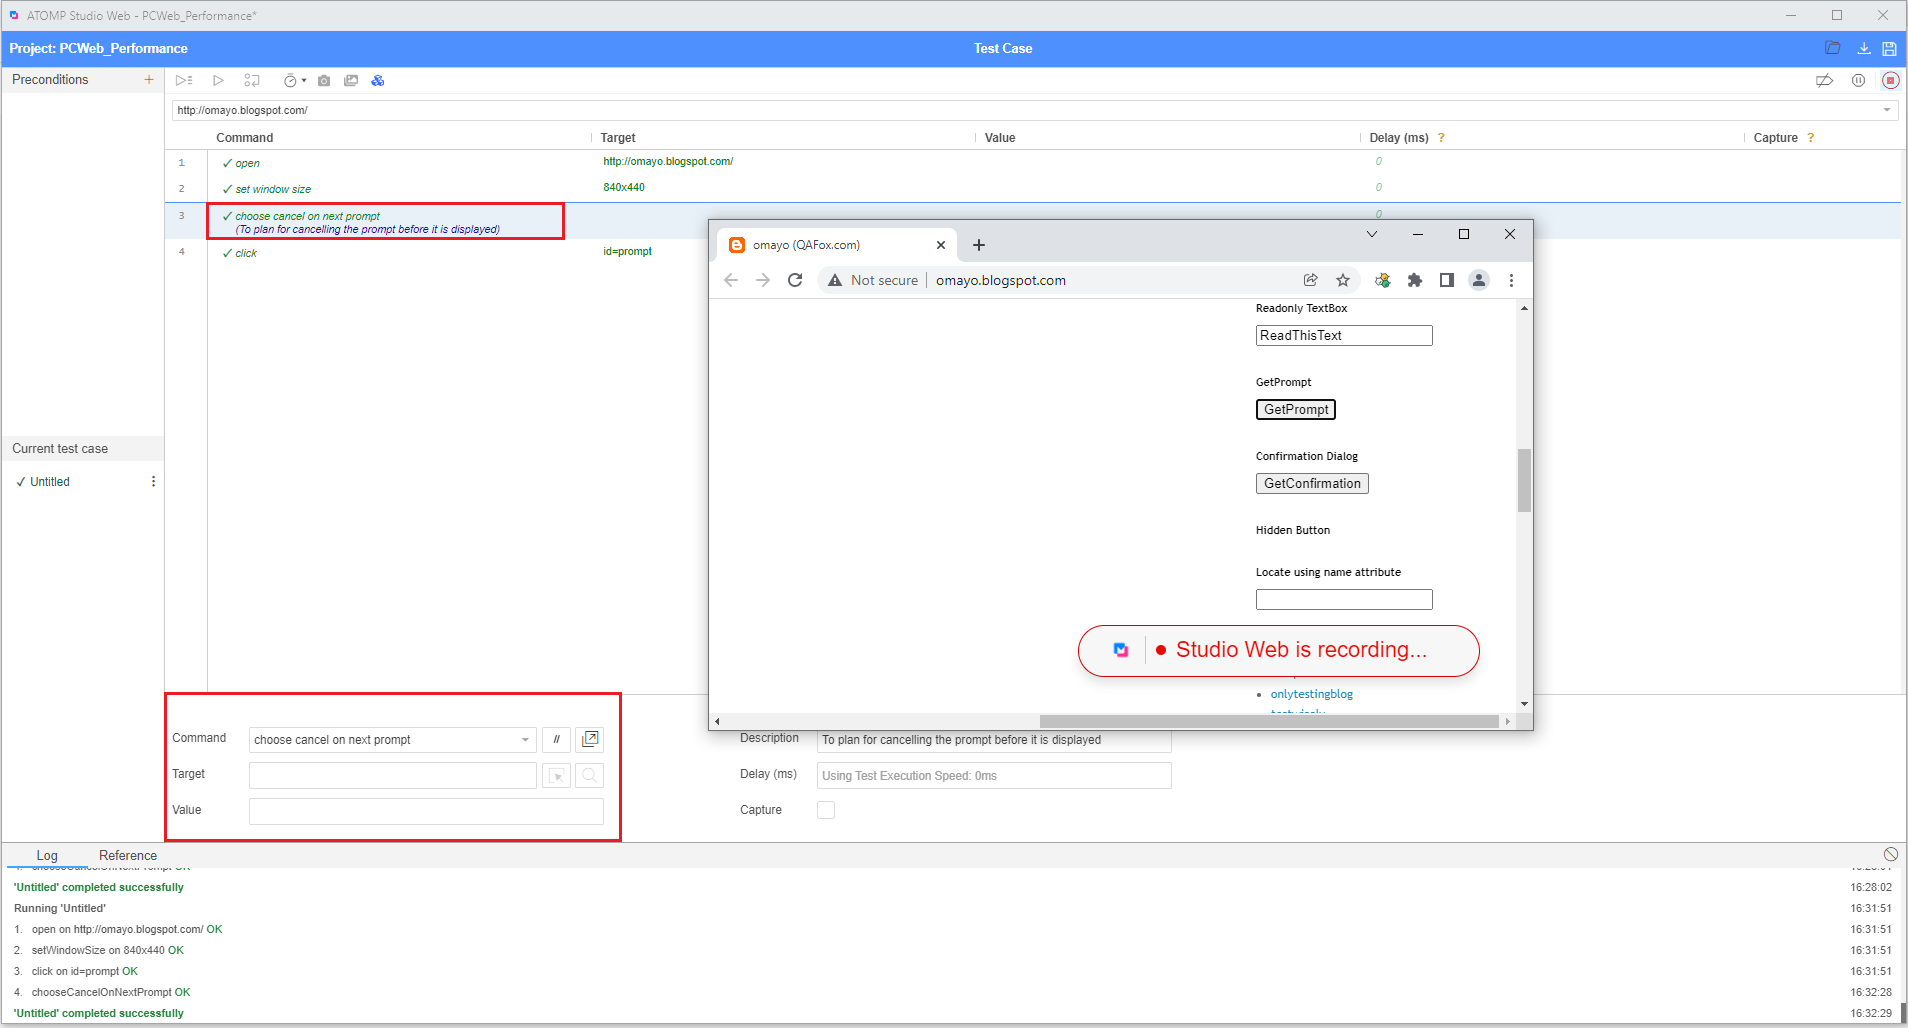
3.26. Choose cancel on next prompt command
Choose cancel on next prompt is one of the commands in ATOMP Studio web.
The purpose of choose cancel on next prompt command in ATOMP Studio web, is to plan for cancelling the prompt before it is displayed. i.e. Once the prompt is displayed on the page, it will be cancelled.
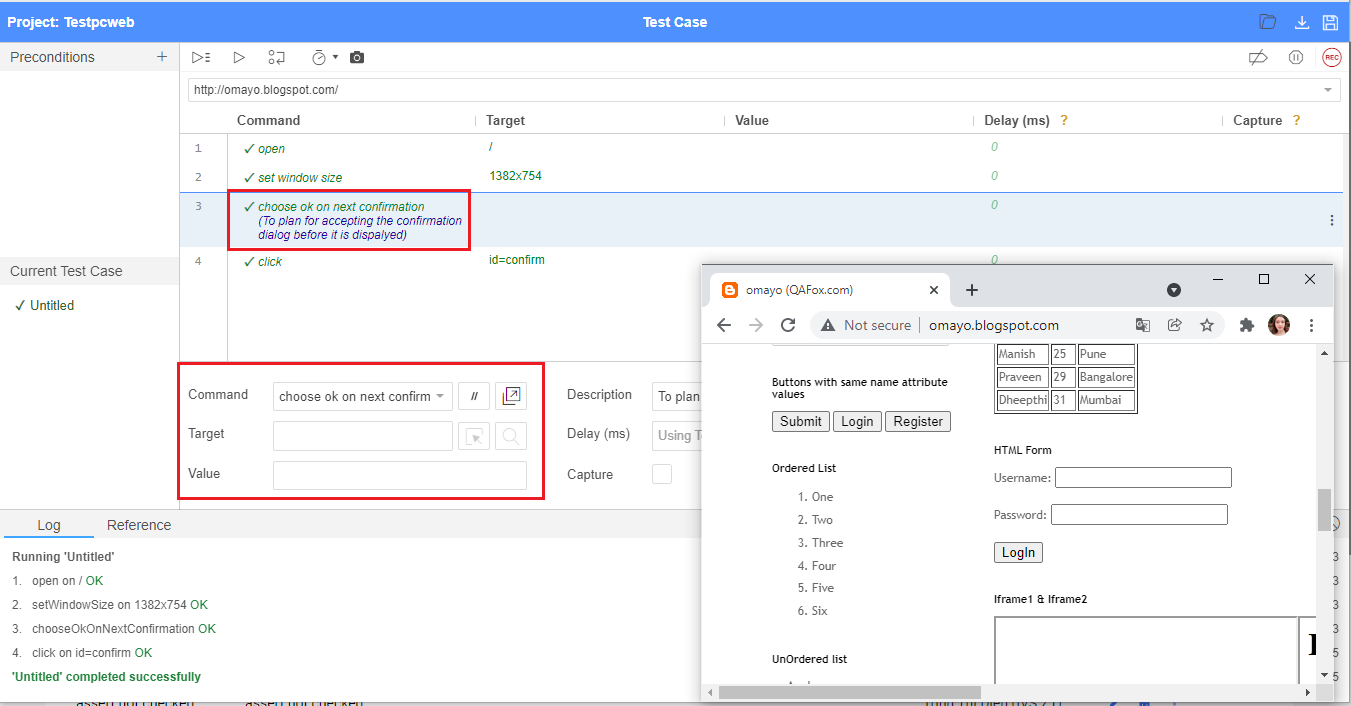
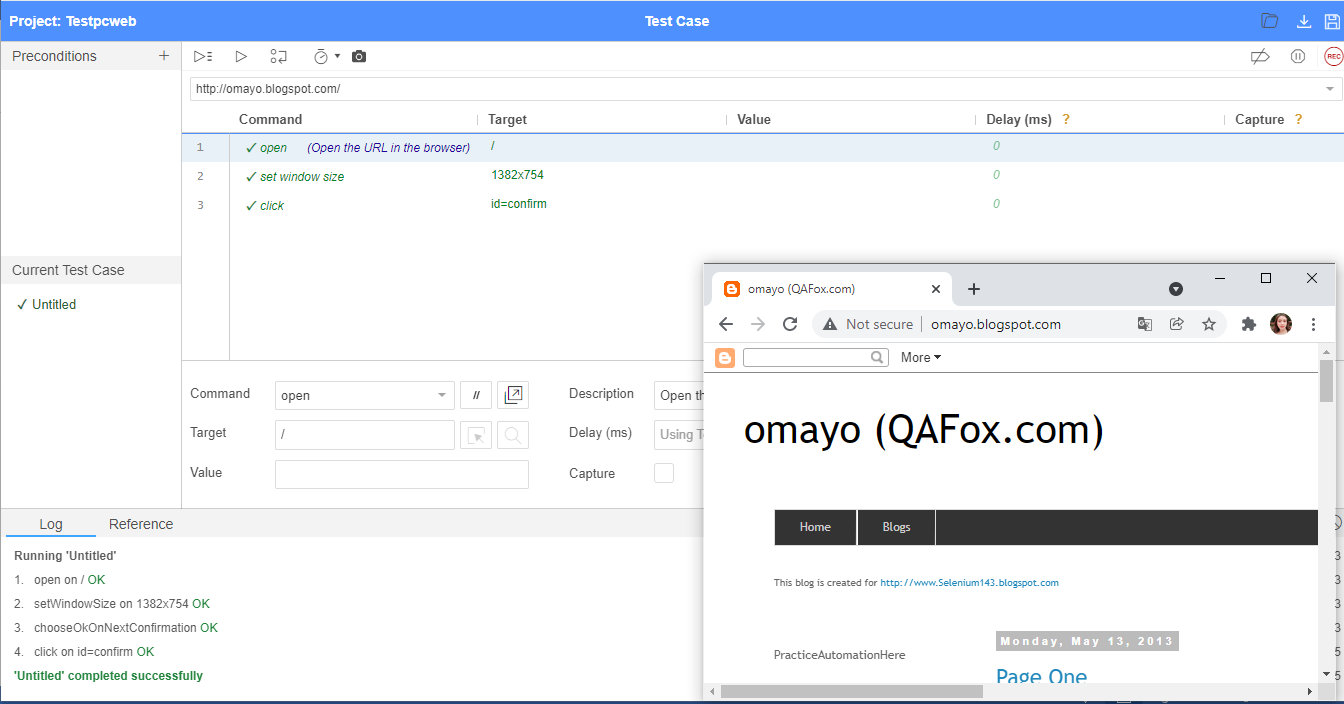
3.27. Choose ok on next confirmation
Choose ok on next confirmation is one of the commands in ATOMP Studio web.
The purpose of choose ok on next confirmation command in ATOMP Studio web, is to plan for accepting the confirmation dialog before it is displayed. i.e. Once the confirmation dialog is displayed on the page, it will be accepted.
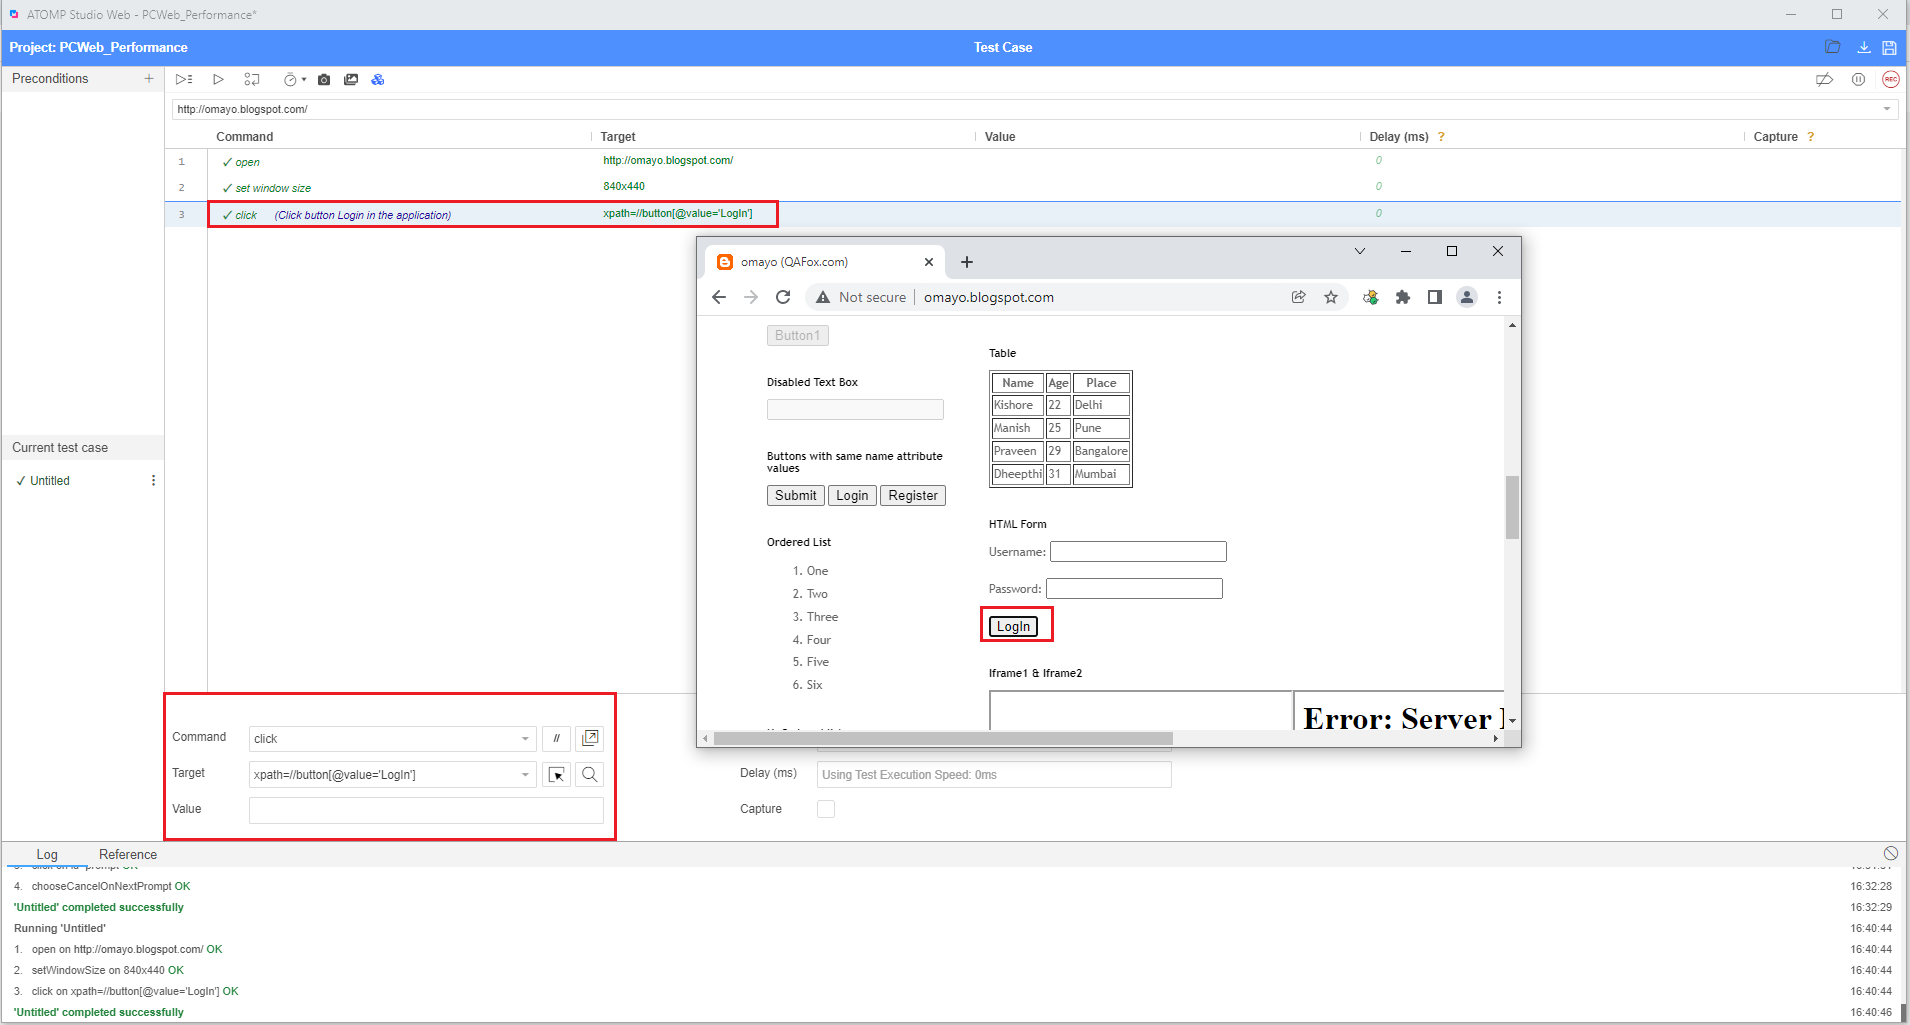
3.28. Click command
Click is one of the commands in ATOMP Studio web.
The purpose of click command in ATOMP Studio web, is to click on any UI element in the application.
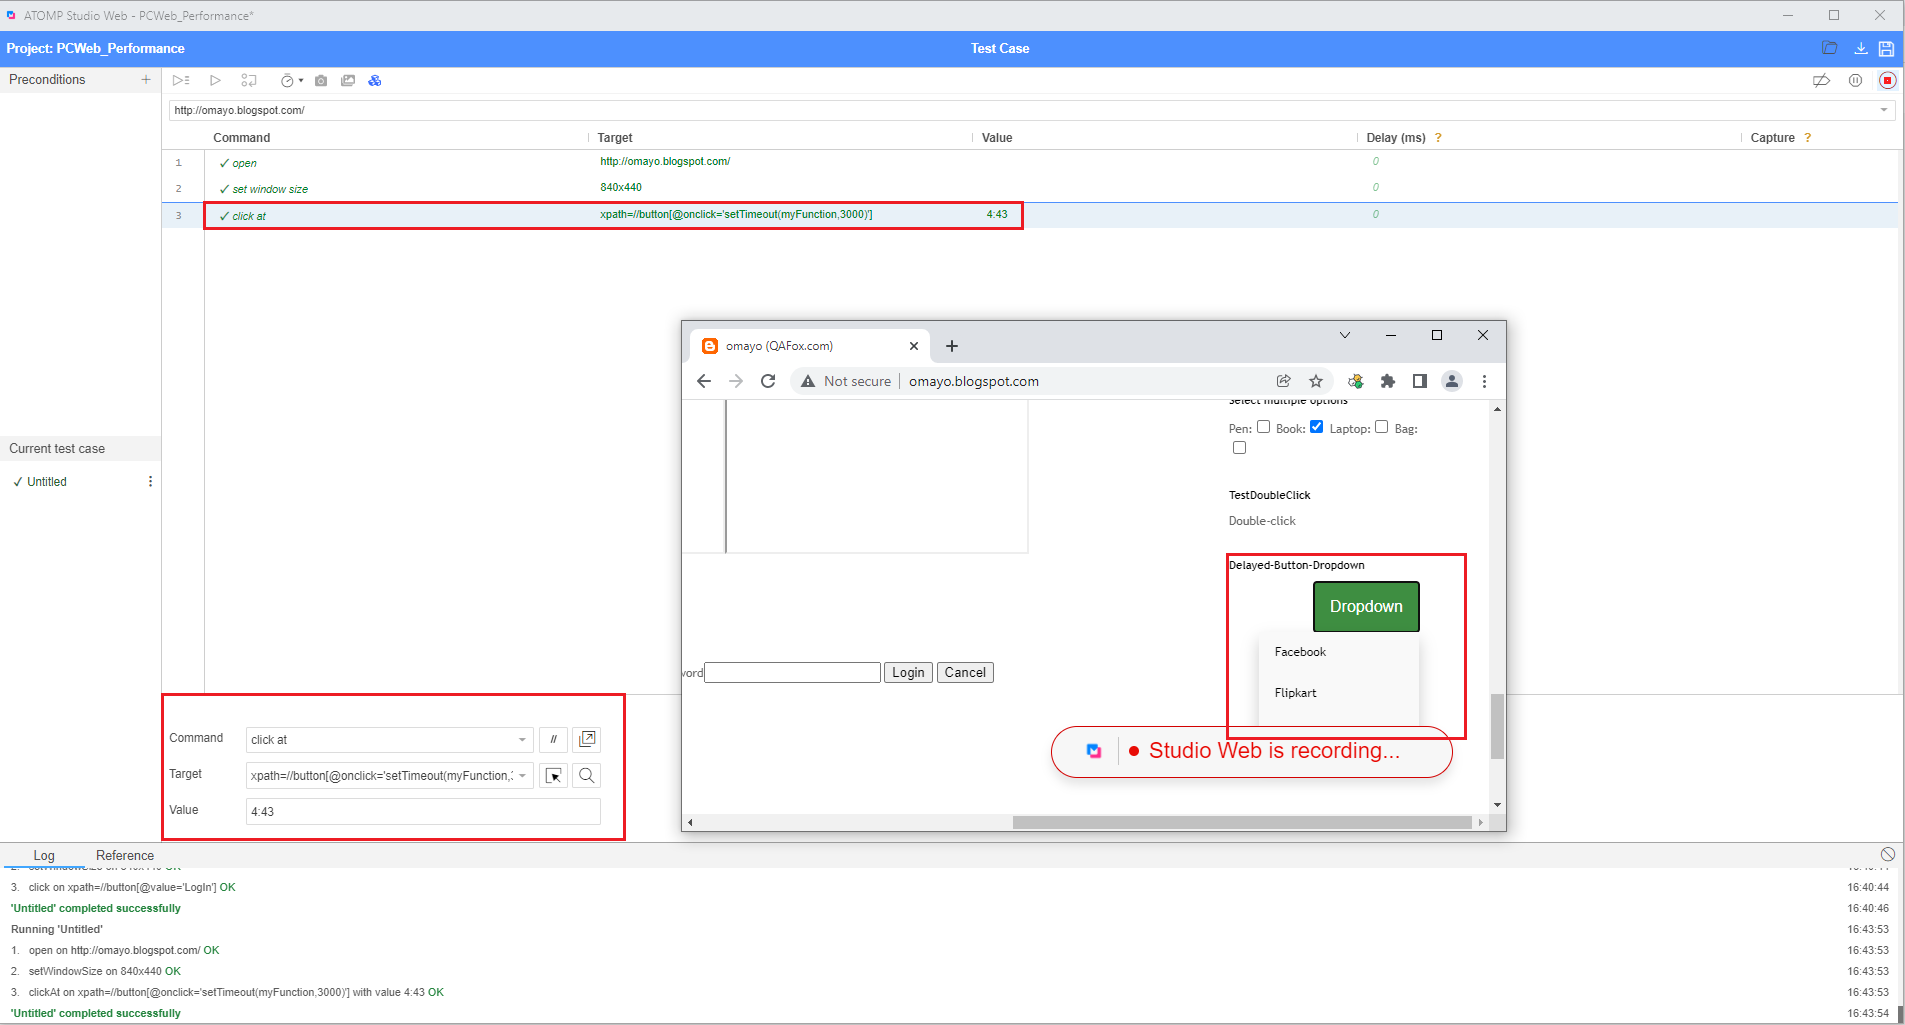
3.29. Click at command
Click at is one of the commands in ATOMP Studio web.
The purpose of click at command in ATOMP Studio web, is to click on any UI element at the given x & y coordinate position of the UI element.
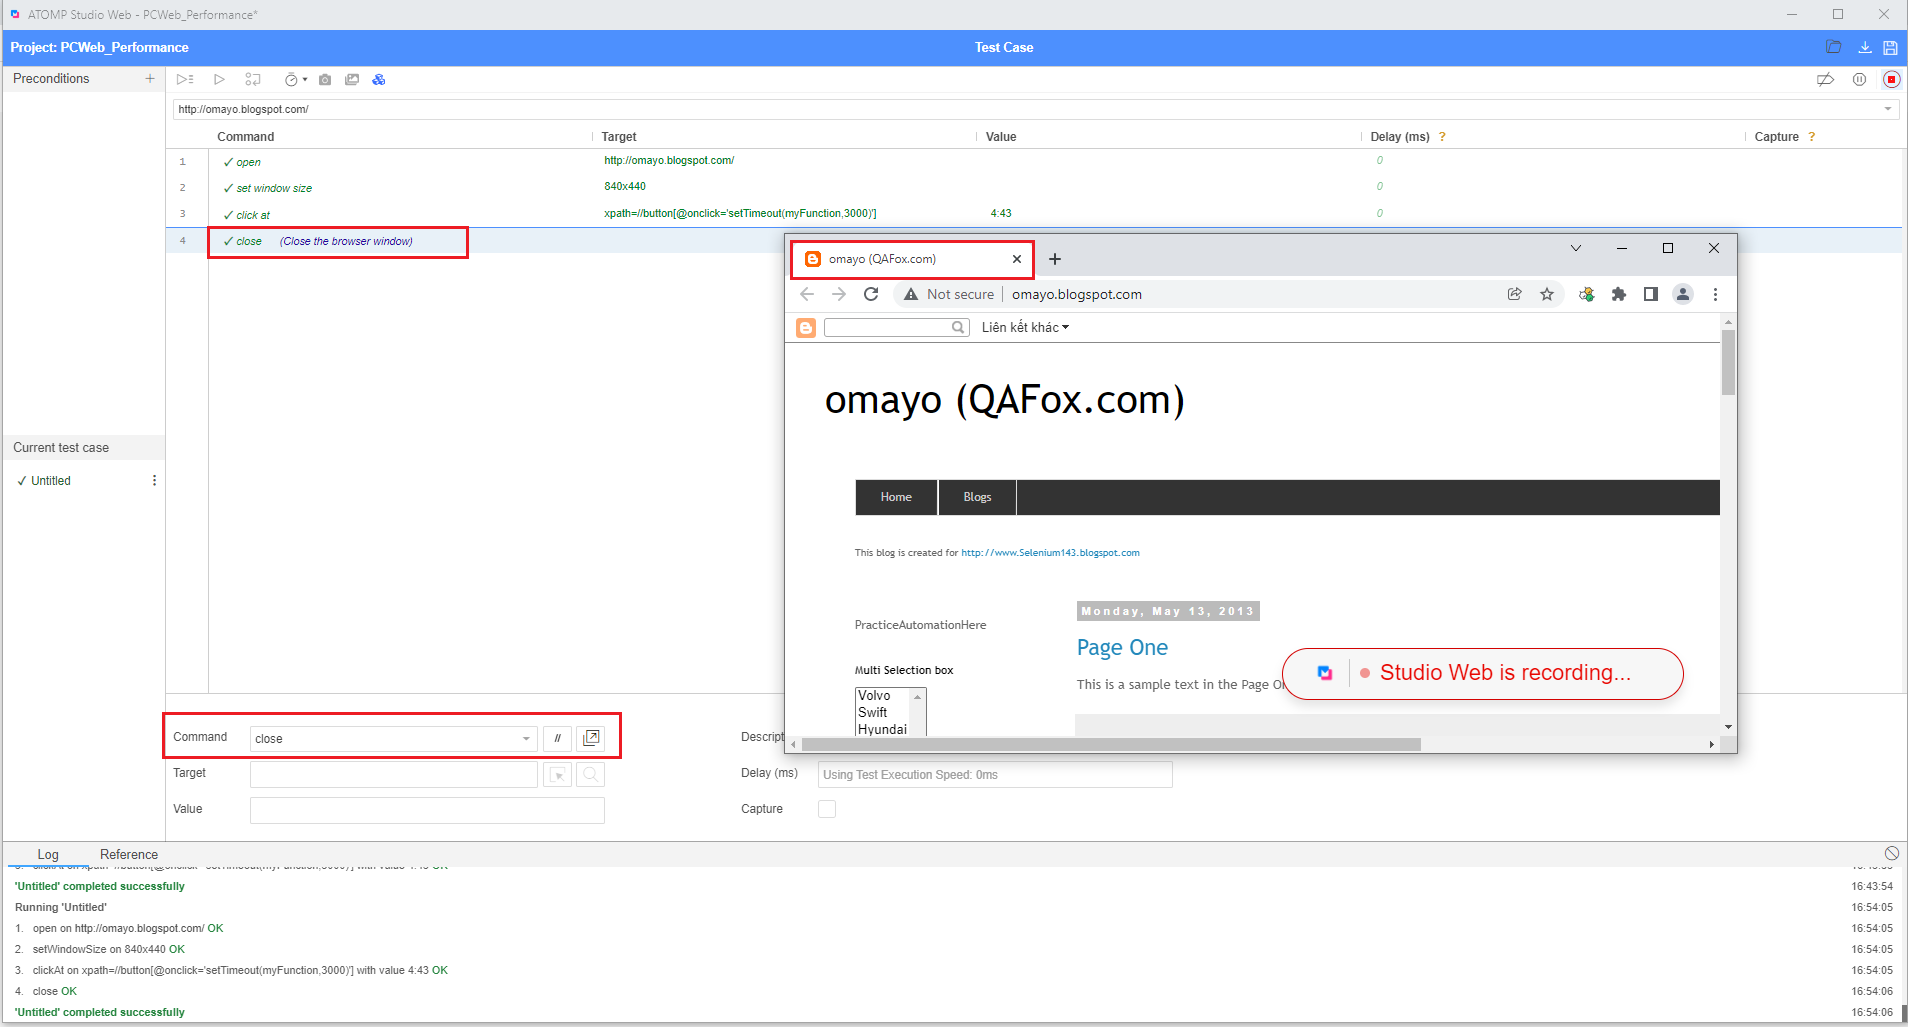
3.30. Close command
Close is one of the commands in ATOMP Studio web.
The purpose of close command in ATOMP Studio web, is to close the browser window.
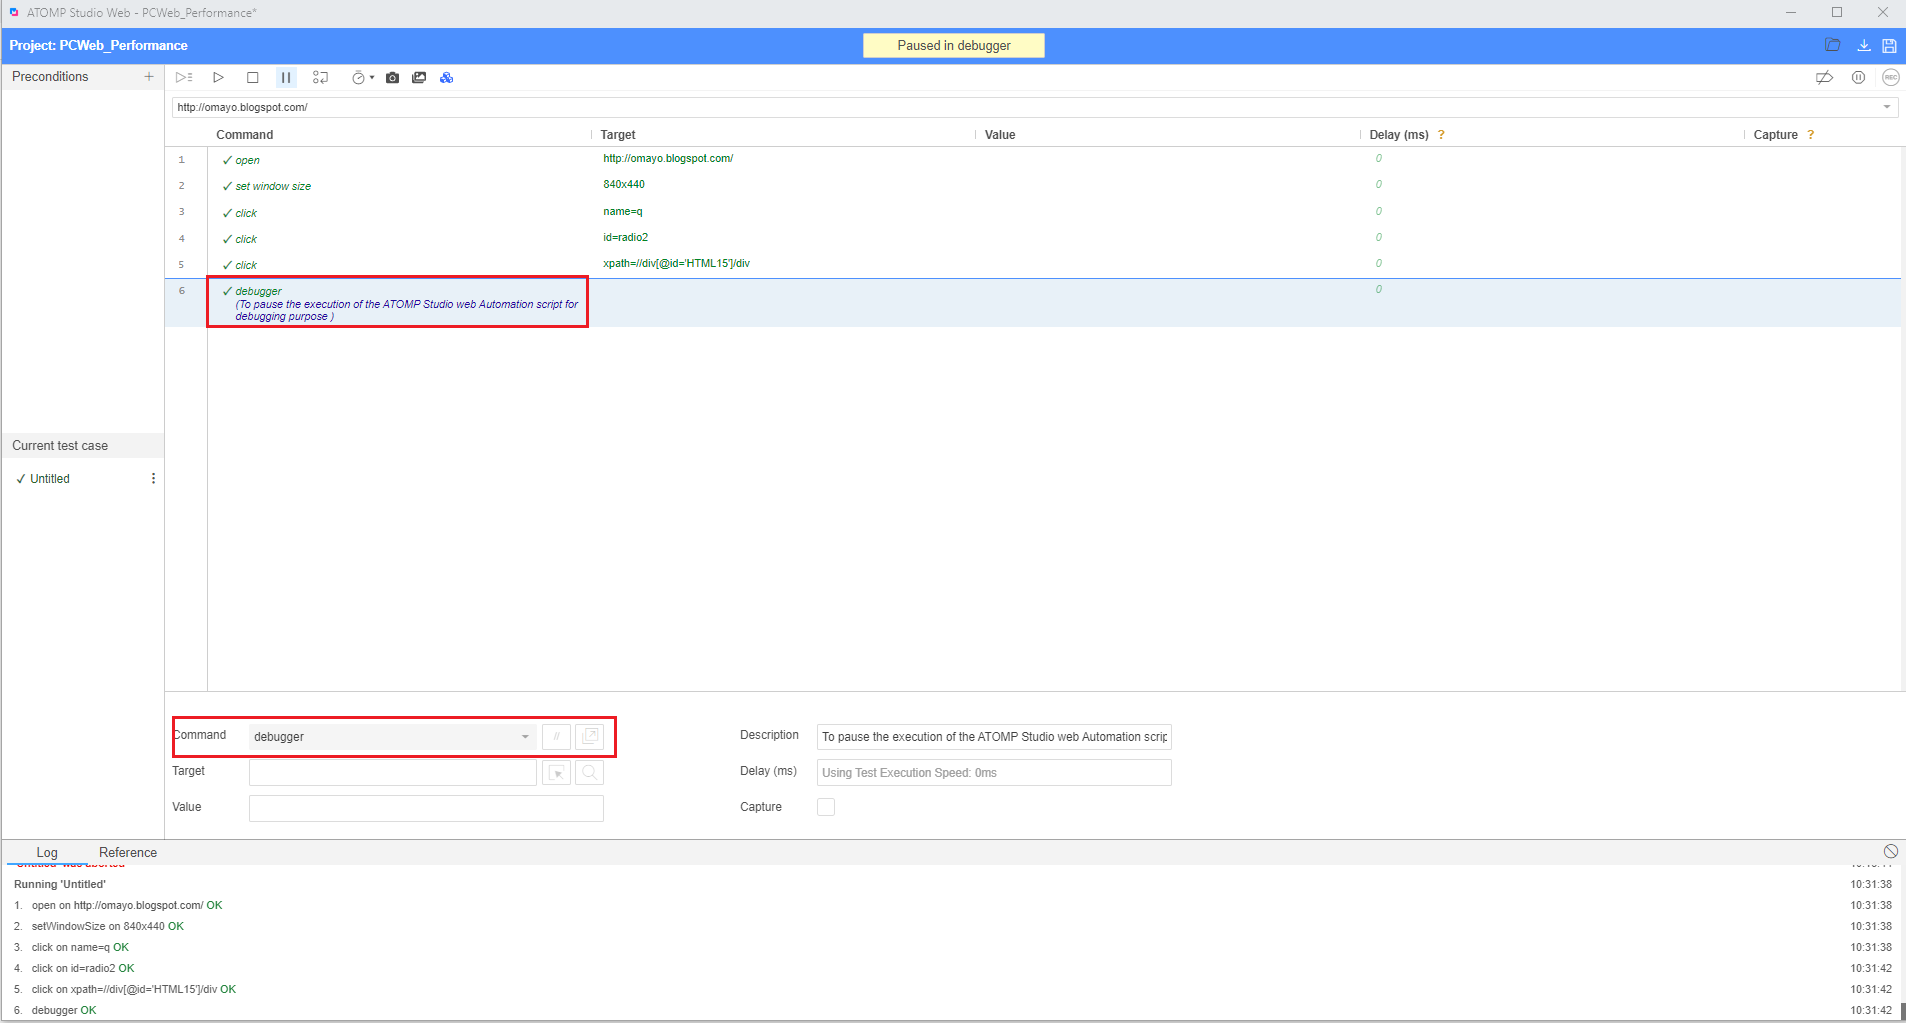
3.31. Debugger command
Debugger is one of the commands in ATOMP Studio web.
The purpose of debugger command in ATOMP Studio web, is to pause the execution of the ATOMP Studio web Automation script for debugging purpose (i.e. for identifying the root cause of any problem and rectifying it)
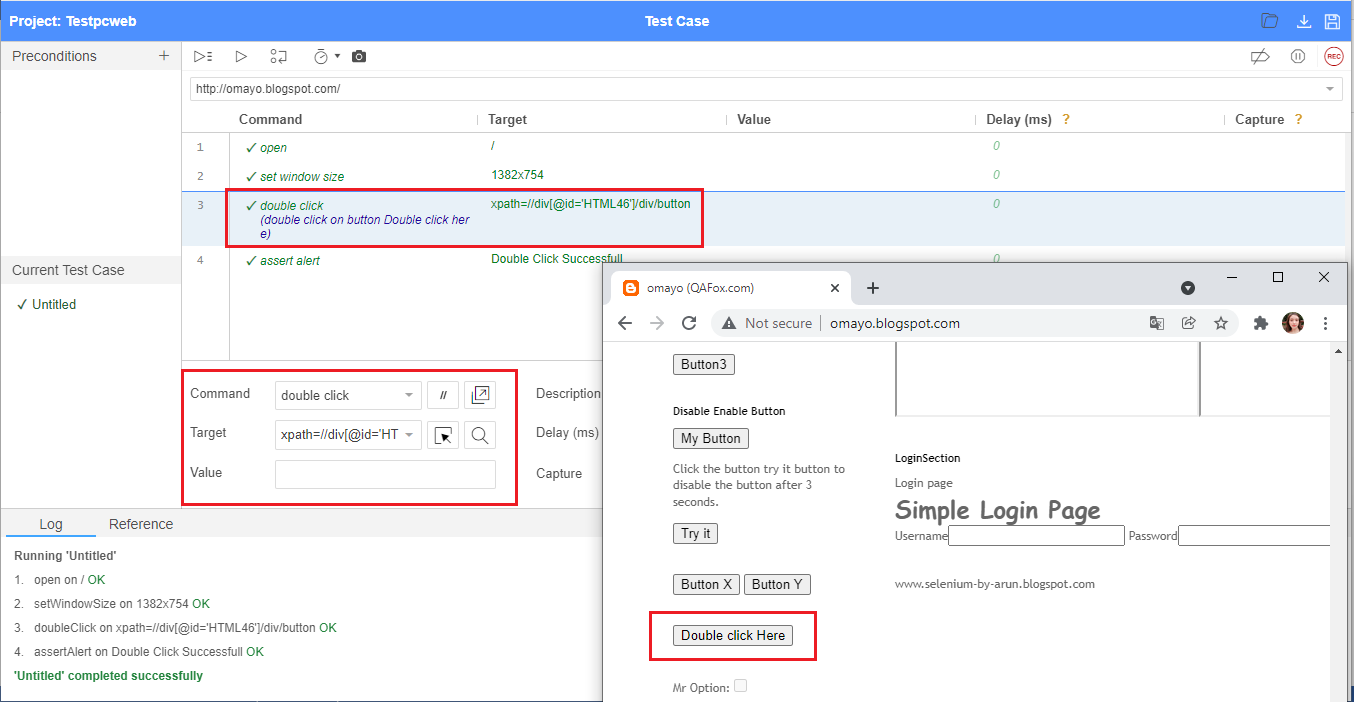
3.32. Double click command
Double click is one of the commands in ATOMP Studio web.
The purpose of double click command in ATOMP Studio web, is to double click on any UI element.
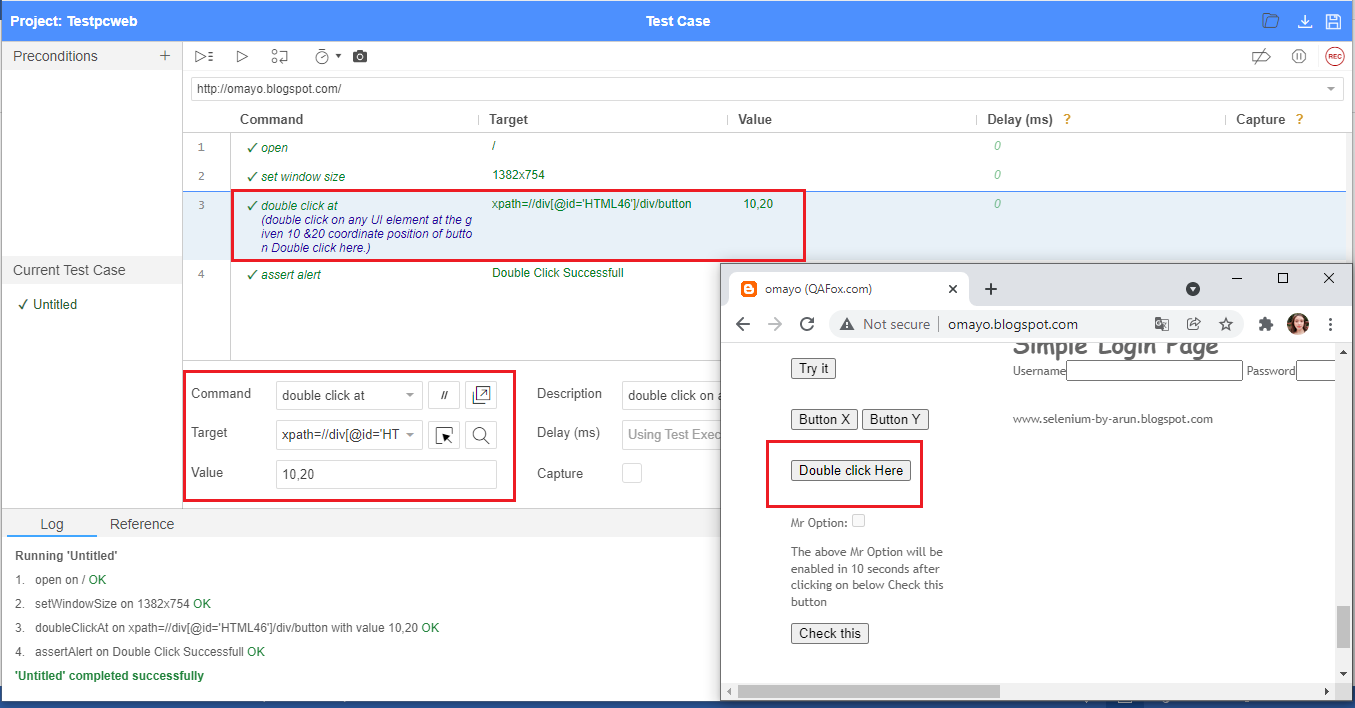
3.33. Double click at command
Double click at is one of the commands in ATOMP Studio web.
The purpose of double click at command in ATOMP Studio web, is to double click on any UI element at the given x & y coordinate position of the UI element.
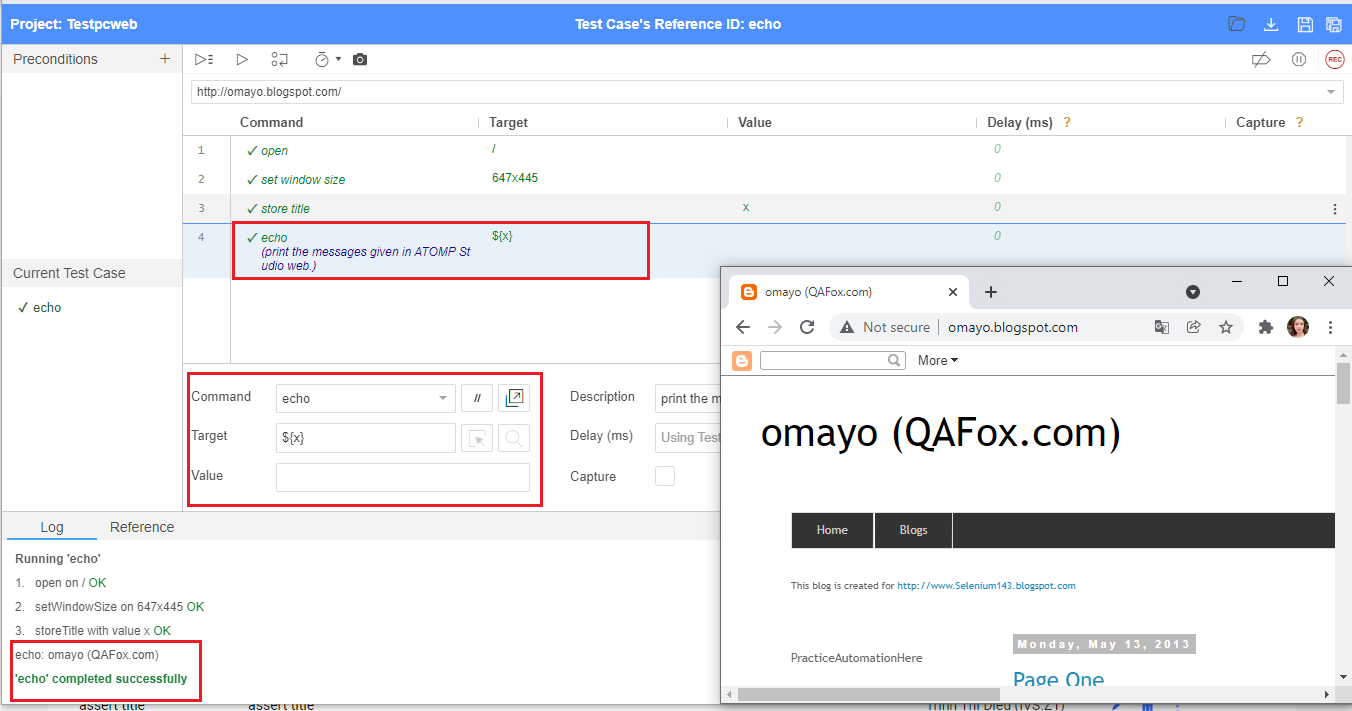
3.34. Echo command
Echo is one of the commands in ATOMP Studio web.
The purpose of echo command in ATOMP Studio web, is to print the messages given in ATOMP Studio web.
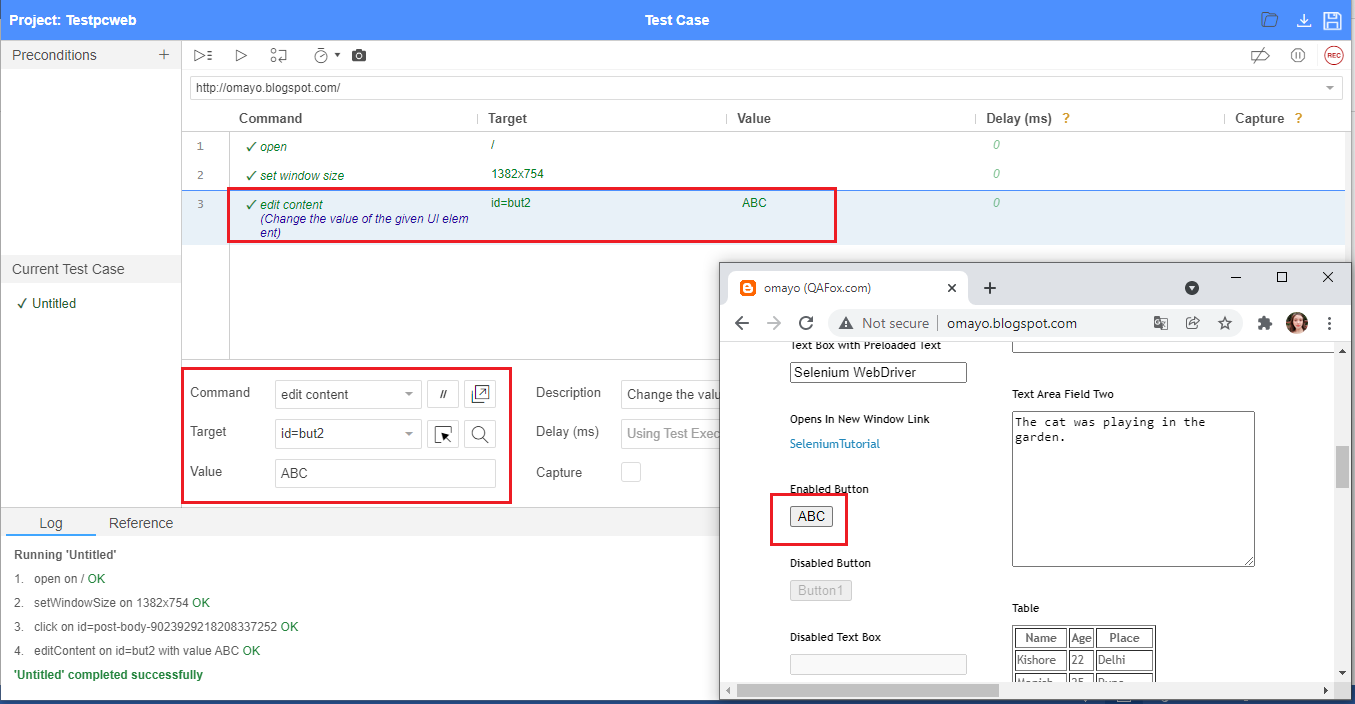
3.35. Edit content command
Edit content is one of the commands in ATOMP Studio web.
The purpose of edit content command in ATOMP Studio web, is to change the value of the given UI element.
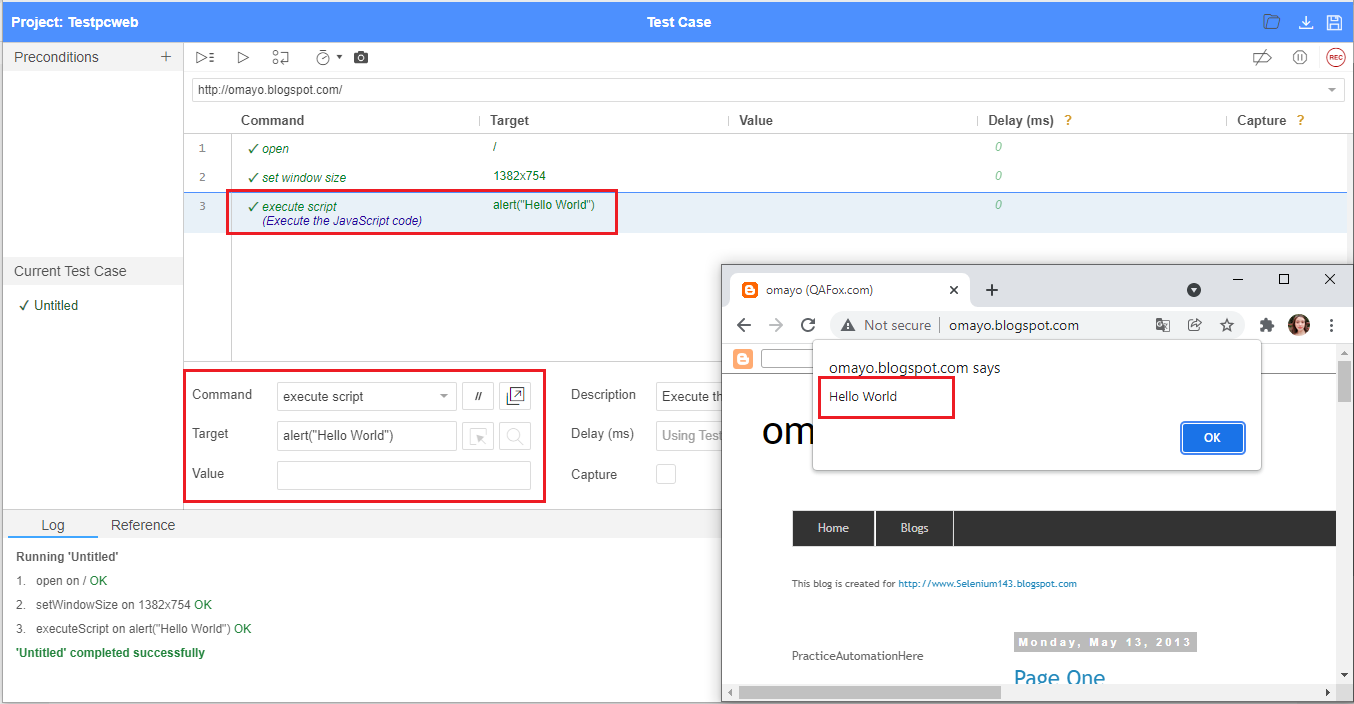
3.36. Execute script commnad
Execute script is one of the commands in ATOMP Studio web.
The purpose of execute script command in ATOMP Studio web, is to execute the JavaScript code in ATOMP Studio web.
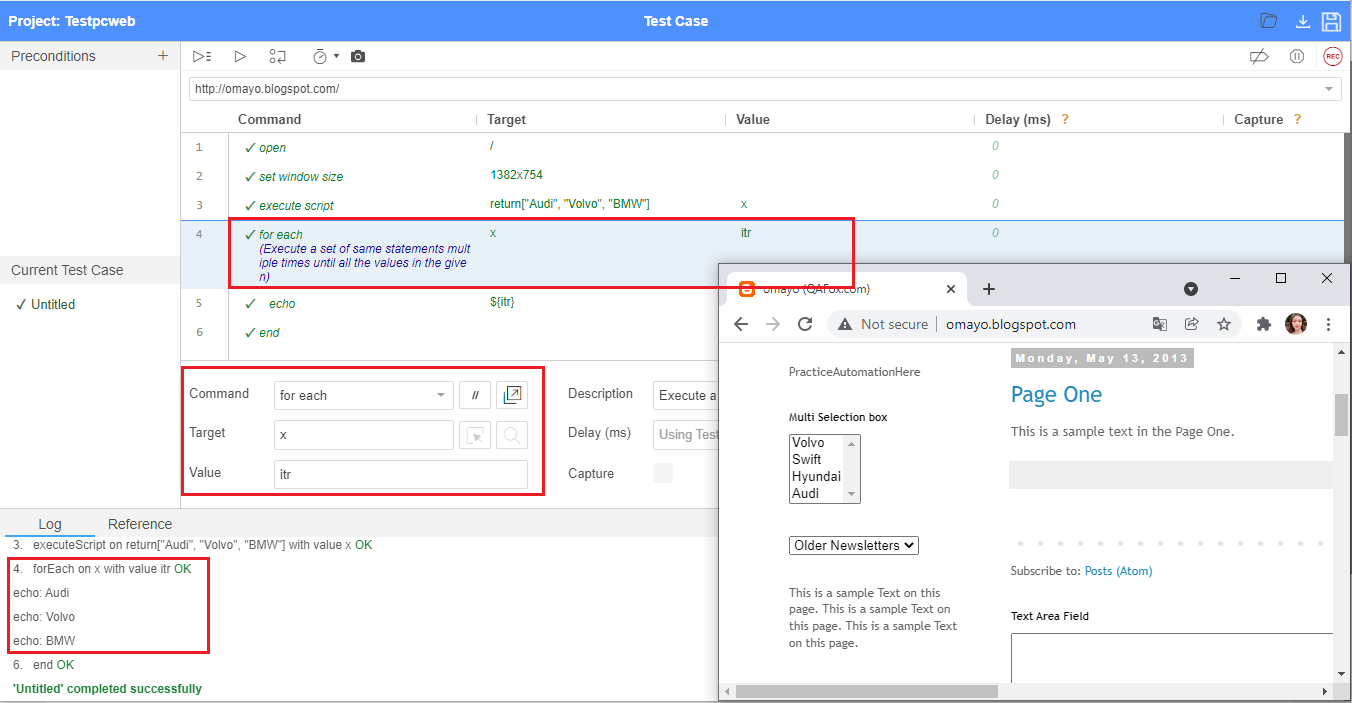
3.37. For each command
For each is one of the commands in ATOMP Studio web.
For each is the command in ATOMP Studio web used for executing a set of same statements multiple times until all the values in the given array (i.e. multiple set of values stored in a single variable) are completed.
3.38. Pause Command
Pause command in ATOMP Studio Web is used to pause the execution in ATOMP Studio web for the required period of time.
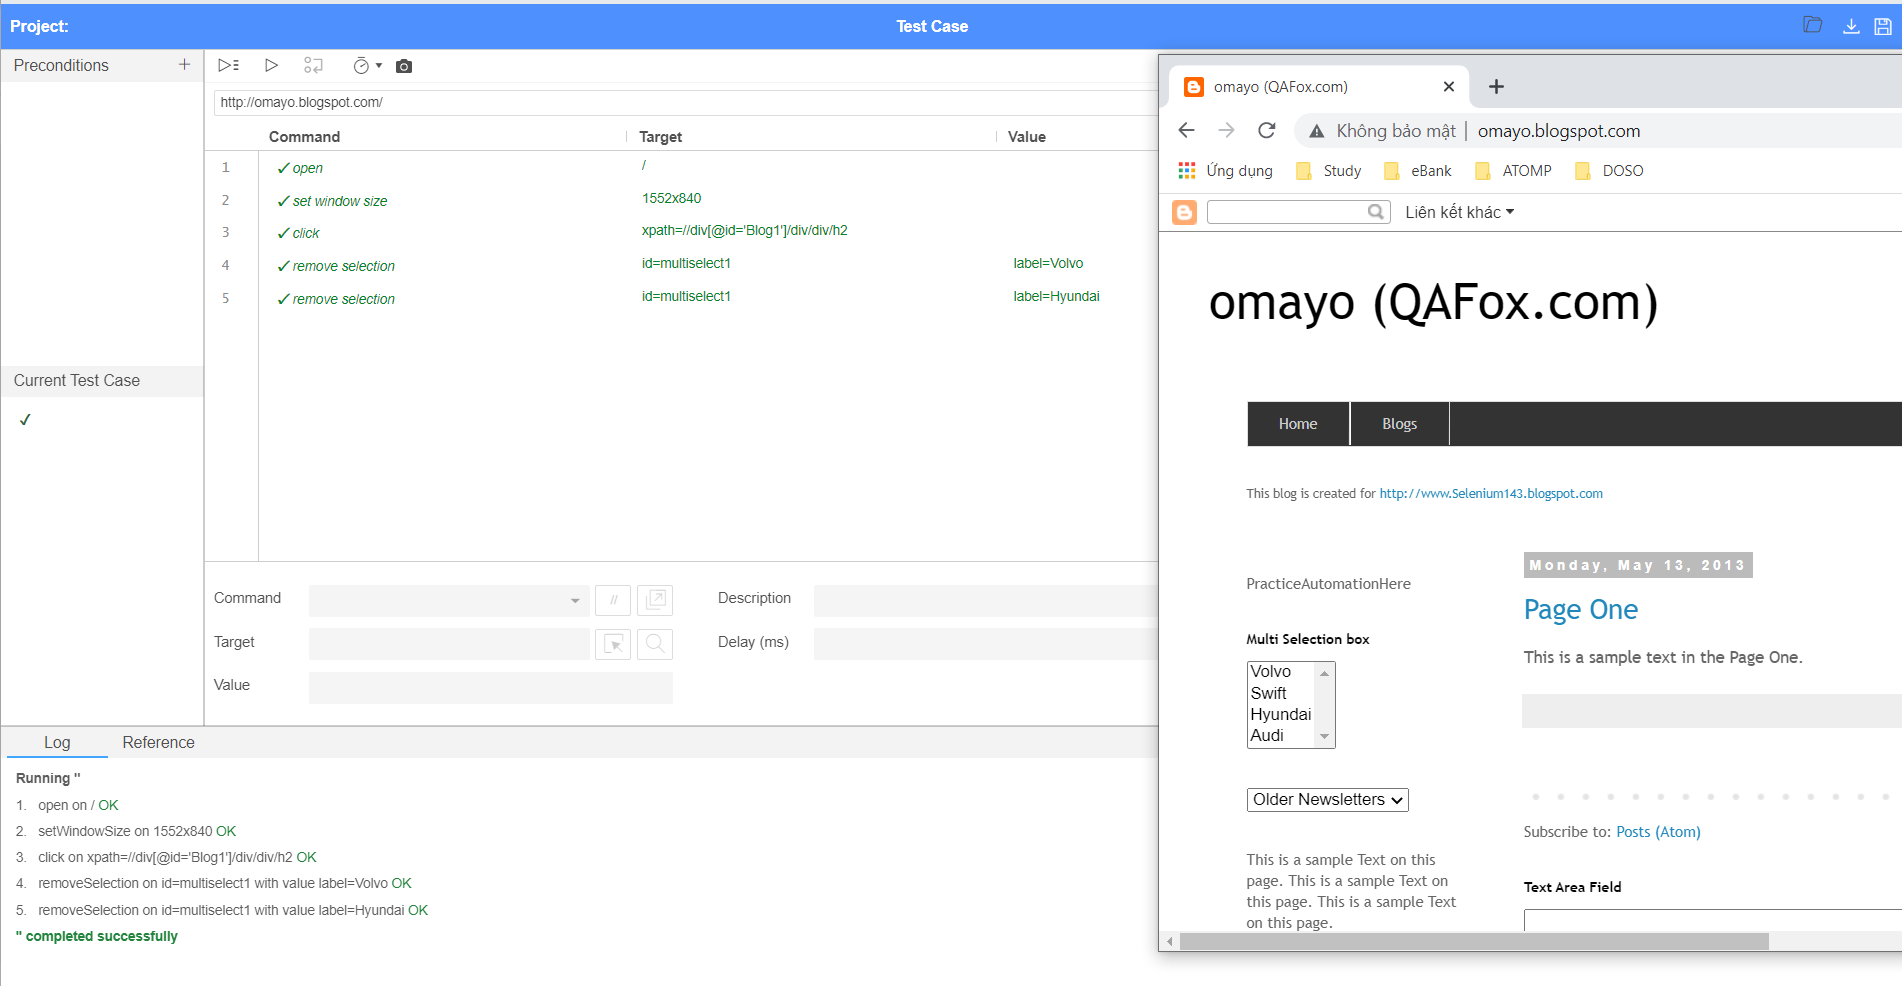
3.39. Remove selection command
Remove selection is one of the commands in ATOMP Studio.
The purpose of the remove selection command is to remove the selection of selected options in the multi-selection box field. In the dropdown field, we can only select one option, but whereas in multi-selection box field, we can select more than one options. Hence using add selection command in ATOMP Studio Web, we can select more than one option in a Multi-selection box field.
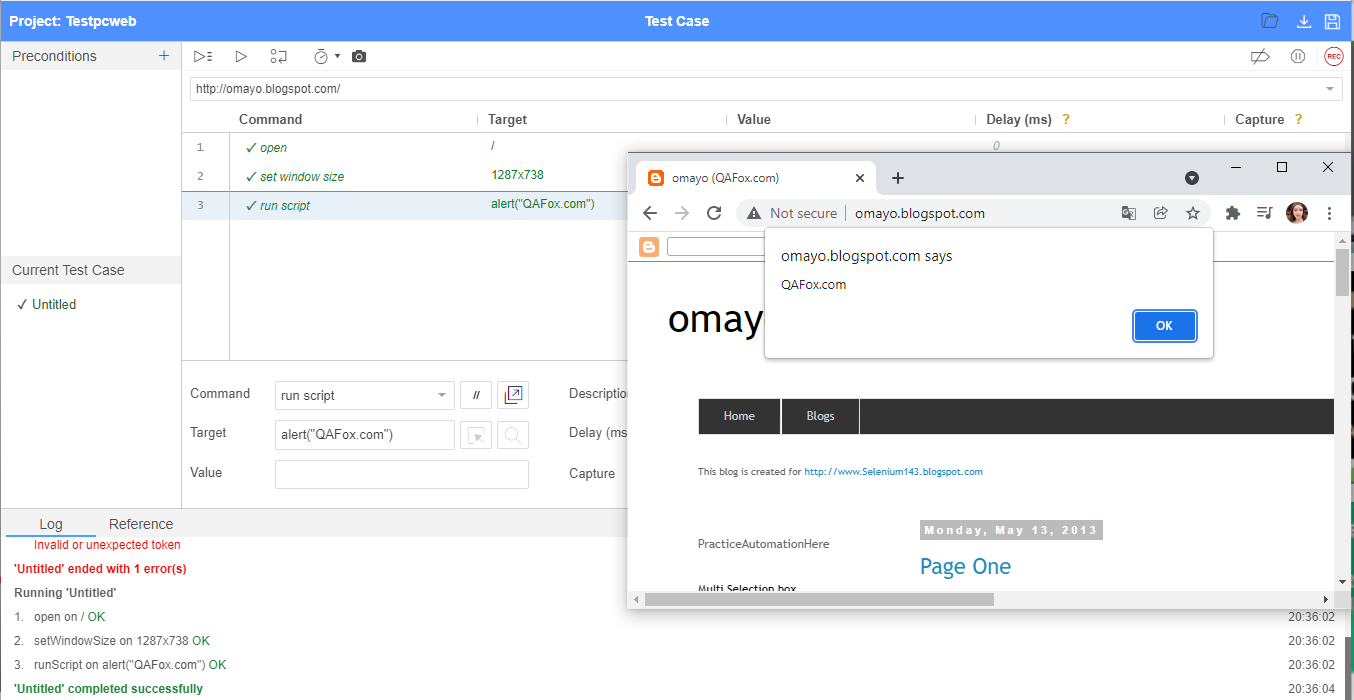
3.40. Run Scripts Command
Run Script is one of the commands in ATOMP Studio Web.
The purpose of run script command in ATOMP Studio, is to execute the JavaScript code snippets in ATOMP Studio.
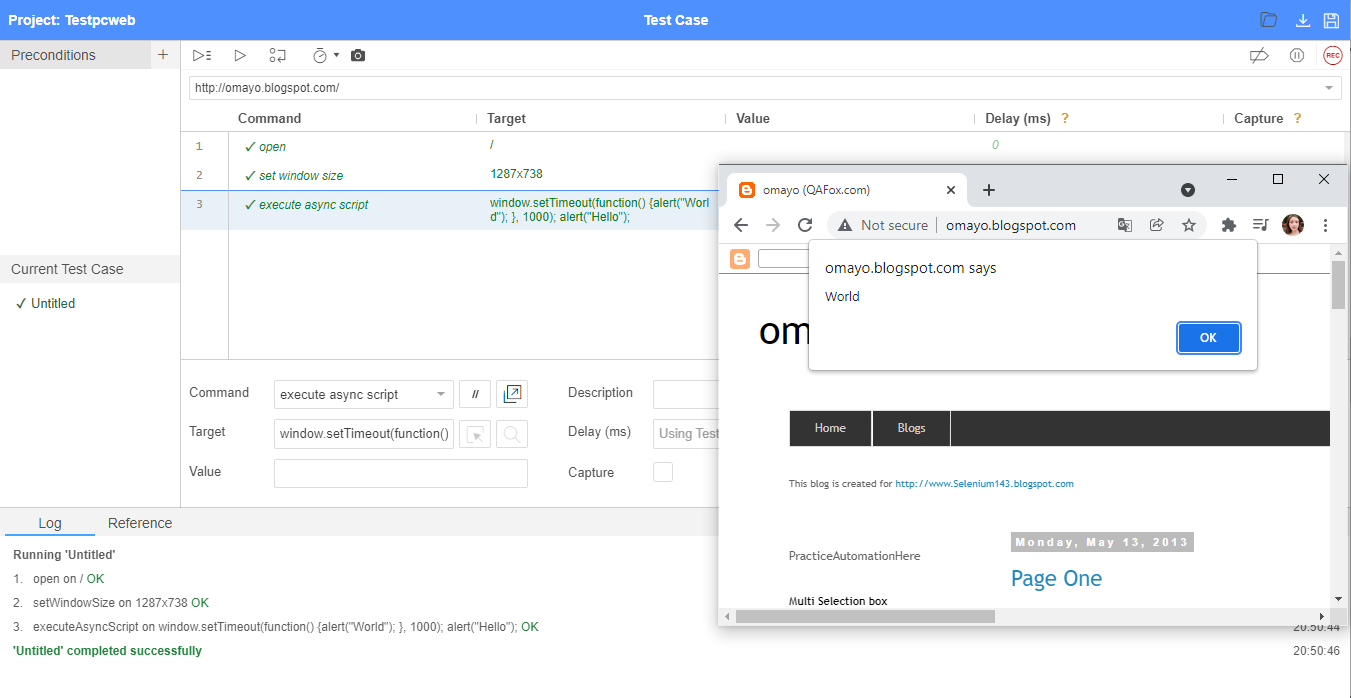
3.41. Execute Async Script command
Execute async script is one of the commands in ATOMP Studio.
The purpose of execute async script command in ATOMP Studio, is to execute the async snippet of JavaScript code in ATOMP Studio.
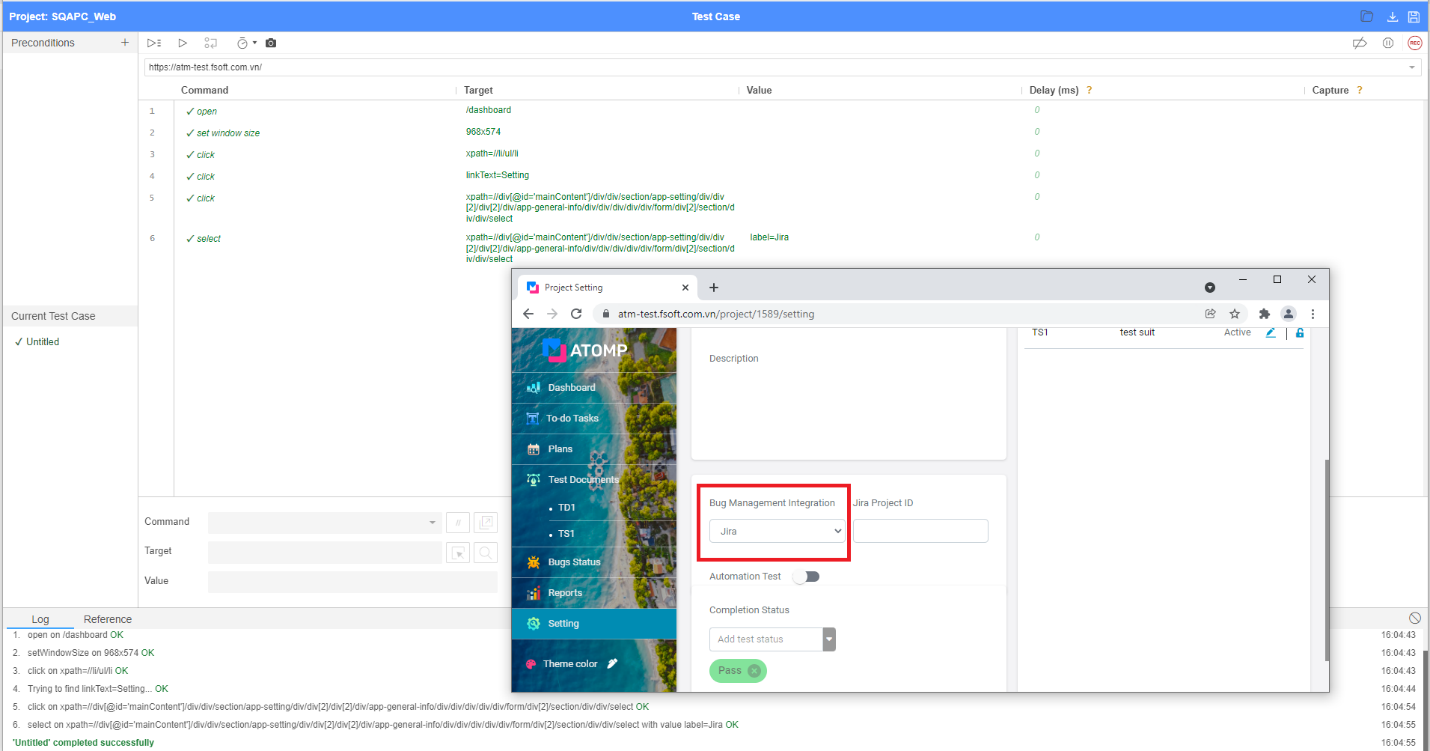
3.42. Select command
Select command is one of the commands in ATOMP Studio Web.
The purpose of select command in ATOMP Studio Web is to select an option from the dropdown list.
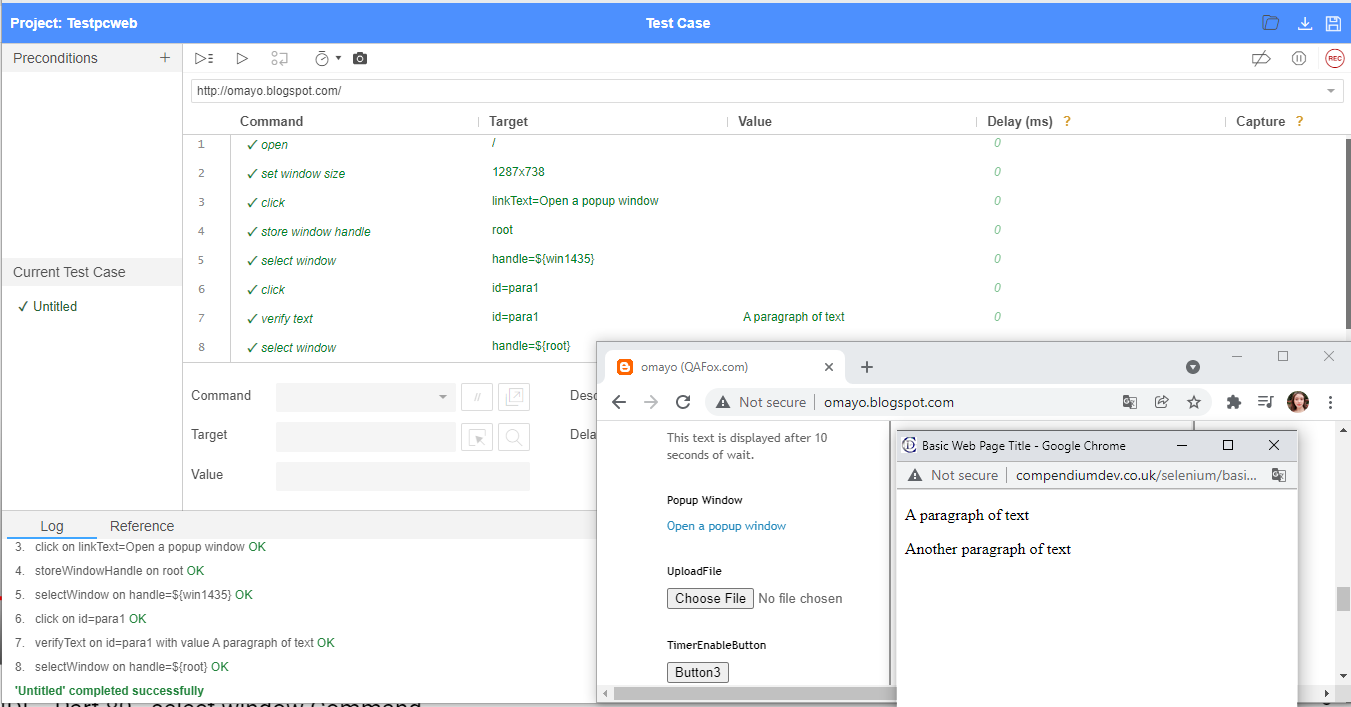
3.43. Select window command
Select window is one of the command in ATOMP Studio Web.
The purpose of the select window command is to select or switch to another window. We can either use the window title or window tab index to select a window using the select window command.
3.44. Select Command
Select is one of the commands in ATOMP Studio.
The purpose of select command in ATOMP Studio, is to select an option from the dropdown field.
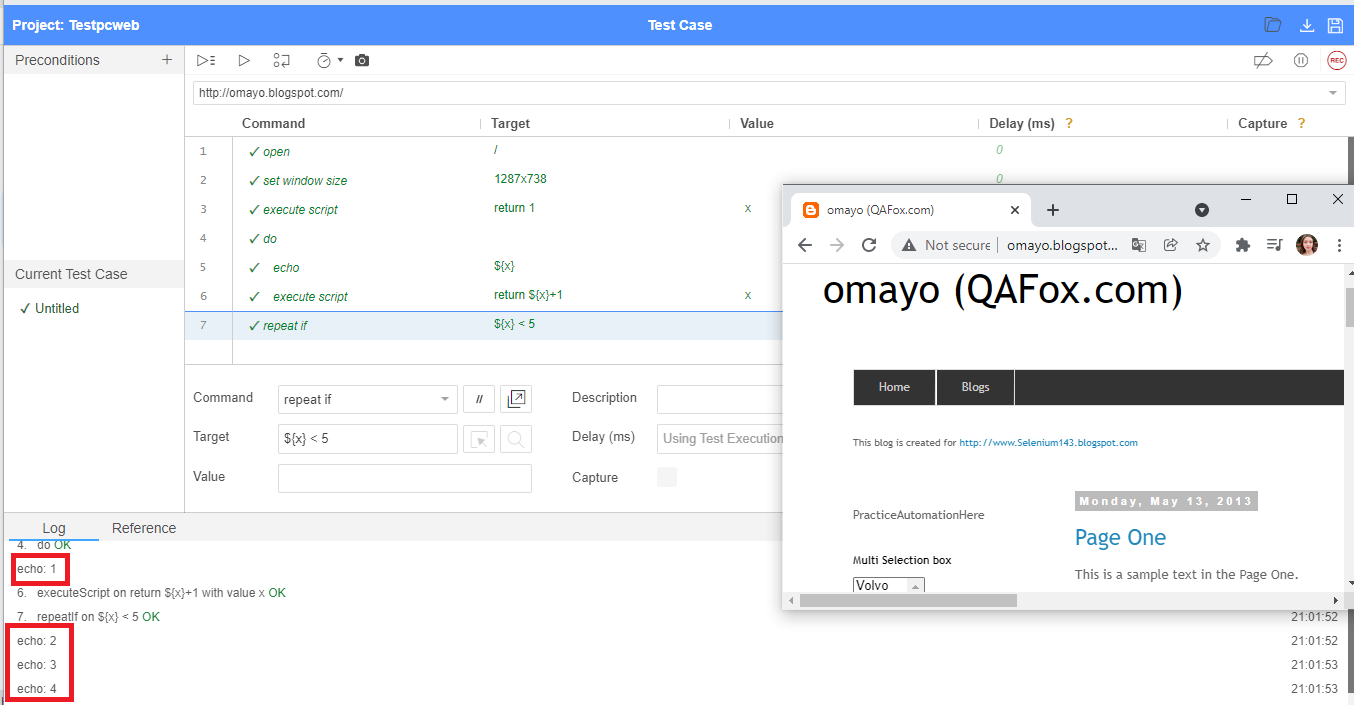
3.45. Do and Repeat if command
Do and repeat if are the commands in ATOMP Studio Web, which needs to be used together.
Do and repeat if are the command in ATOMP Studio Web used for executing a set of same statements multiple times until the repeat if condition becomes false.
Difference between while and do commands
In while command, the condition to be checked for entering into the iterative loop block will be at the beginning. Whereas in do command, we will check the condition at the end of the iterative loop block using repeat if command.
3.46. Set Speed Command
Set speed is one of the commands in ATOMP Studio Web.
The purpose of the set speed command is to modify the default speed of ATOMP Studio Web execution (i.e. 0 seconds) to the required milliseconds.
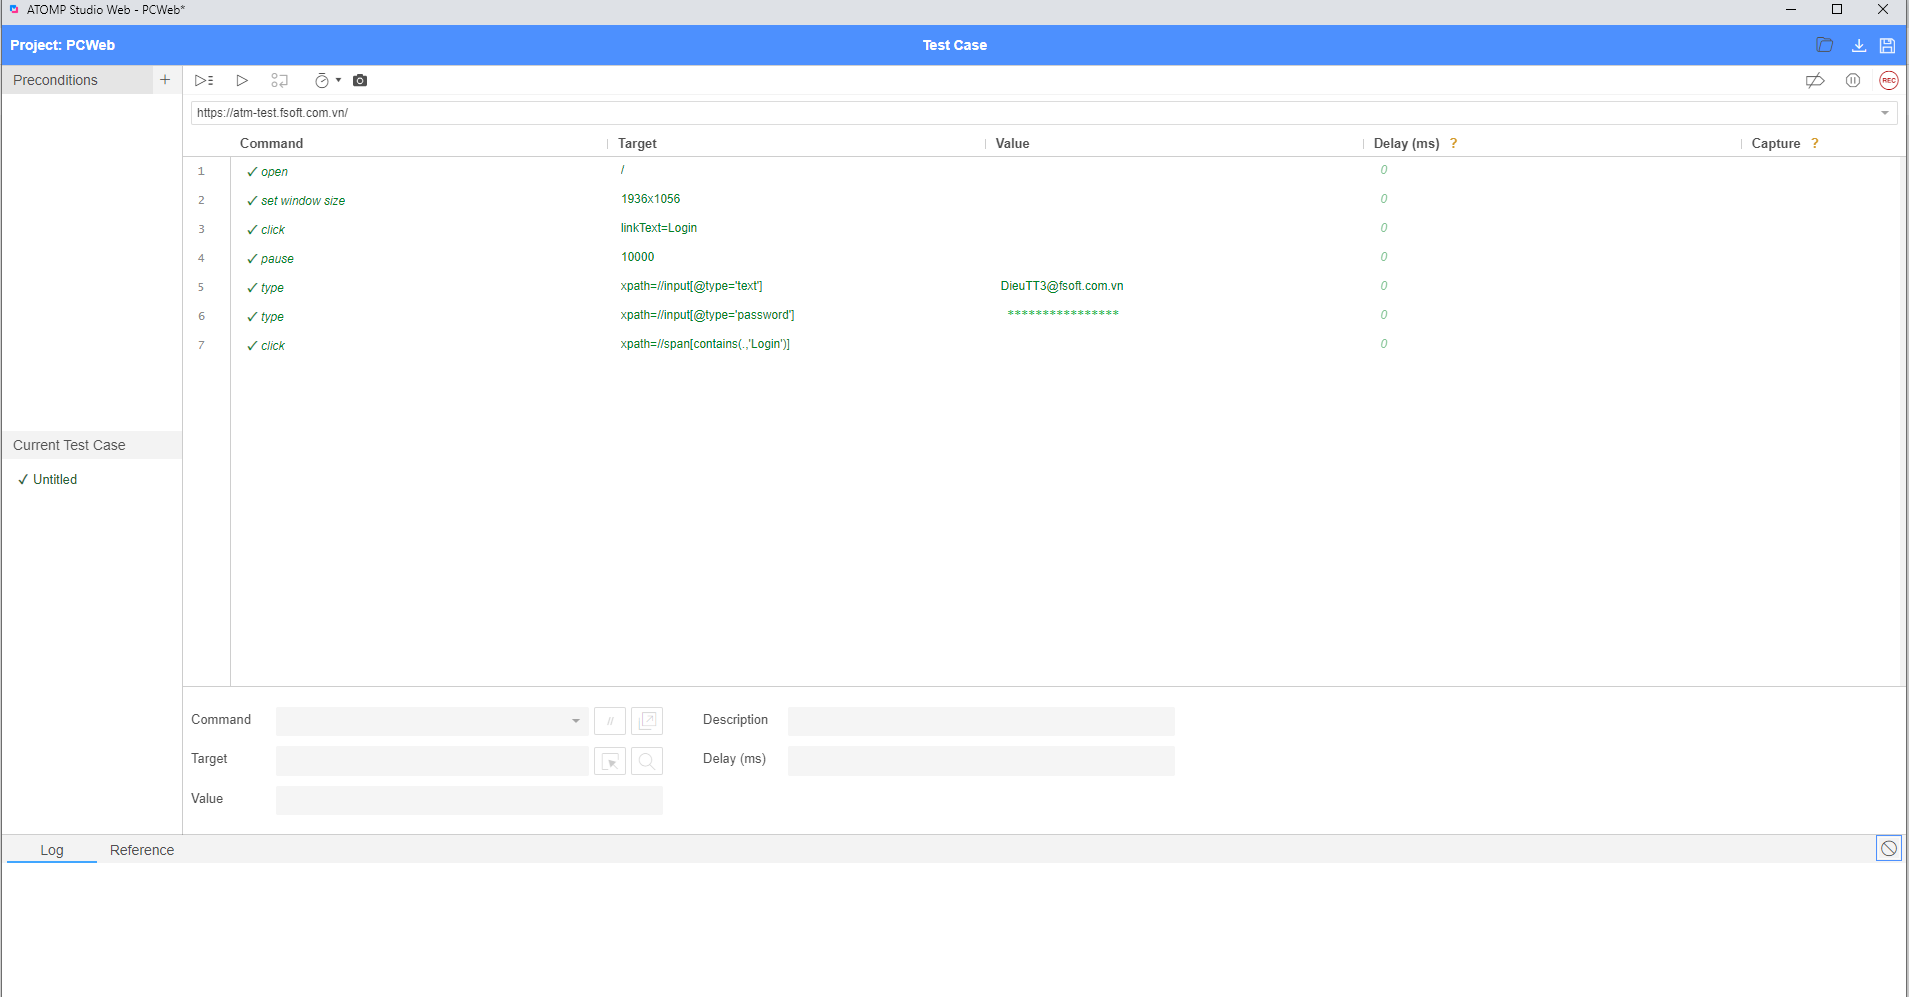
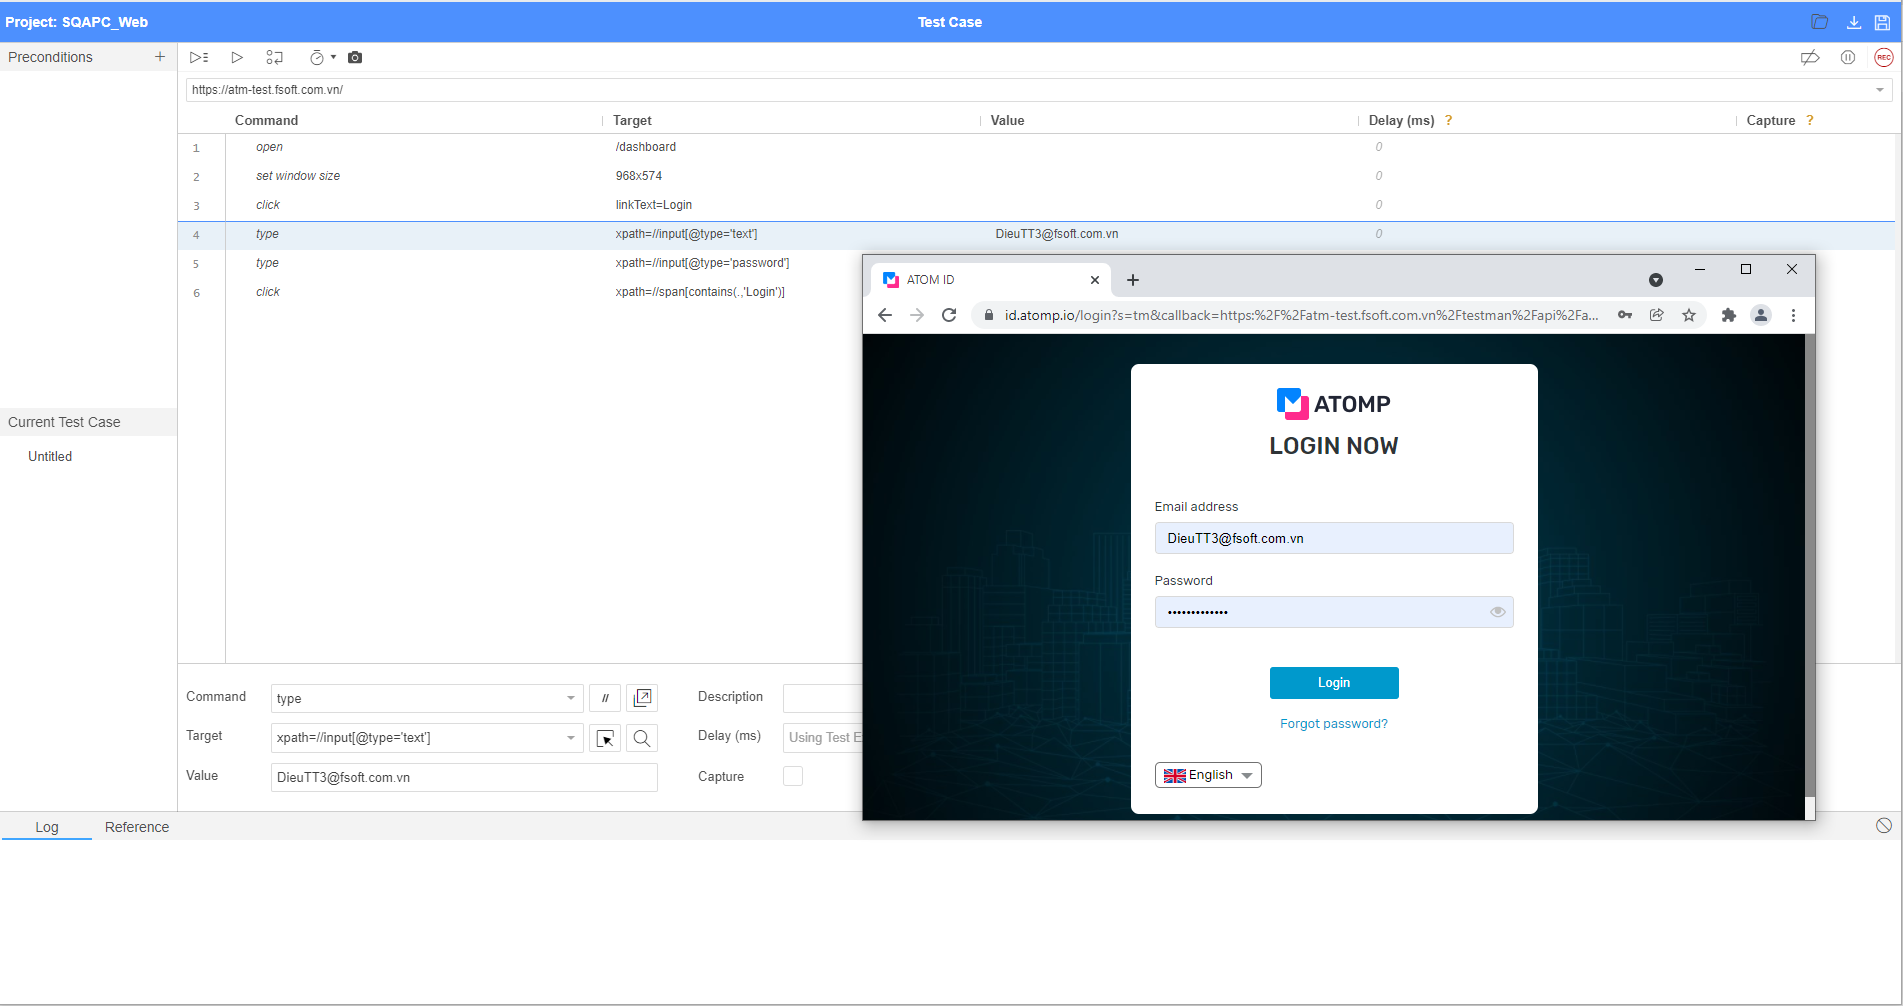
3.47. Type command
Type is one of the commands in ATOMP Studio.
The purpose of type command in ATOMP Studio, is to type any given text into the text fields in the application.
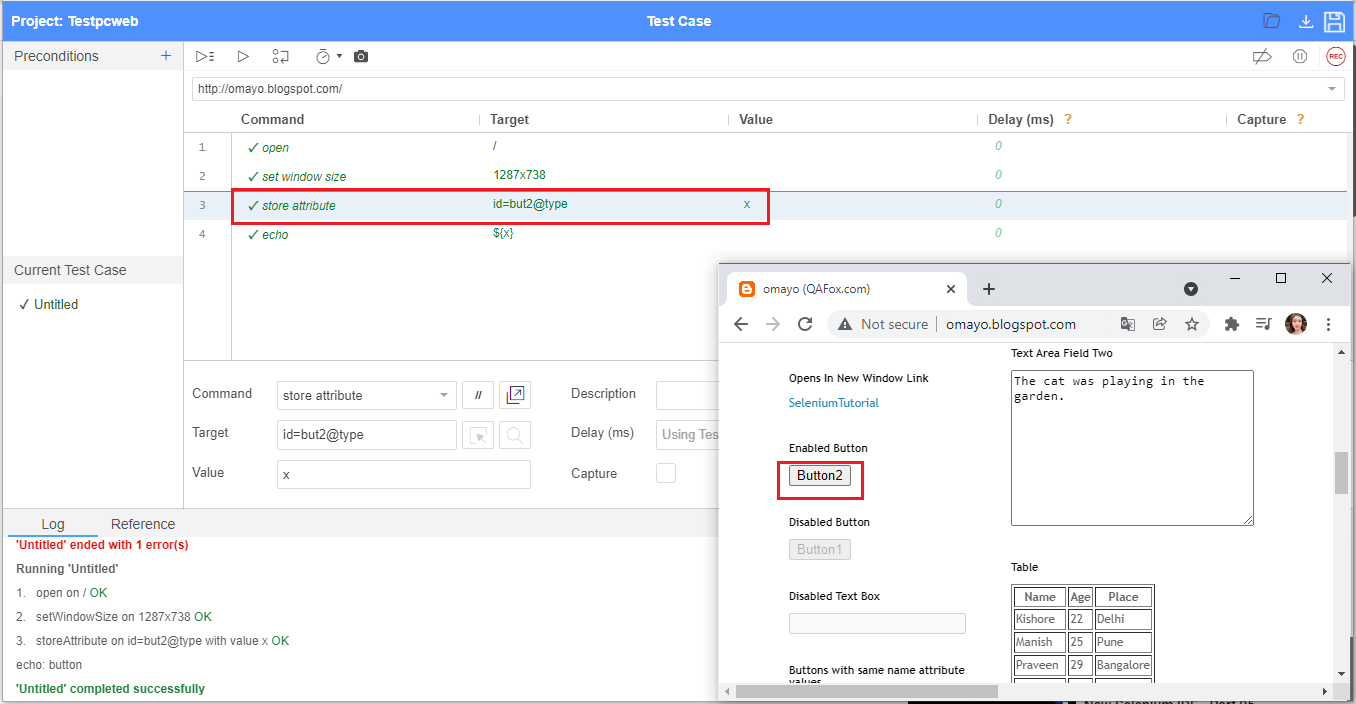
3.48. Store attribute Command
Store attribute is one of the commands in ATOMP Studio web.
The purpose of the store attribute command is to retrieve and store the value of the given attribute name of the located UI element into a variable in ATOMP Studio.
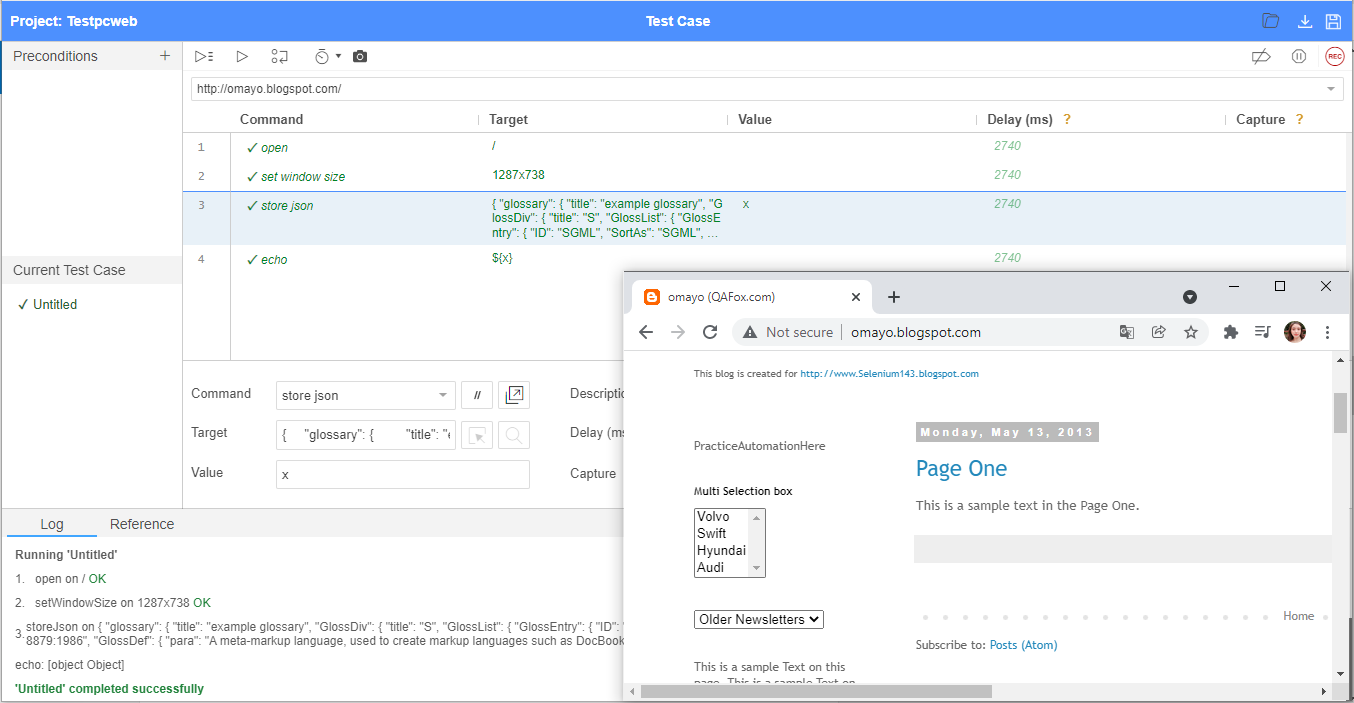
3.49. Store json command
Store json is one of the commands in ATOMP Studio.
The purpose of the store json command is to retrieve and store json content into a variable in ATOMP Studio.
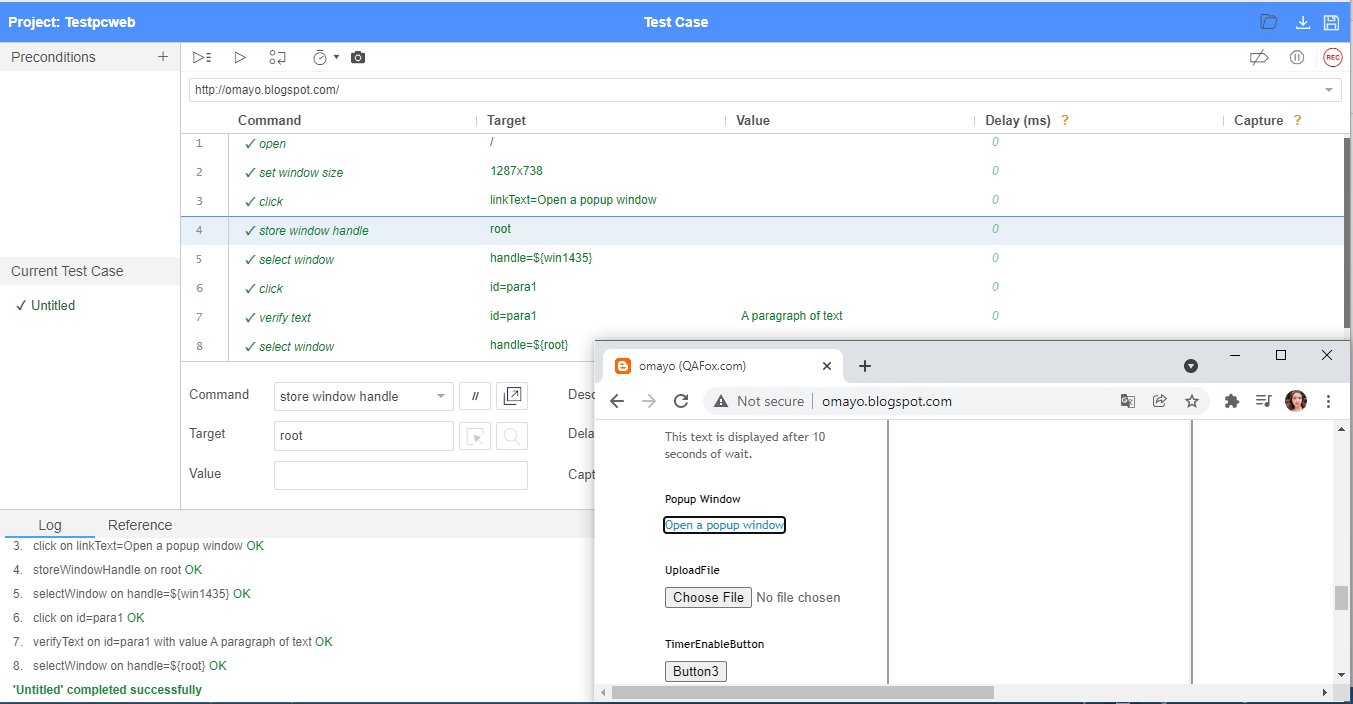
3.50. Store window handle command
Store window handle is one of the commands in ATOMP Studio.
The purpose of the store window handle command is to store the window using its locator i.e. tab index or title.
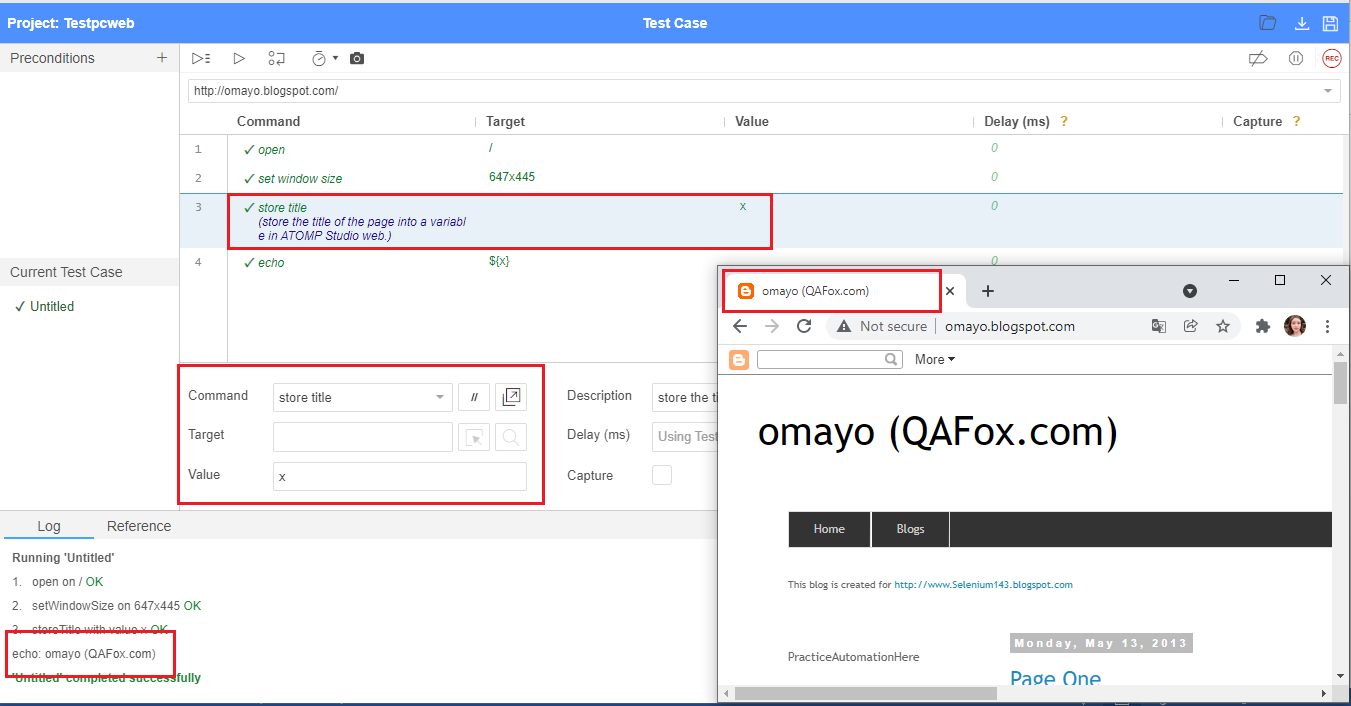
3.51. Store title command
Store title is one of the commands in ATOMP Studio web
The purpose of the store title command is to retrieve and store the title of the page into a variable in ATOMP Studio web.
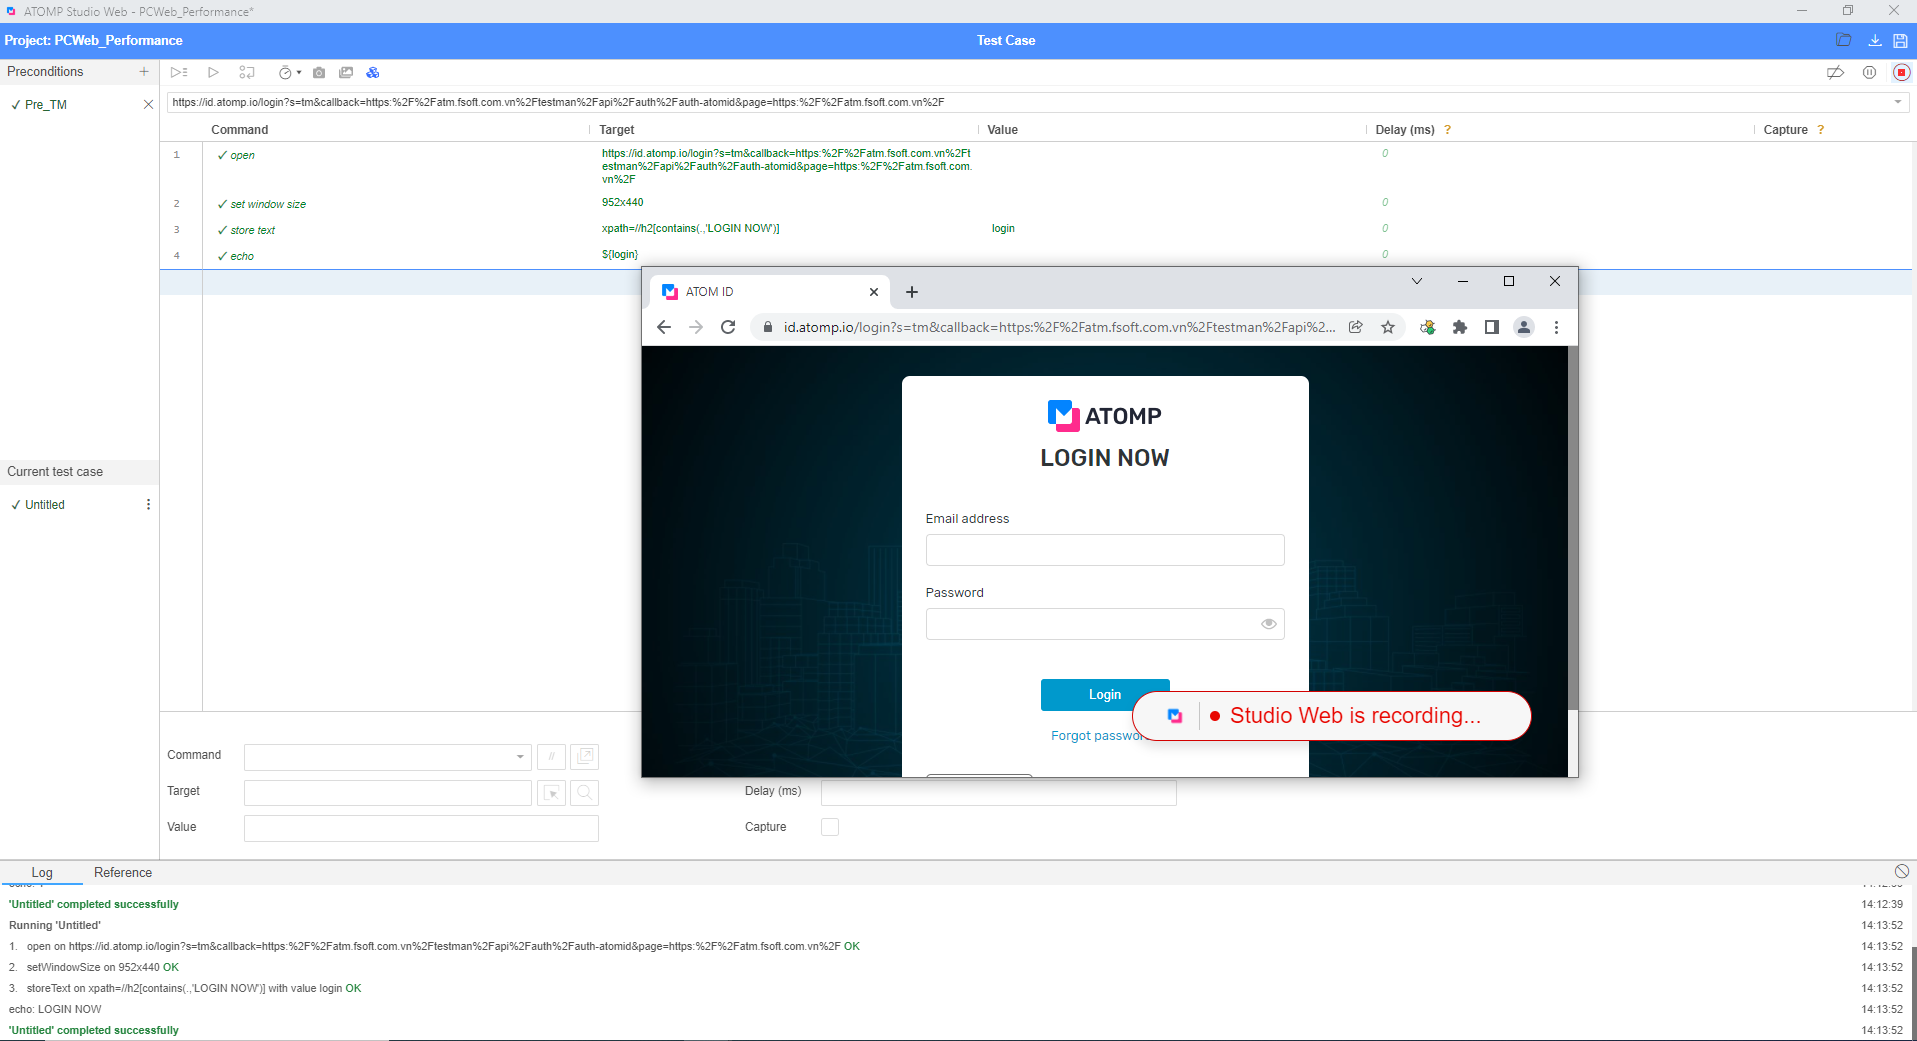
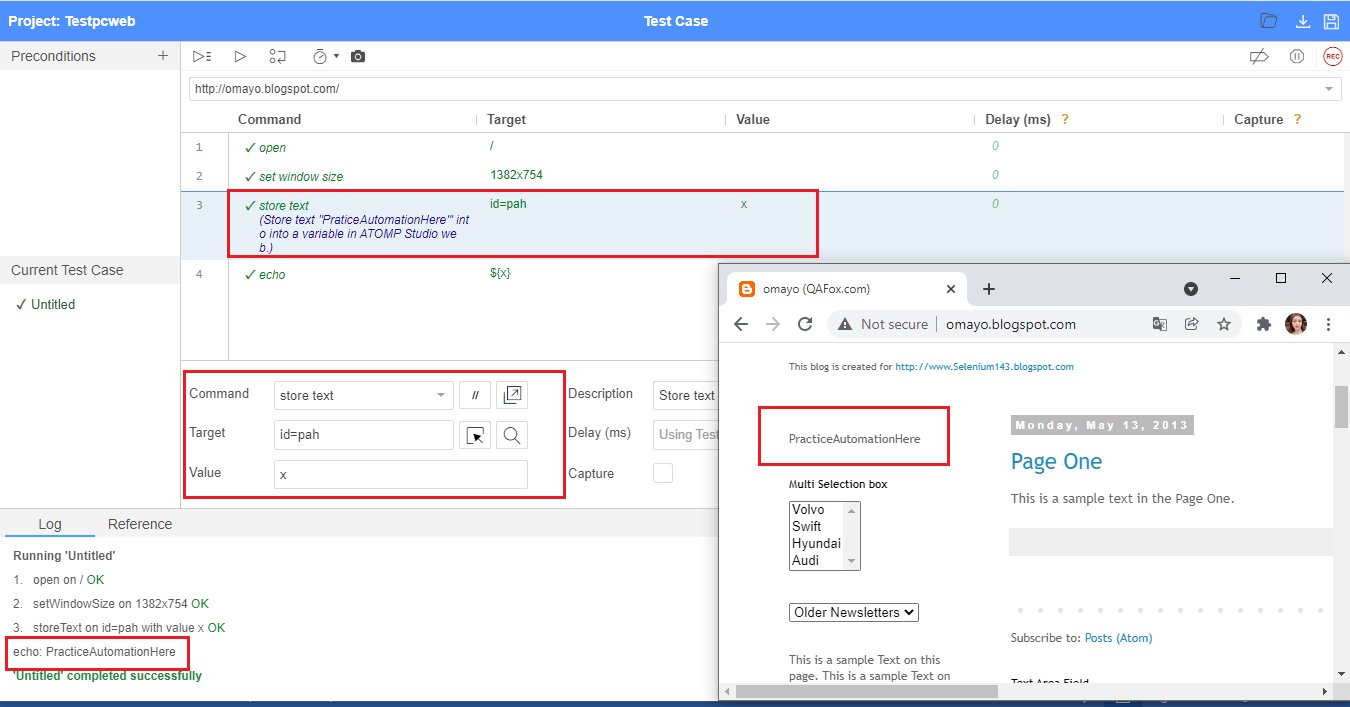
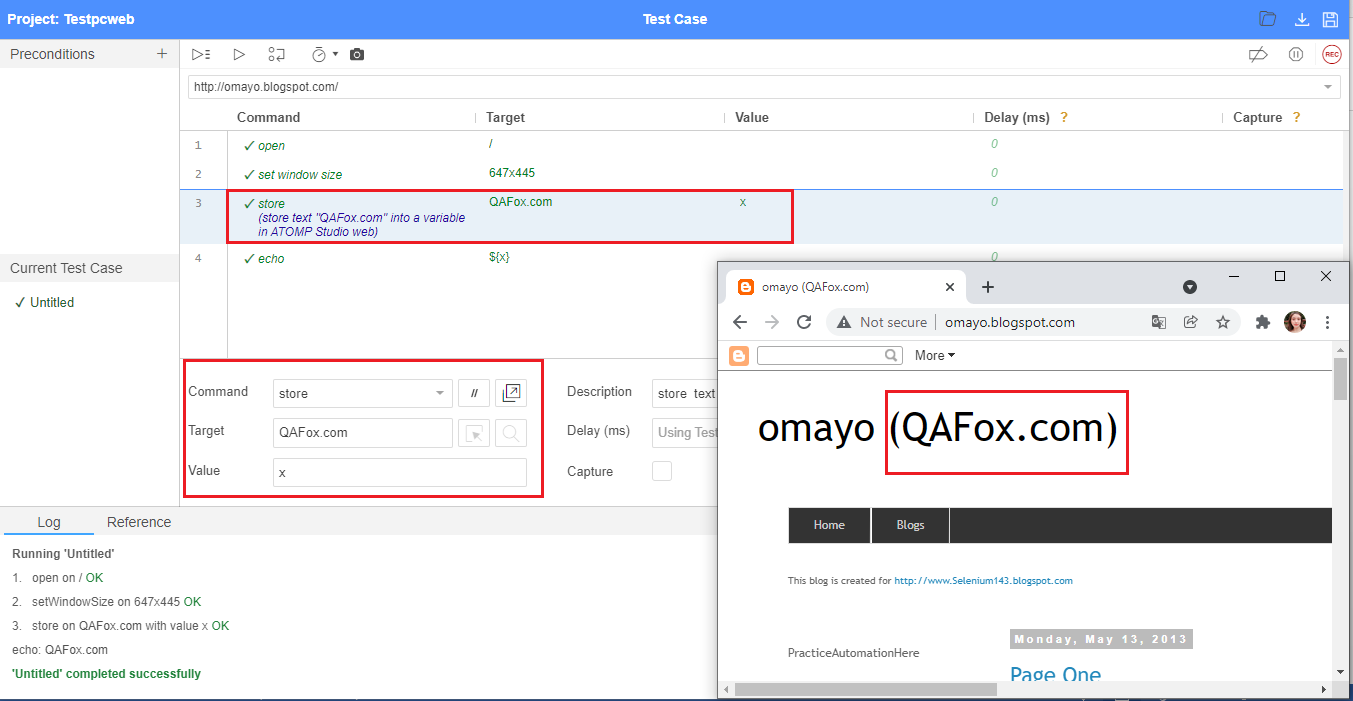
3.52. Store text command
Store text is one of the commands in ATOMP Studio web
The purpose of the store text command is to retrieve and store the text between the HTML tags of the located UI element into a variable in ATOMP Studio web.
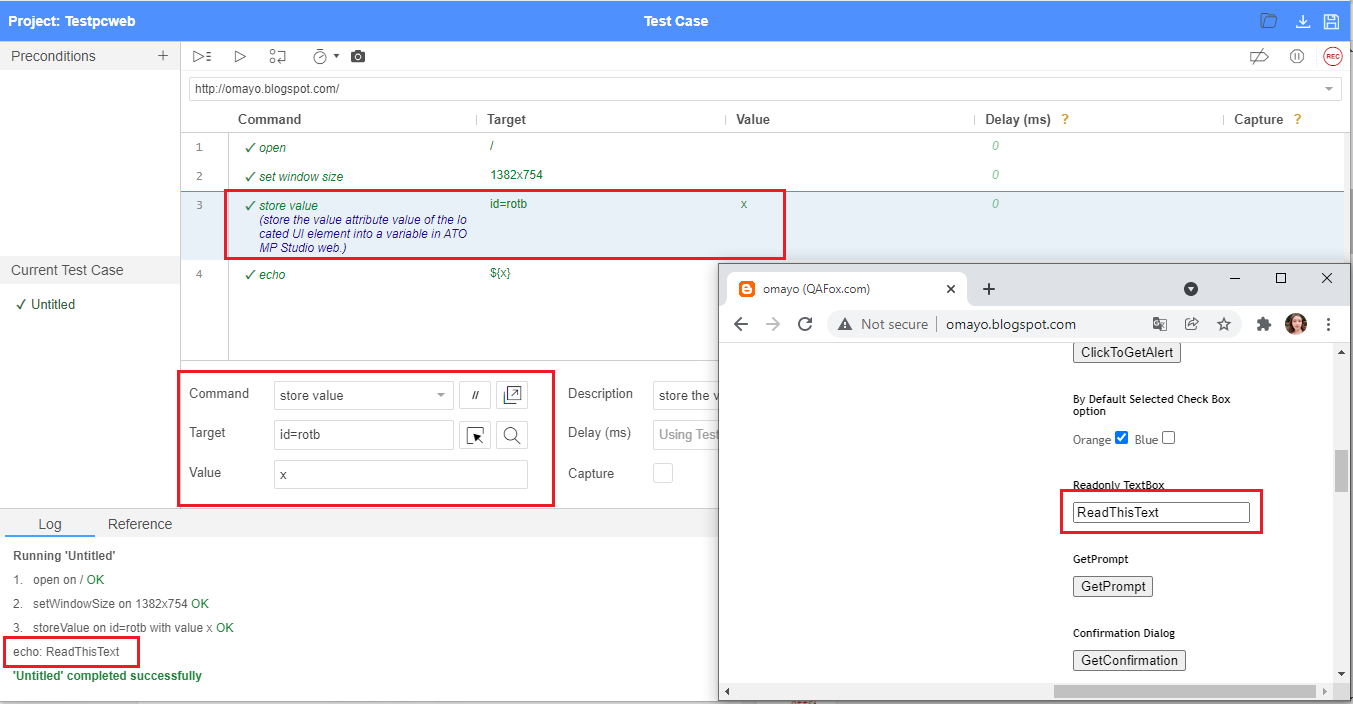
3.53. Store value command
Store value is one of the commands in ATOMP Studio web.
The purpose of the store value command is to retrieve and store the value attribute value of the located UI element into a variable in ATOMP Studio web.
3.54. Store Command
Store is one of the commands in ATOMP Studio web.
The purpose of the store command is to store any text into a variable in ATOMP Studio web
3.55. Store window handle command
Store window handle is one of the commands in ATOMP Studio.
The purpose of the store window handle command is to store the window using its locator i.e. tab index or title.

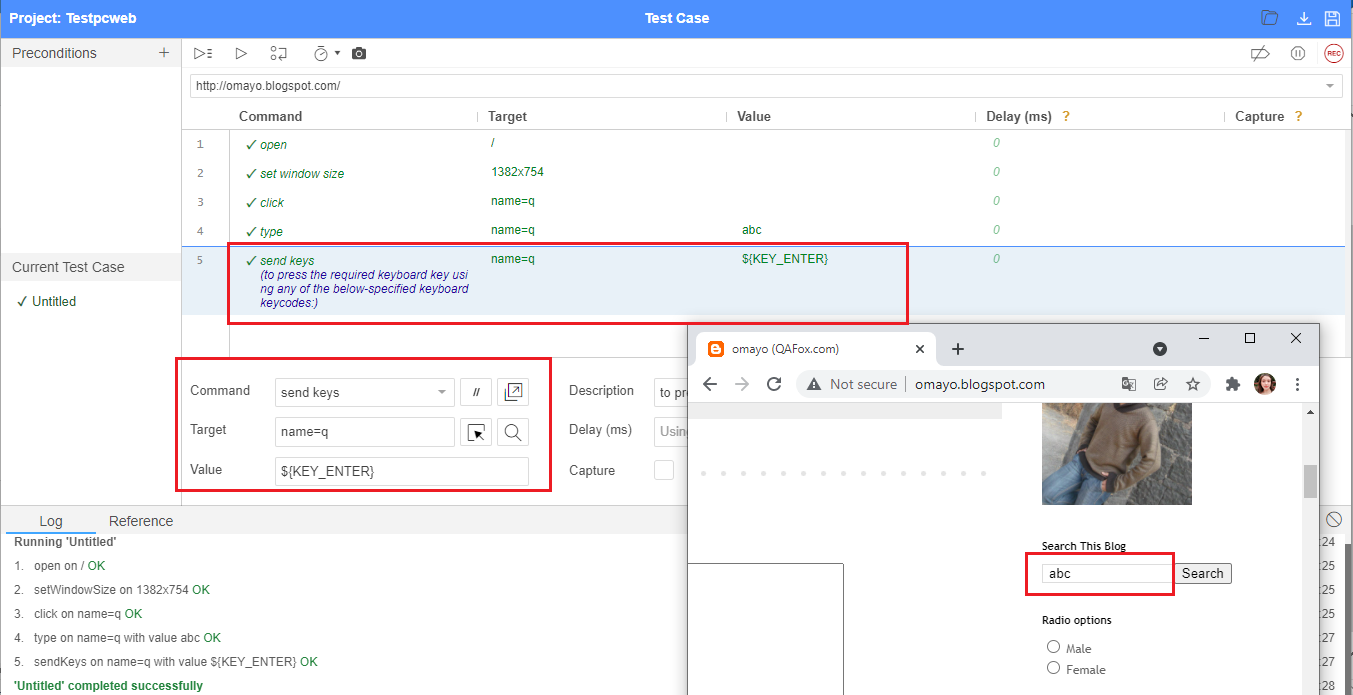
3.56. Send keys command
Send keys is one of the commands in ATOMP Studio web.
The purpose of the send keys command is to press the required keyboard key using any of the below-specified keyboard keycodes:
| Key Code | Function |
| KEY_LEFT | Navigation Left |
| KEY_UP | Navigation Up |
| KEY_RIGHT | Navigation Right |
| KEY_DOWN | Navigation Down |
| KEY_PGUP or KEY_PAGE_UP | Page up |
| KEY_PGDN or KEY_PAGE_DOWN | Page down |
| KEY_BKSP or KEY_BACKSPACE | Backspace |
| KEY_DEL or KEY_DELETE | Delete |
| KEY_ENTER | Enter |
| KEY_TAB | Tab |
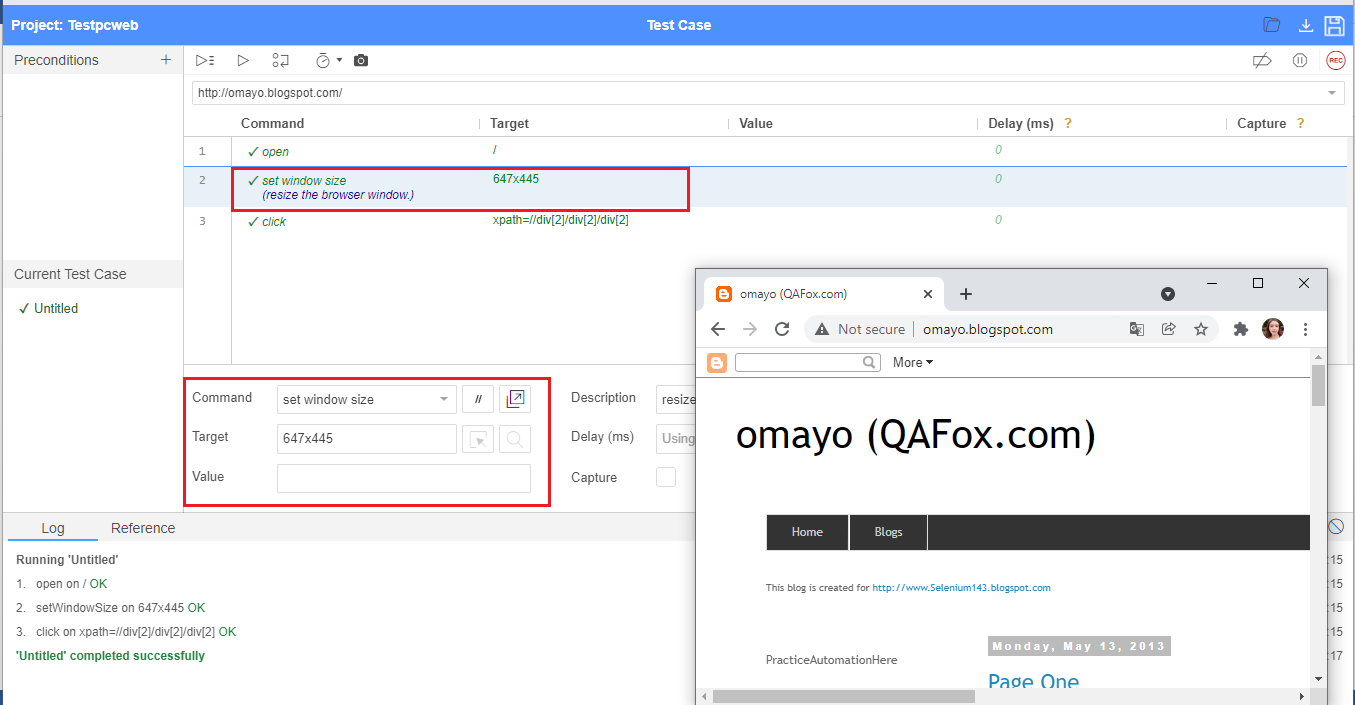
3.57. Set window size command
Set window size is one of the commands in ATOMP Studio web
The purpose of set window size command in ATOMP Studio web, is to resize the browser window.
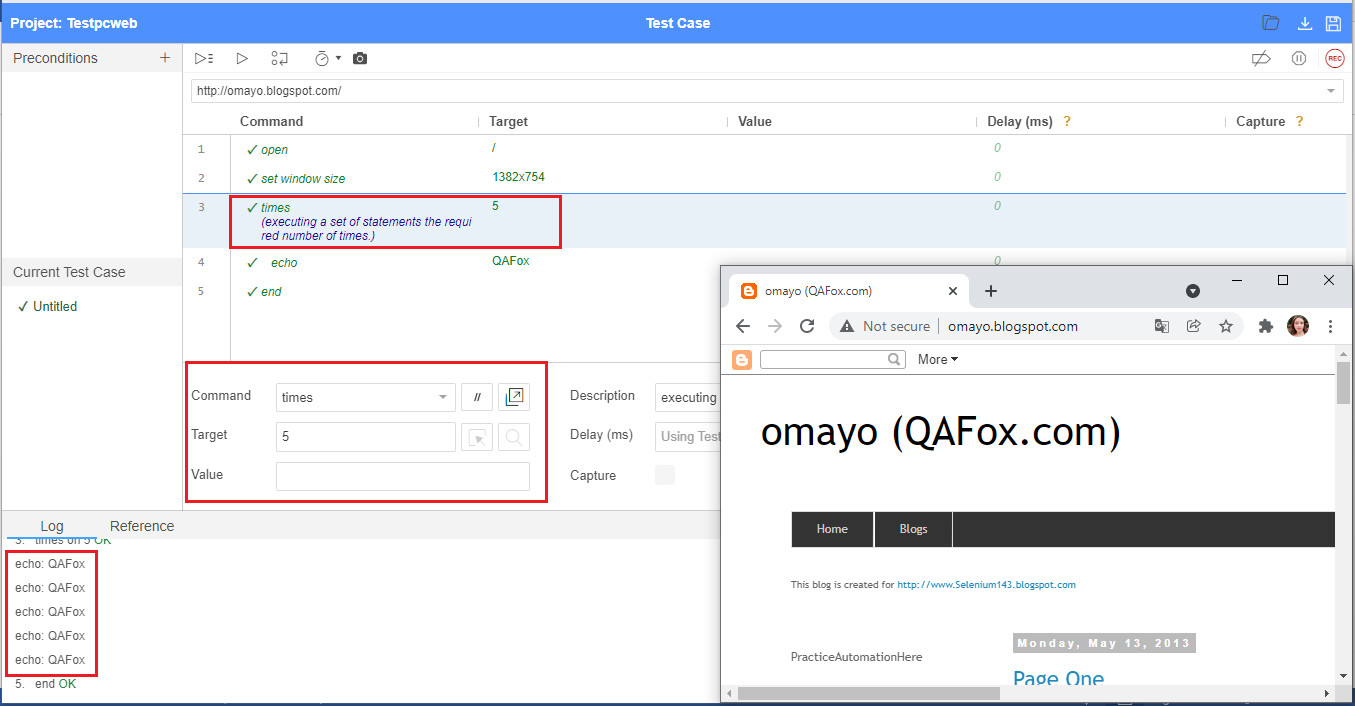
3.58. Times command
Times is one of the commands in ATOMP Studio web and we can end it with end command.
Times is the command in ATOMP Studio web used for executing a set of statements the required number of times.
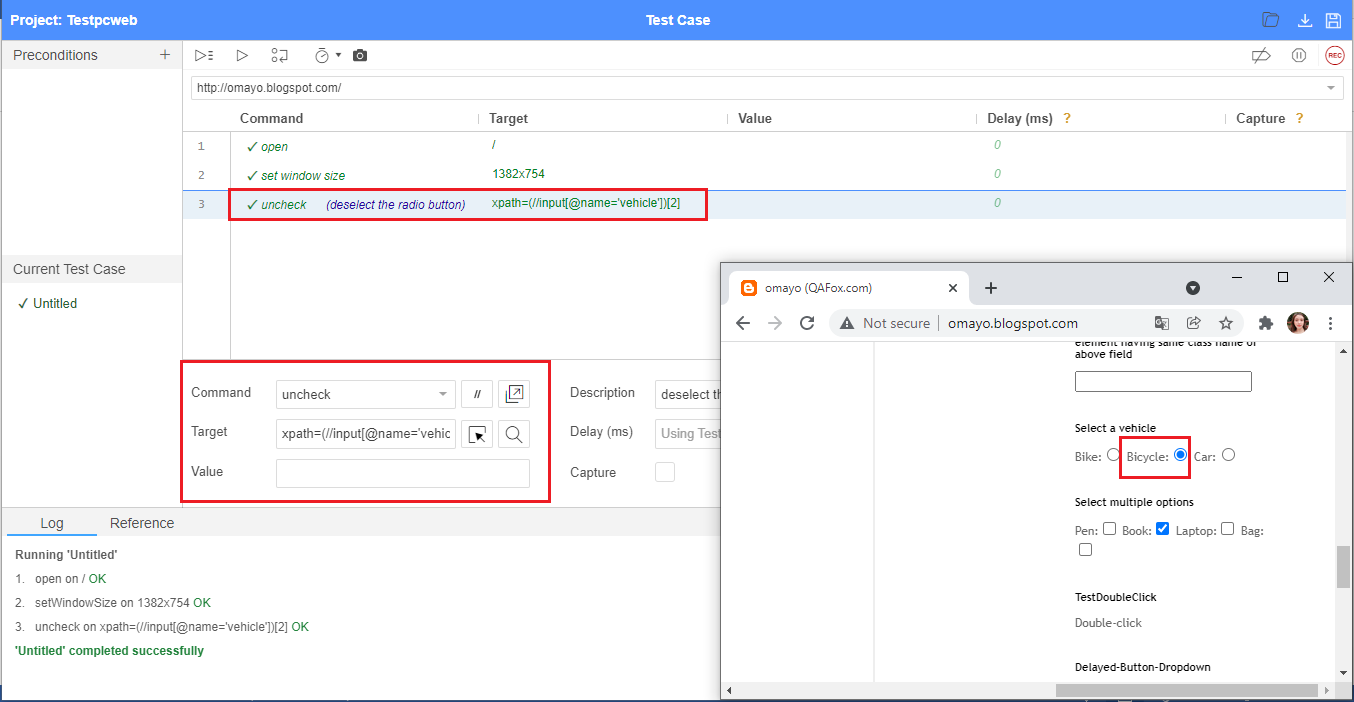
3.59. Uncheck command
Uncheck is one of the commands in ATOMP Studio web.
The purpose of uncheck command in ATOMP Studio web, is to deselect the radio button.
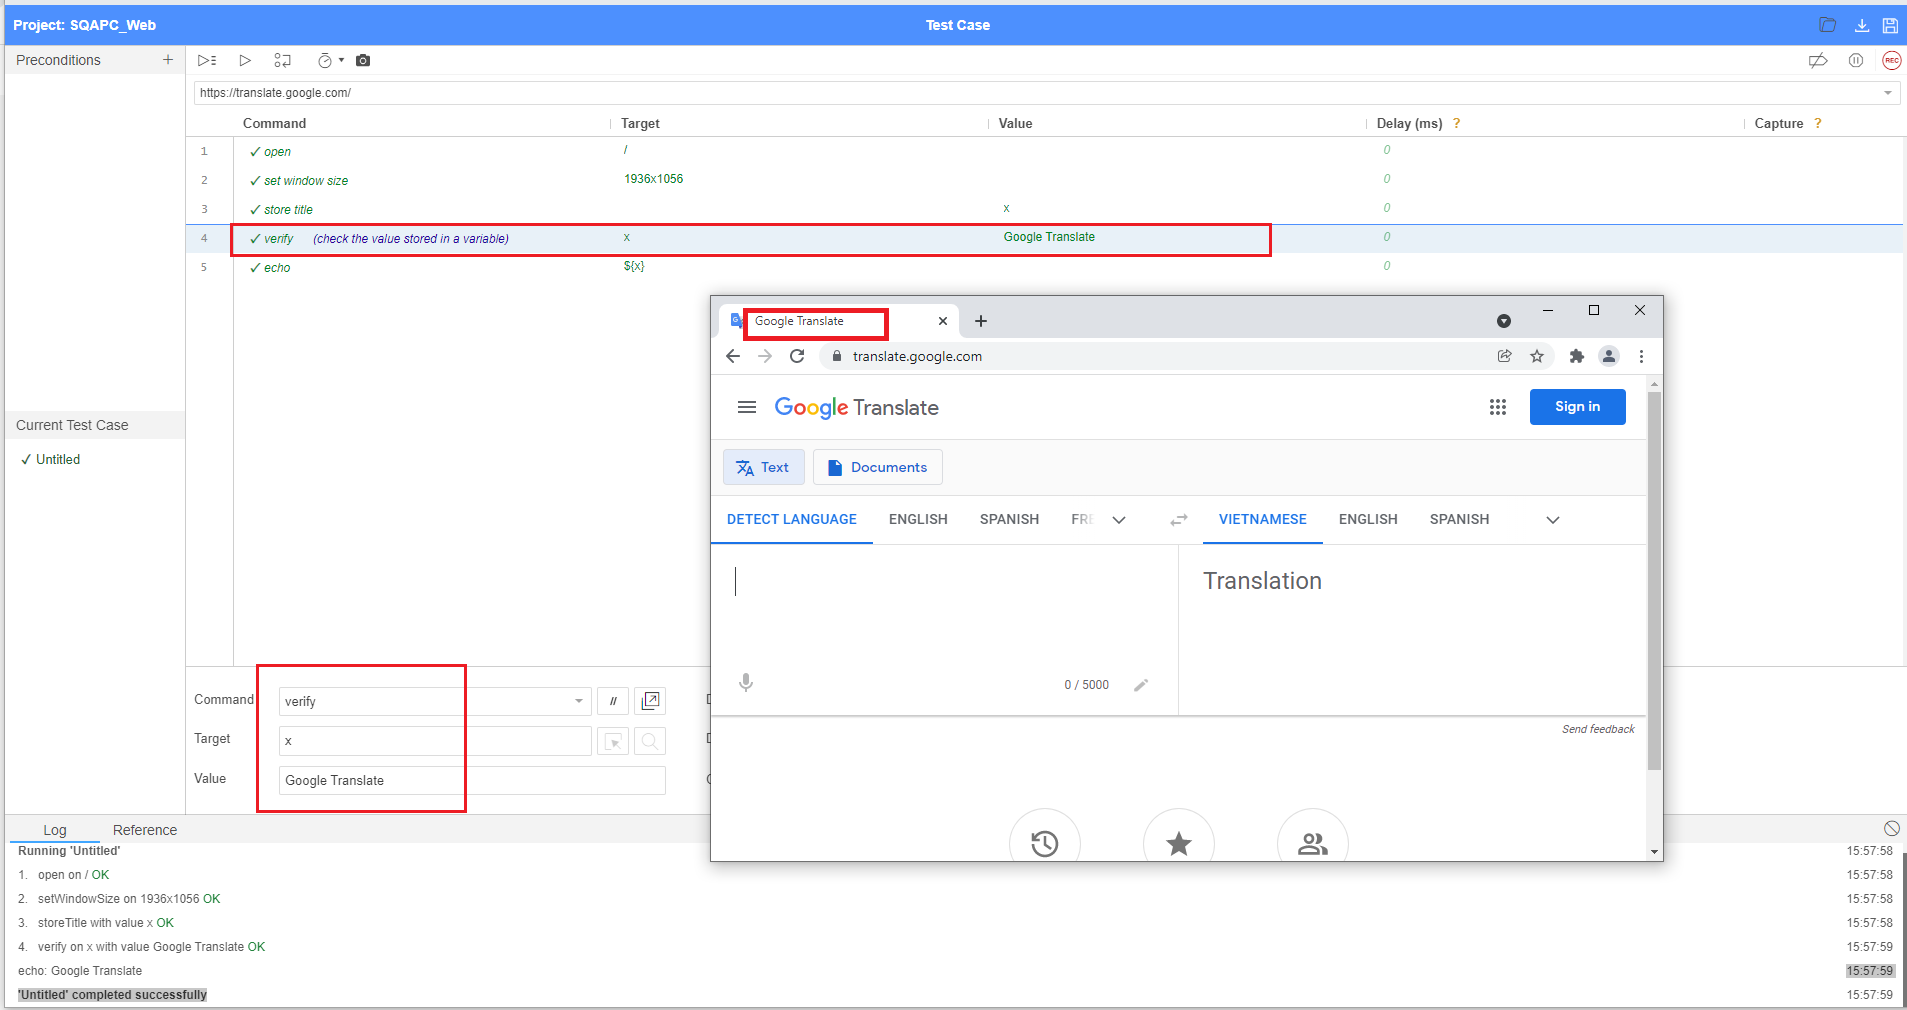
3.60. Verify Command
Verify is one of the commands in ATOMP Studio.
The purpose of the verify command is to check the value stored in a variable is according to the expected result.
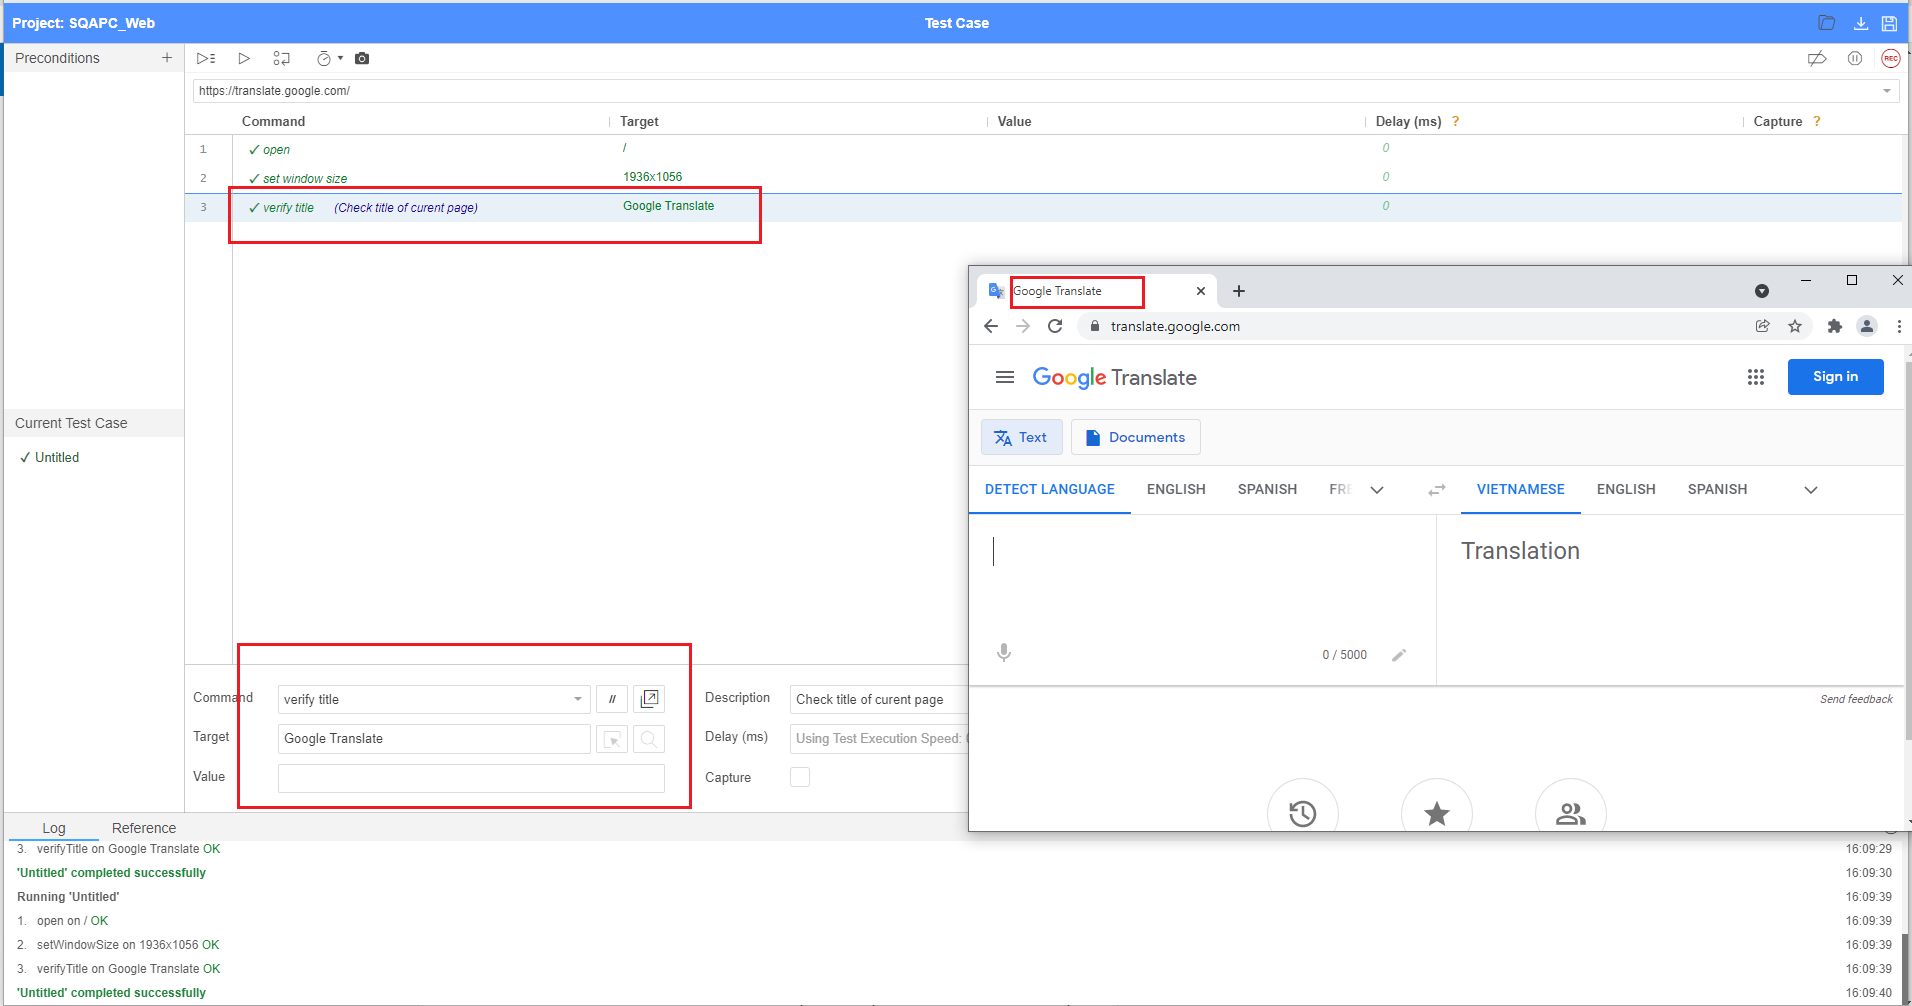
3.61. Verify title command
Verify title is one of the commands in ATOMP Studio.
The purpose of verify title command in ATOMP Studio is to check the title of the current page.
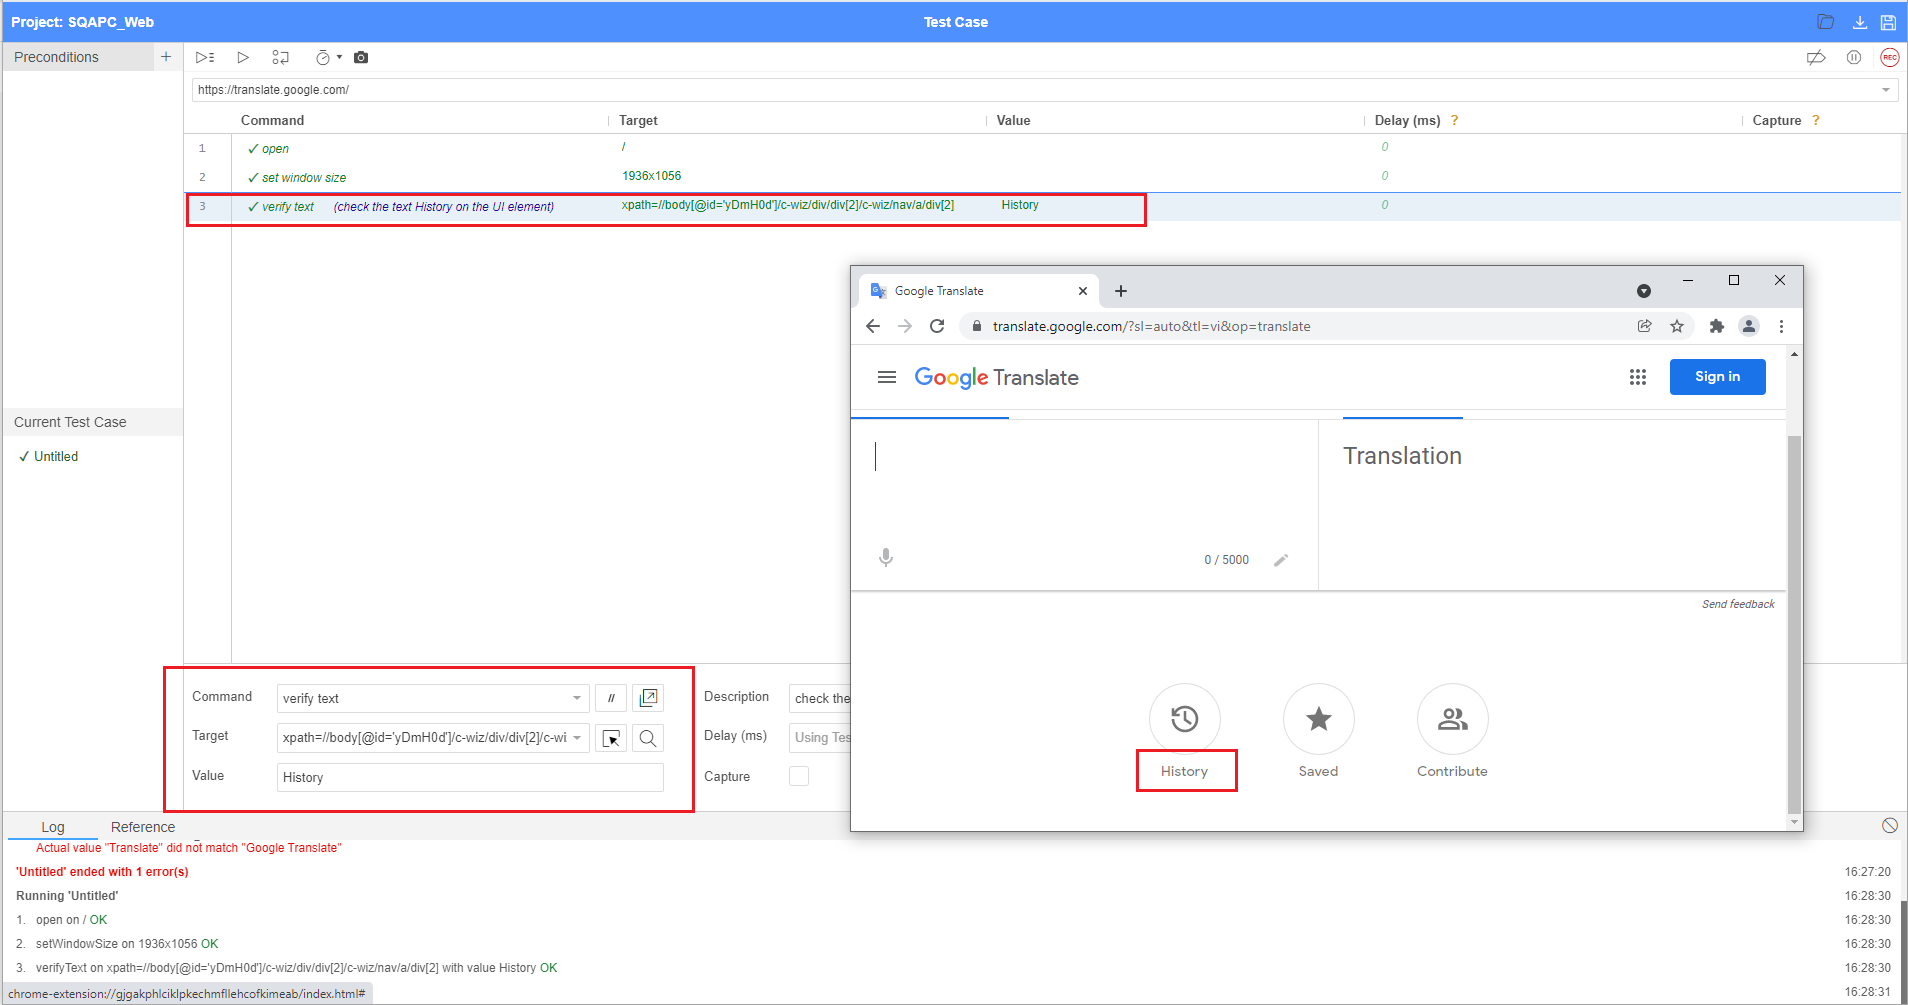
3.62. Verify text Command
Verify text is one of the commands in ATOMP Studio.
The purpose of verify text command in ATOMP Studio, is to check the text on the UI element. (i.e. The text between the HTML tags of the located UI element
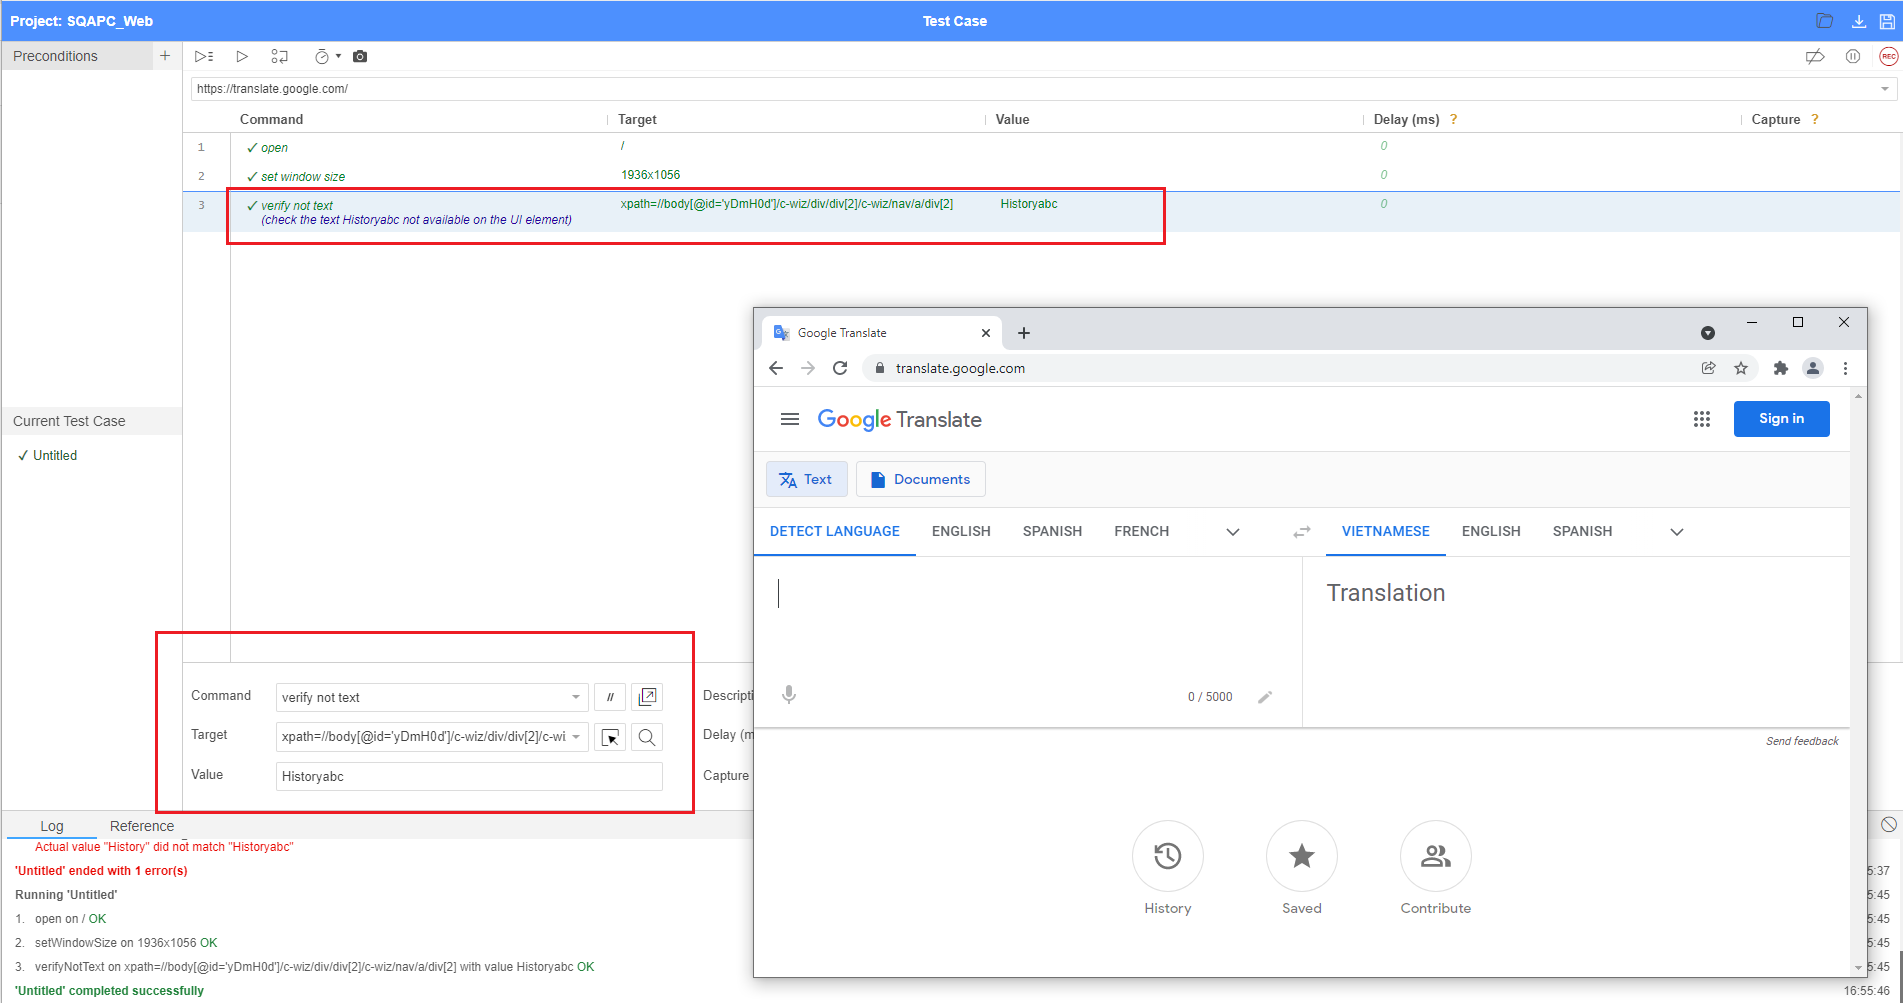
3.63. Verify not text command
Verify not text is one of the commands in ATOMP Studio and is the opposite of verify text command.
The purpose of verify not text command in ATOMP Studio, is to check that the given text is not available on the UI element. (i.e. The text between the HTML tags of the located UI element)
3.64. Verify selected value command
Verify selected value is one of the commands in ATOMP Studio.
The purpose of verify selected value command in ATOMP Studio, is to check whether the given option is selected in the dropdown field.

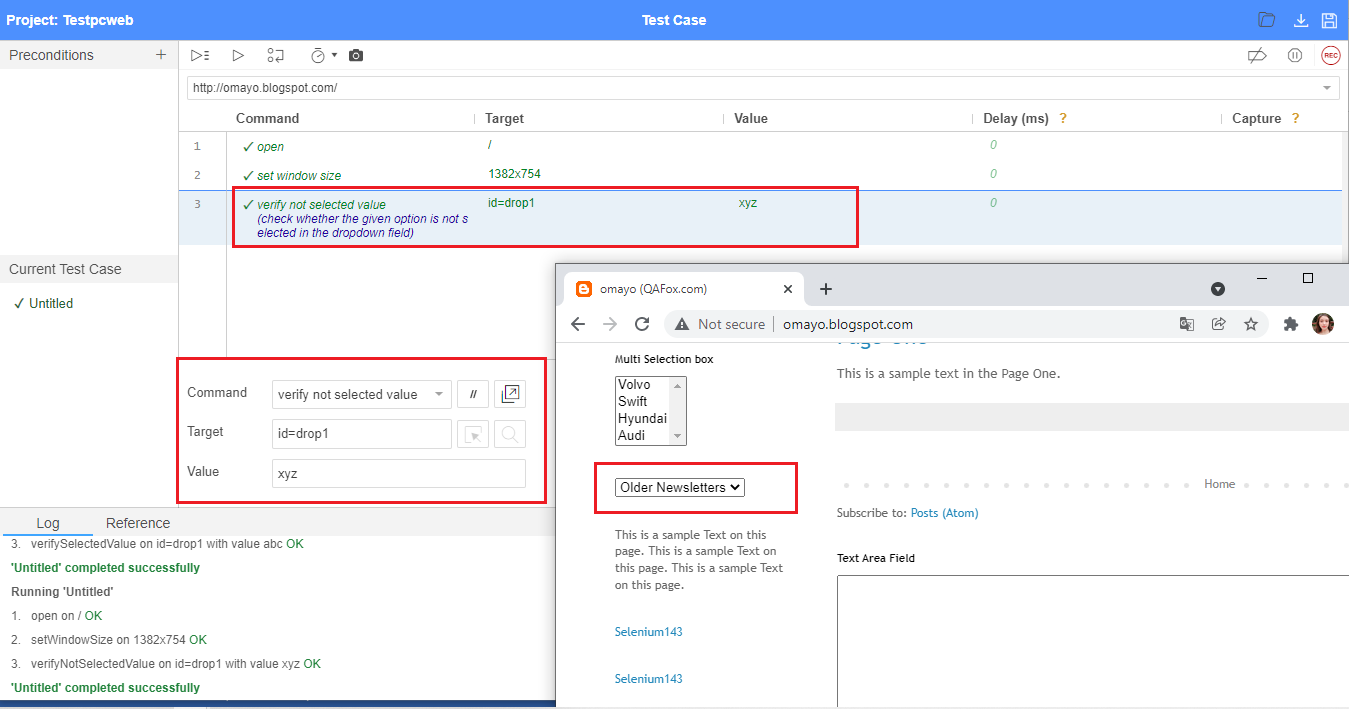
3.65. Verify not selected value command
Verify not selected value is one of the commands in ATOMP Studio. This option works in opposite to the verify selected value command.
The purpose of verify not selected value command in ATOMP Studio, is to check whether the given option is not in the selected state in dropdown field.
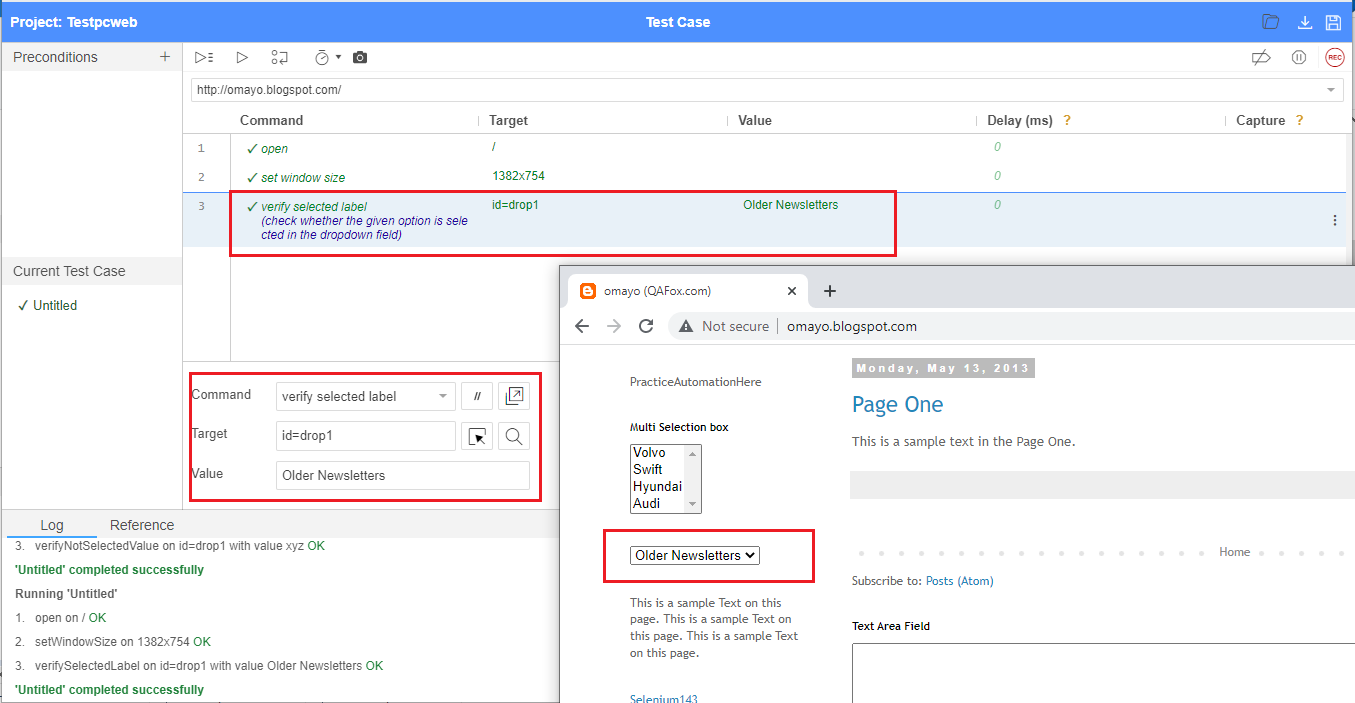
3.66. Verify selected label command
Verify selected label is one of the commands in ATOMP Studio.
The purpose of verify selected label command in ATOMP Studio, is to check whether the given option is selected in the dropdown field using its label text or display text.
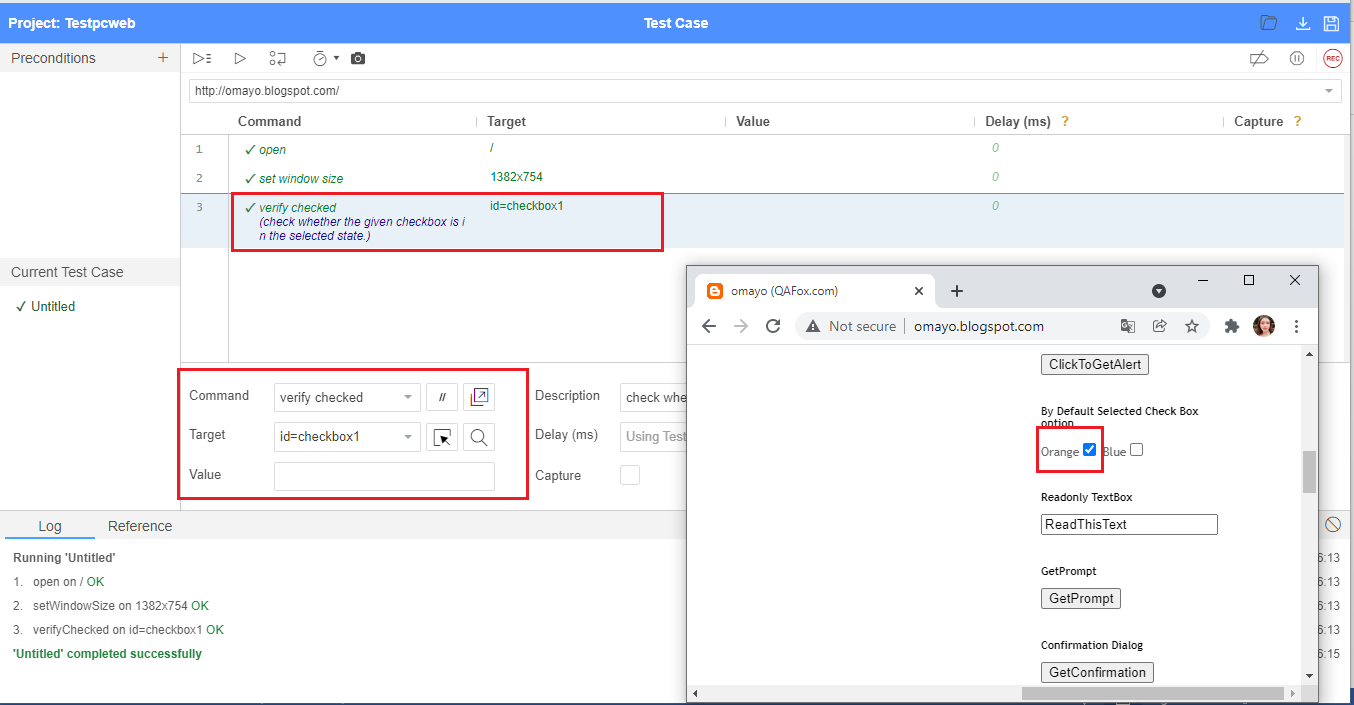
3.67. Verify checked command
Verify checked is one of the commands in ATOMP Studio.
The purpose of verify checked command in ATOMP Studio, is to check whether the given checkbox is in the selected state.
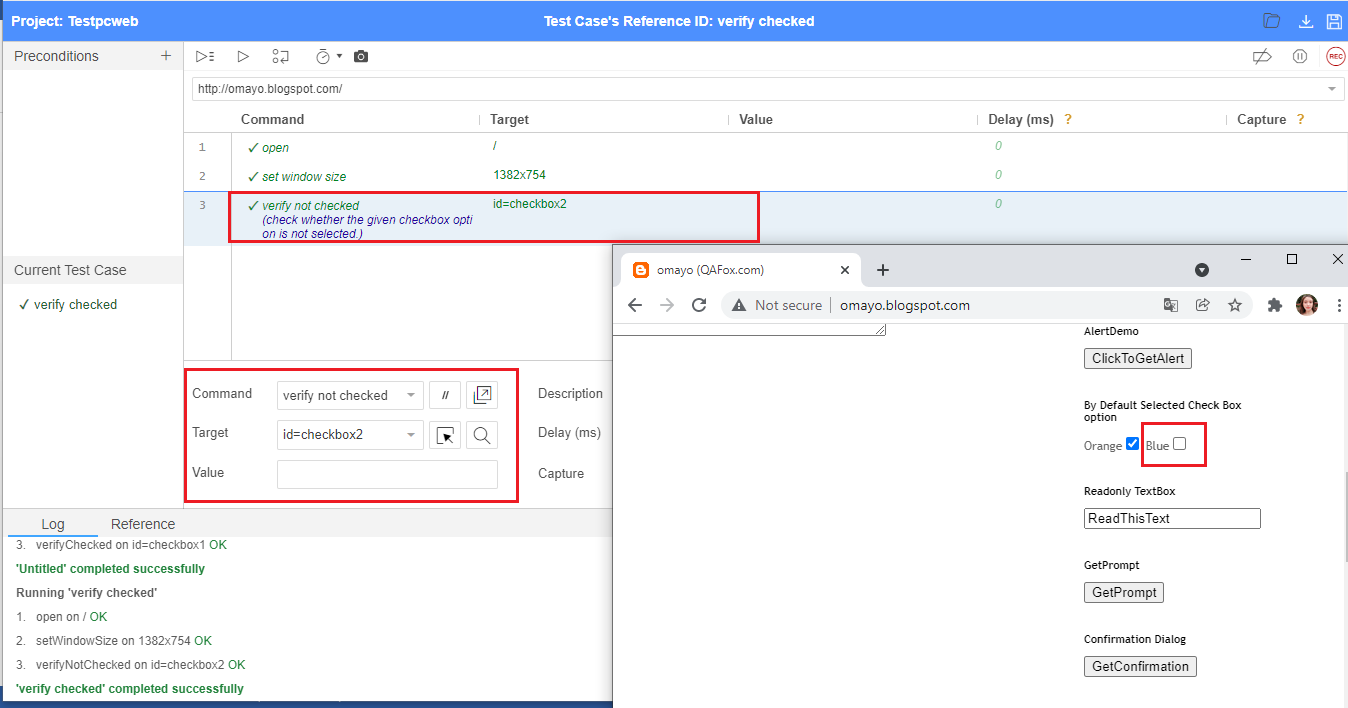
3.68. Verify not checked command
Verify not checked is one of the commands in ATOMP Studio.
The purpose of verify not checked command in ATOMP Studio, is to check whether the given checkbox option is not selected.
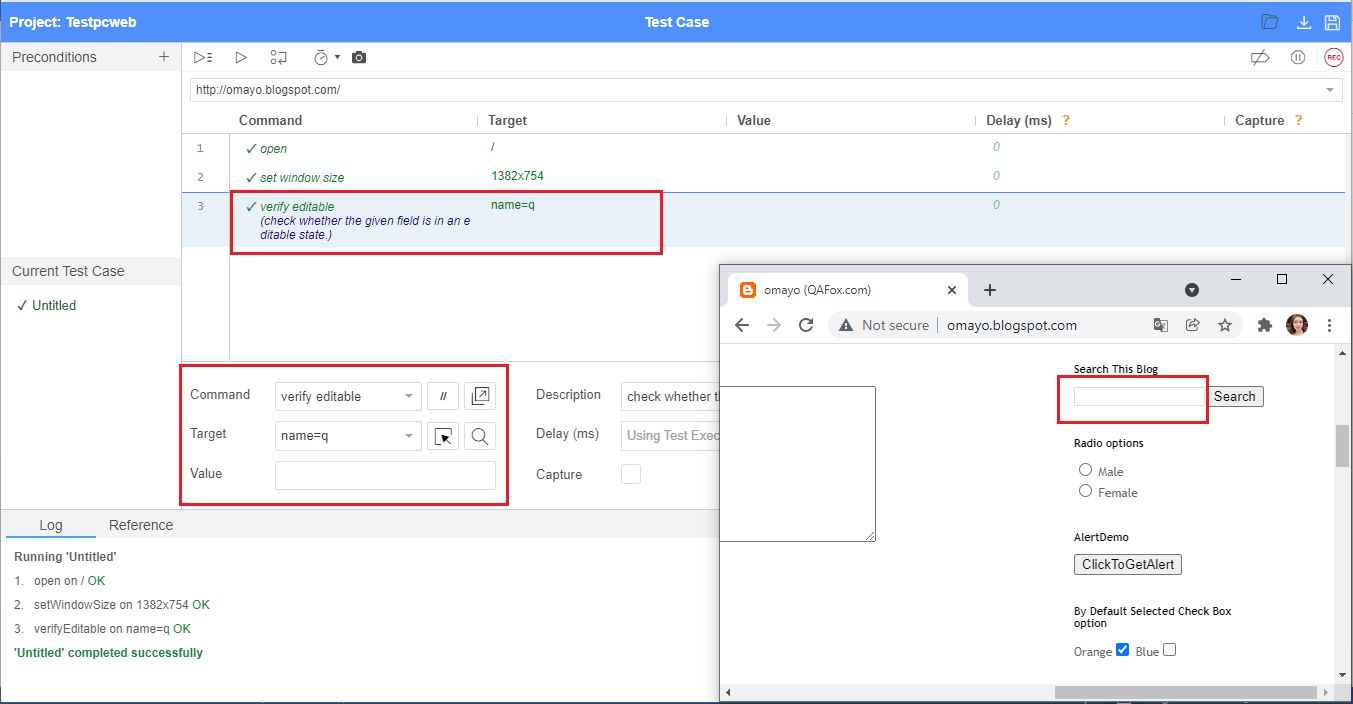
3.69. Verify editable command
Verify editable is one of the commands in ATOMP Studio.
The purpose of verify editable command in ATOMP Studio, is to check whether the given field is in an editable state.
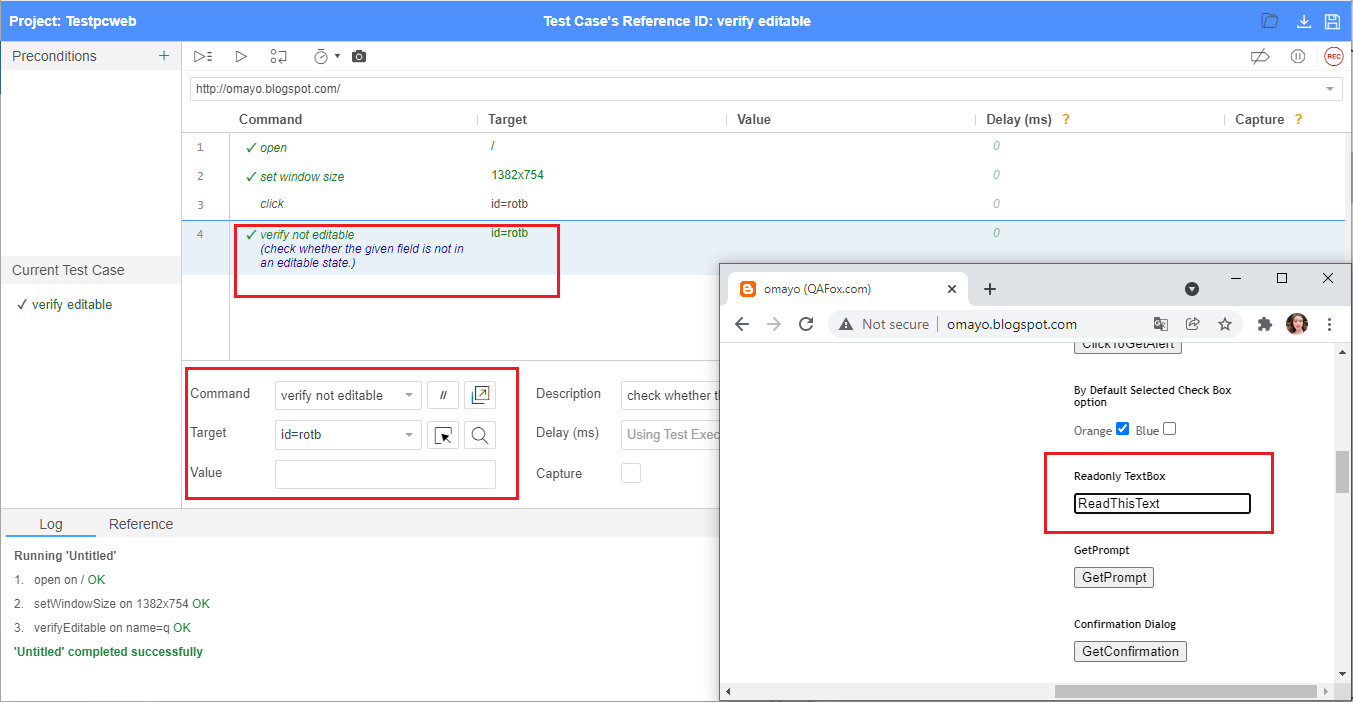
3.70. Verify not editable command
Verify not editable is one of the commands in ATOMP Studio.
The purpose of verify not editable command in ATOMP Studio, is to check whether the given field is not in an editable state.
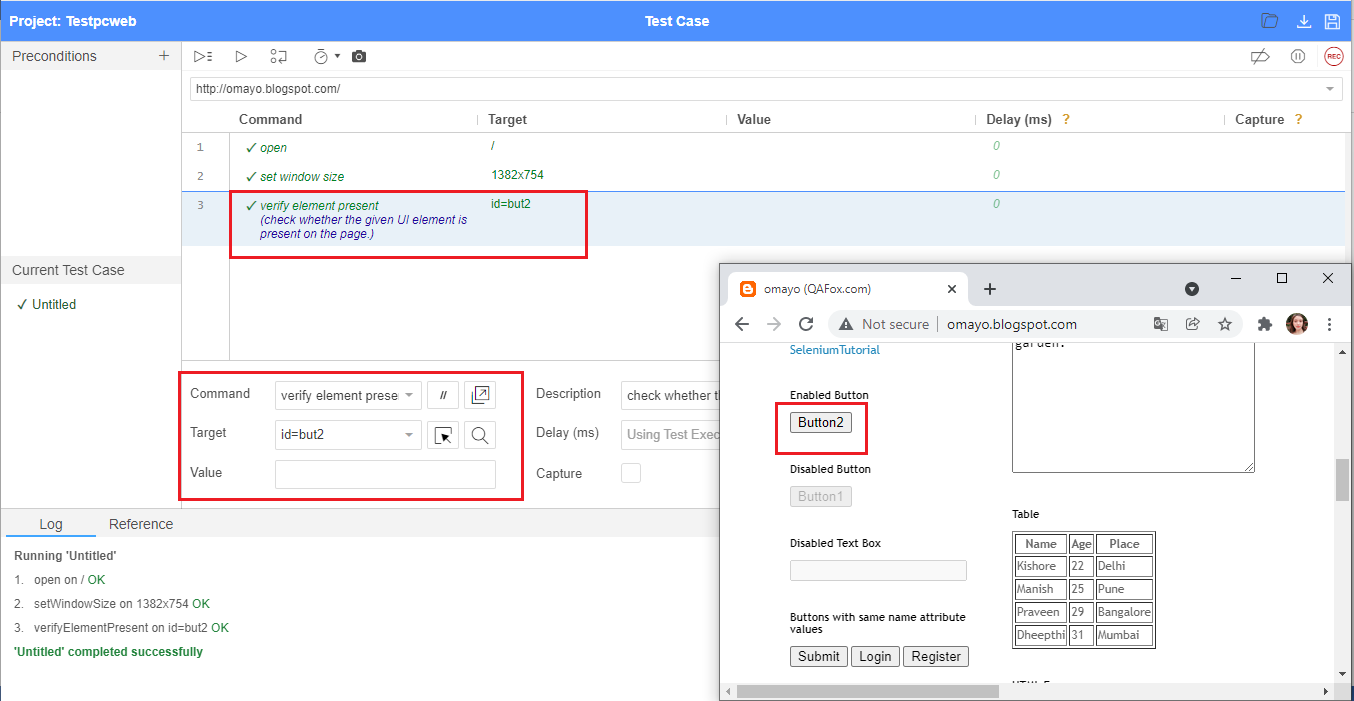
3.71. Verify element present command
Verify element present is one of the commands in ATOMP Studio.
The purpose of verify element present command in ATOMP Studio, is to check whether the given UI element is present on the page.
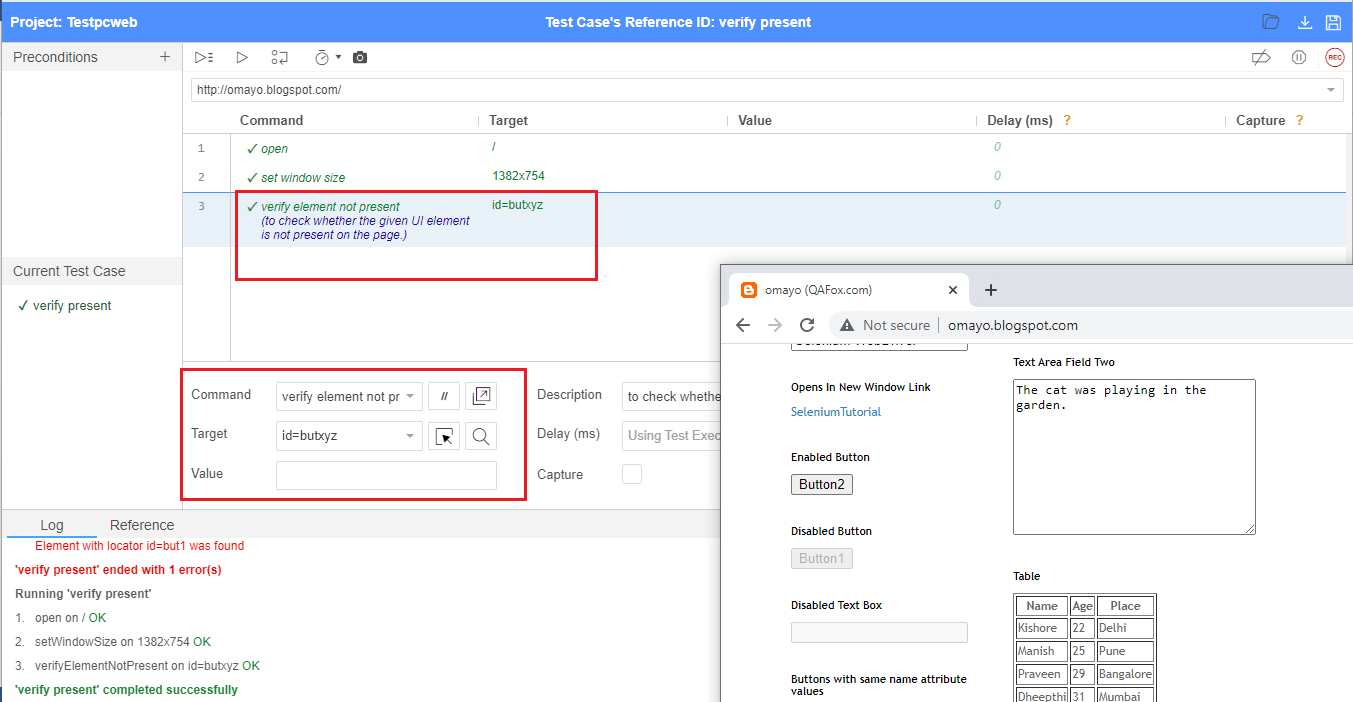
3.72. Verify element not present command
Verify element not present is one of the commands in ATOMP Studio.
The purpose of verify element not present command in ATOMP Studio, is to check whether the given UI element is not present on the page.
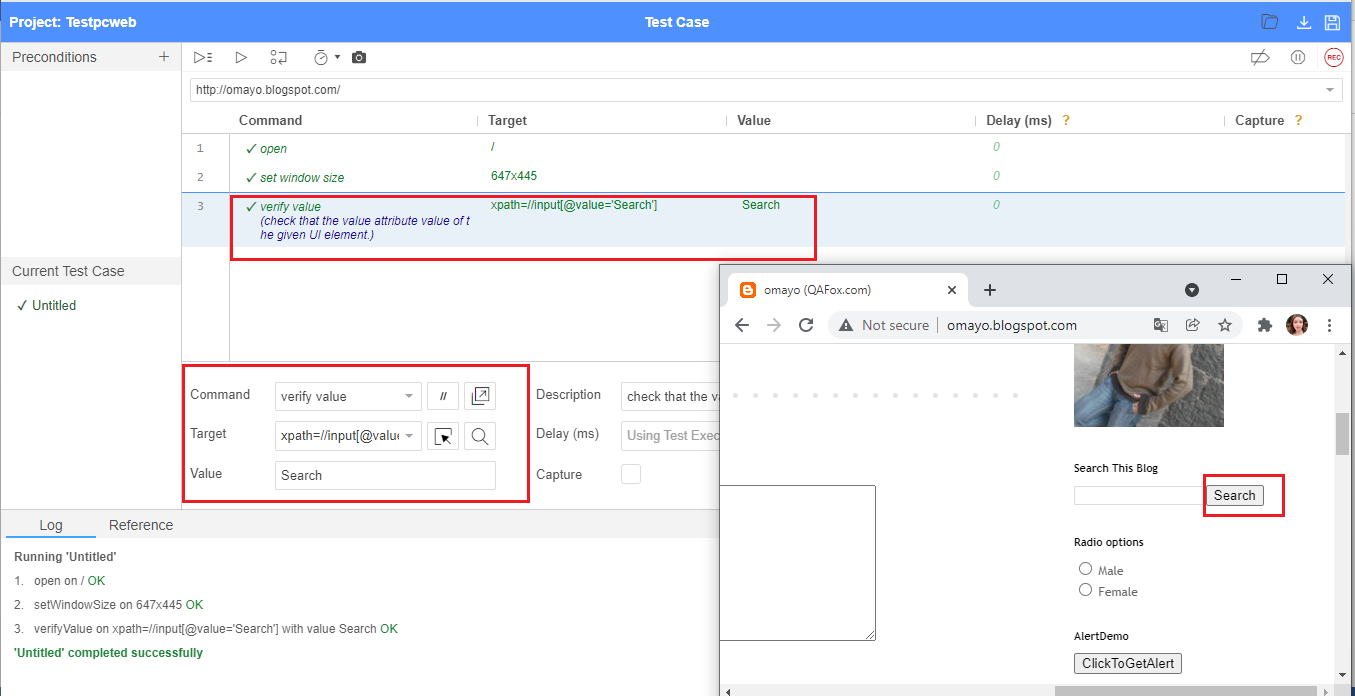
3.73. Verify value command
Verify value is one of the commands in ATOMP Studio.
The purpose of verify value command in ATOMP Studio, is to check that the value attribute value of the given UI element.
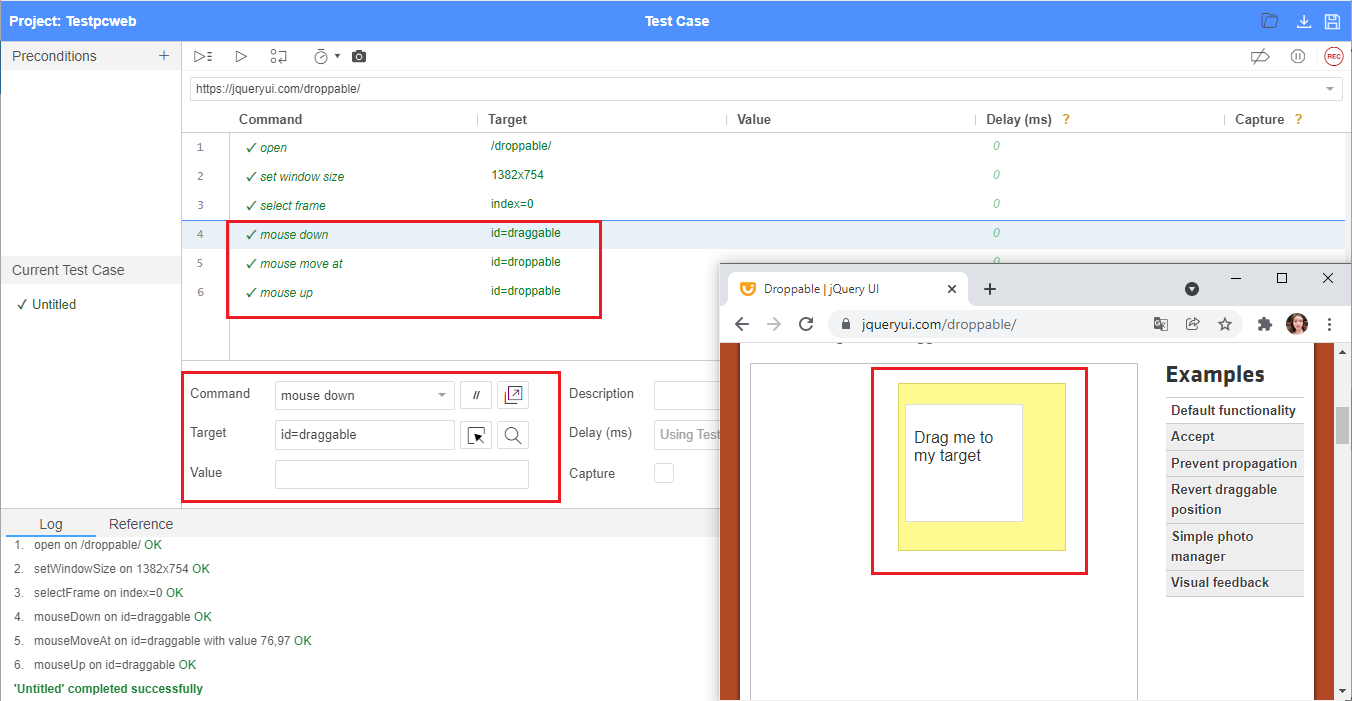
3.74. Mouse down, mouse move at and mouse up command
Mouse down, mouse move at and mouse up are commands in ATOMP Studio web.
- The purpose of the mouse down command is to perform mouse left click operation.
- The purpose of the mouse move at command is to move the holder UI element to the target element.
- The purpose of the mouse up command is to release the mouse click to release the so far held UI element to the desired element in ATOMP Studio web.
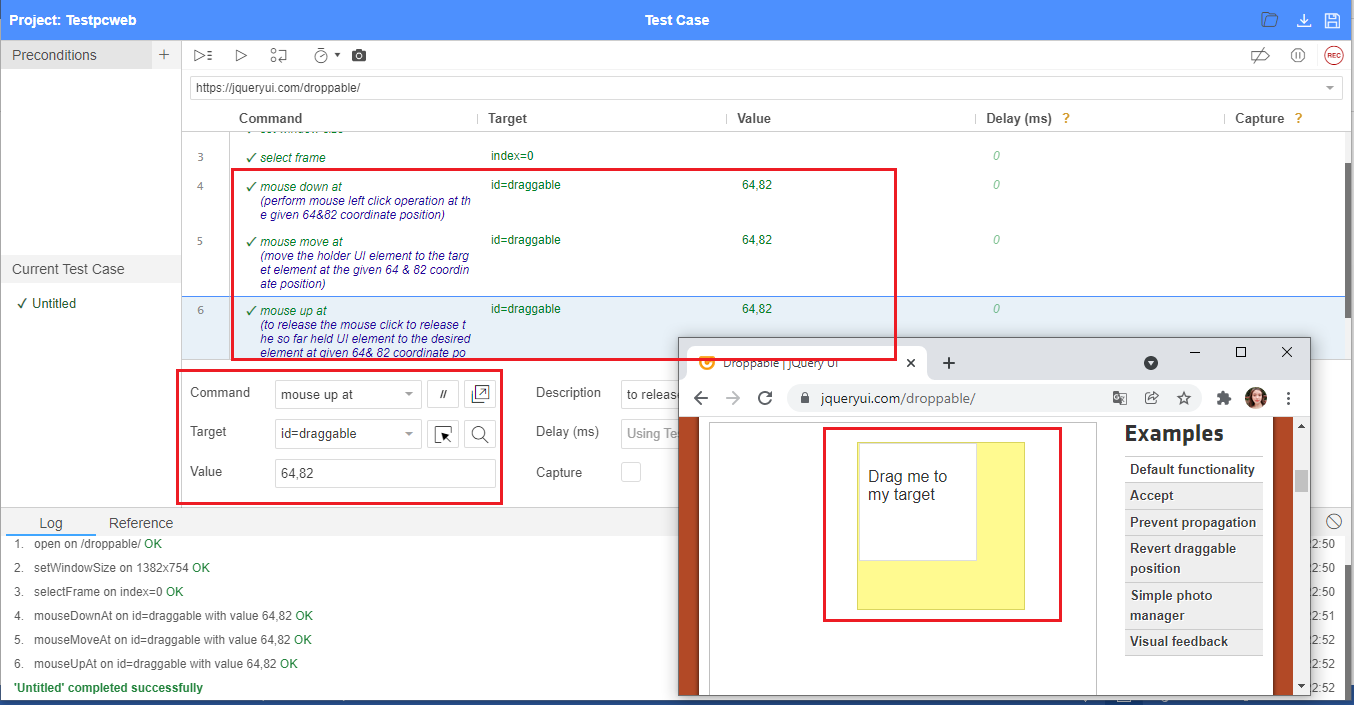
3.75. Mouse down at, mouse move at and mouse up at command
Mouse down at, mouse move at and mouse up at are commands in ATOMP Studio web.
- The purpose of the mouse down at command is to perform mouse left click operation at the given x & y coordinate position.
- The purpose of the mouse move at command is to move the holder UI element to the target element at the given x & y coordinate position.
- The purpose of the mouse up at command is to release the mouse click to release the so far held UI element to the desired element at given x & y coordinate position in ATOMP Studio web.
3.76. Mouse out and Mouse over command
Mouse over and mouse out are the commands in ATOMP Studio web.
The purpose of the mouse over command is to perform mouse the hover action on the given UI element. And the purpose of the mouse out command is to move the mouse outside of the hovered UI element.

3.77. Open command
Open is one of the commands in ATOMP Studio web.
The purpose of open command in ATOMP Studio web, is to open the given Application base URL in the browser.
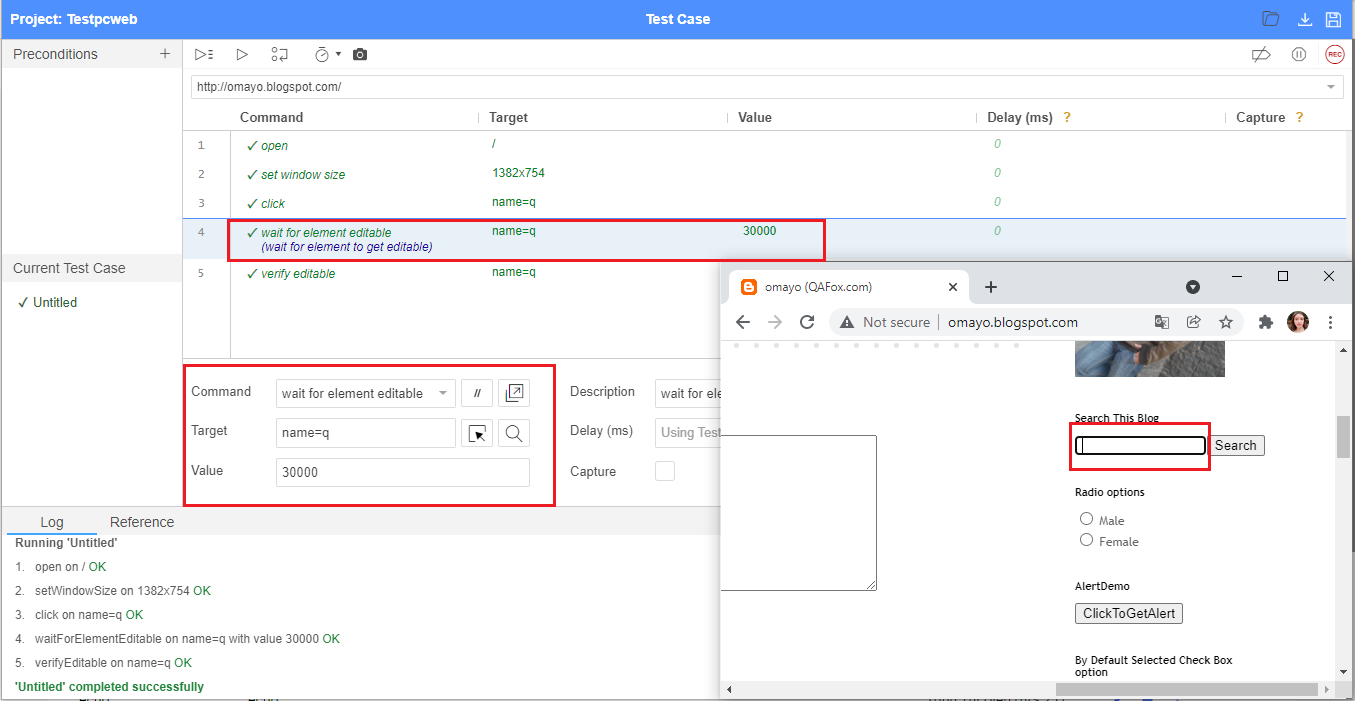
3.78. Wait for element editable command
Wait for element editable is one of the commands in ATOMP Studio.
The purpose of the wait for element editable command is to wait for the element to get editable. i.e. If any required element on the application is by default in non-editable state and gets editable in some time, we can use wait for element editable command to wait for the element to get editable, before editing the element.
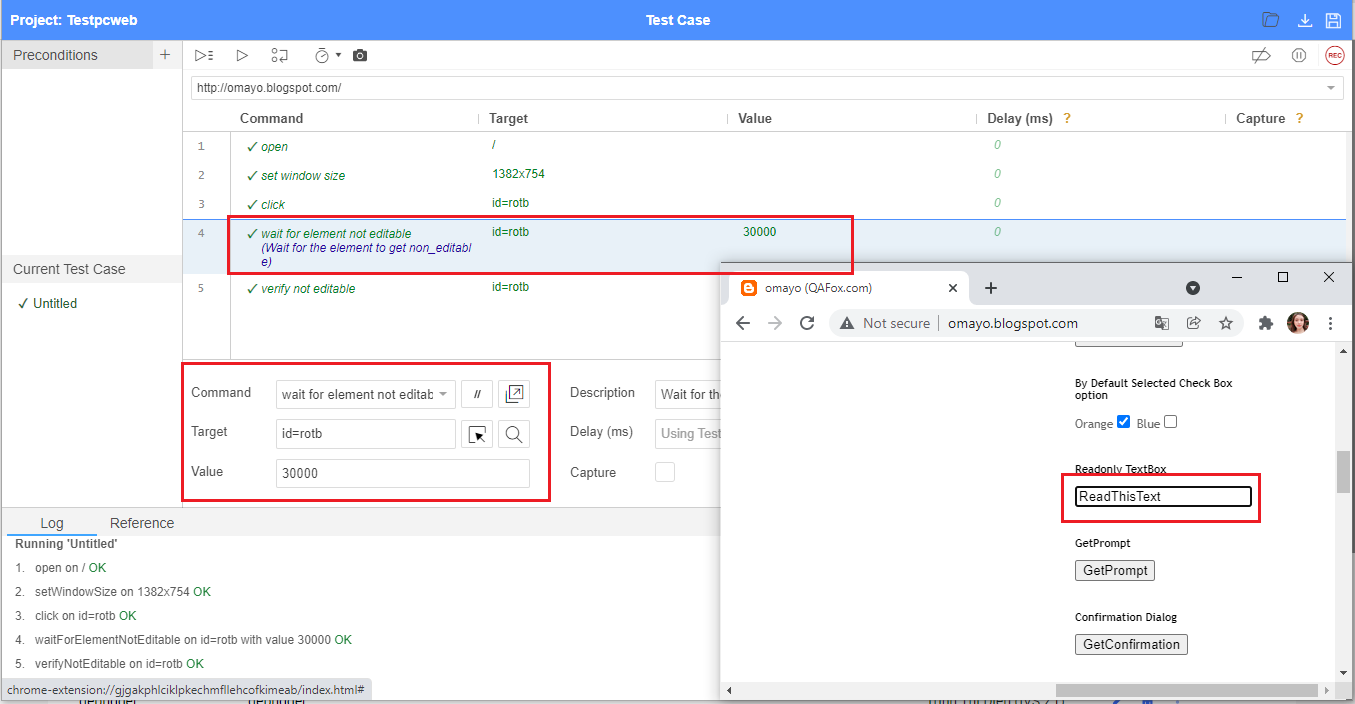
3.79. Wait for element not editable command
Wait for element not editable is one of the commands in ATOMP Studio.
The purpose of the wait for element not editable command is to wait for the element to get non-editable. i.e. If any required element on the application is by default in editable state and gets non-editable in some time, we can use wait for element not editable command to wait for the element to get non-editable.
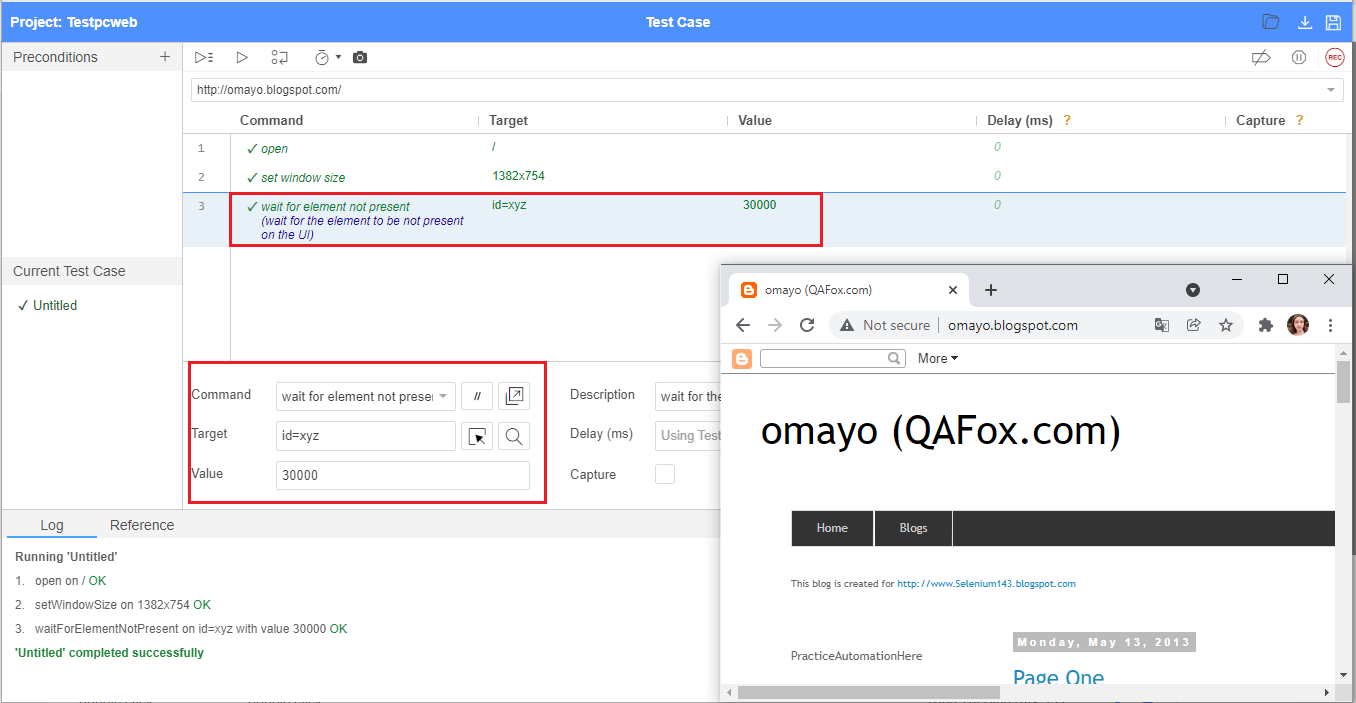
3.80. Wait for element not present command
Wait for element not present is one of the commands in ATOMP Studio.
The purpose of the wait for element not present command is to wait for the element to be not present on the UI and also its HTML code is not present in the HTML DOM of the page.
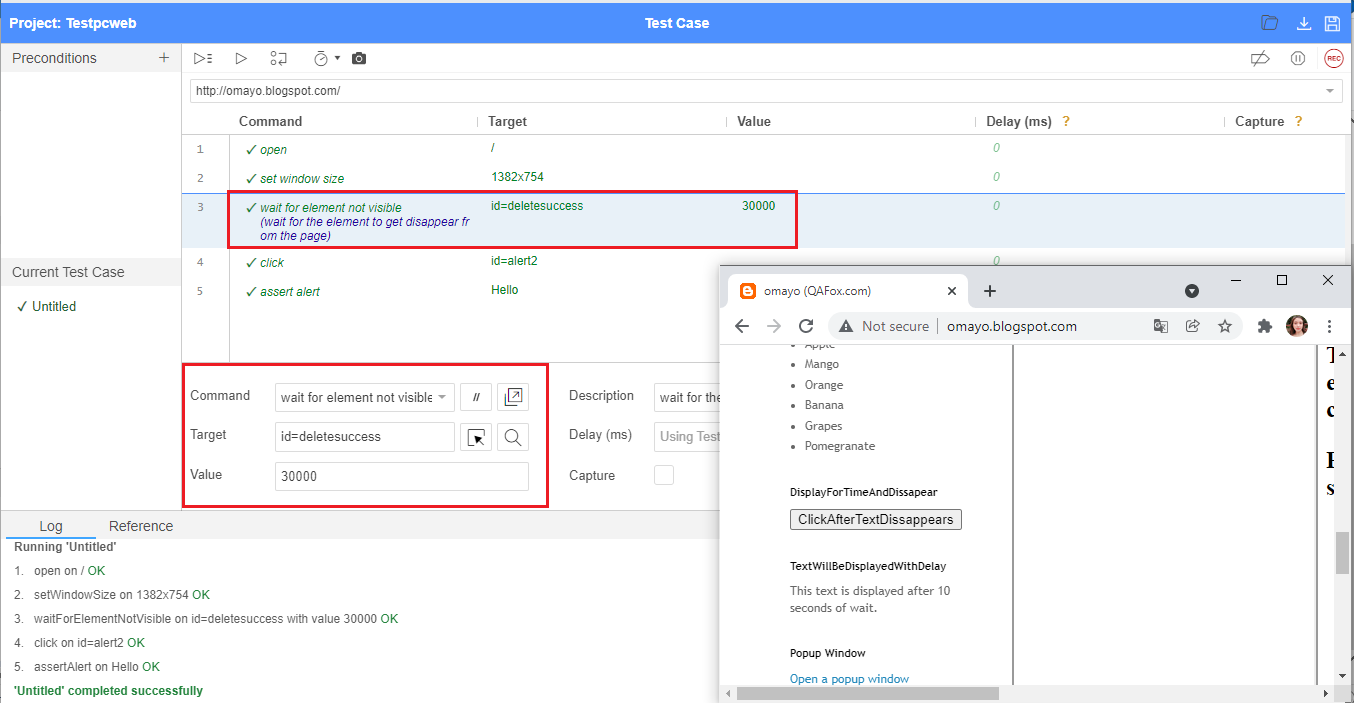
3.81. Wait for element not visible command
Wait for element not visible is one of the commands in ATOMP Studio.
The purpose of the wait for element not visible command is to wait for the element to get disappear from the page i.e. If any required element on the application is by default displayed and then disappear in some time, we can use wait for element not visible command to wait for the element to disappear from the page.
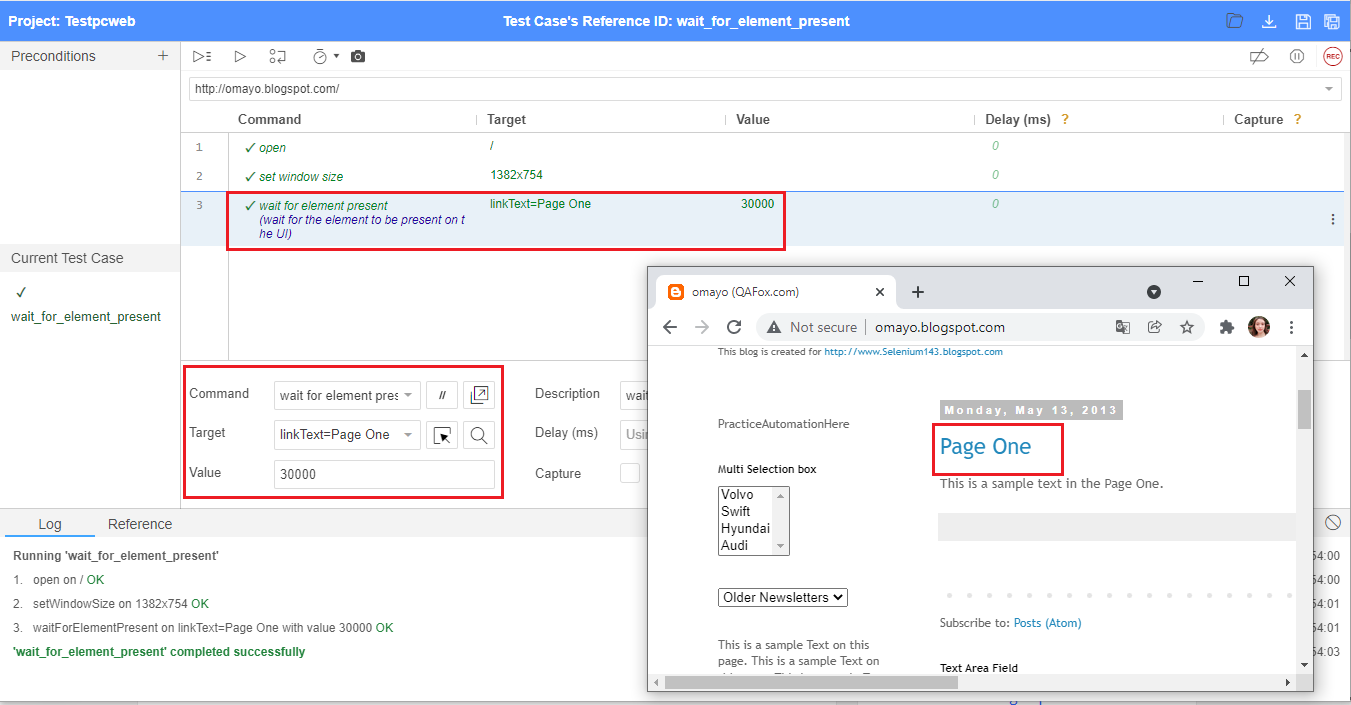
3.82. Wait for element present command
Wait for element present is one of the commands in ATOMP Studio.
The purpose of the wait for element present command is to wait for the element to be present on the UI and also the HTML DOM of the page.
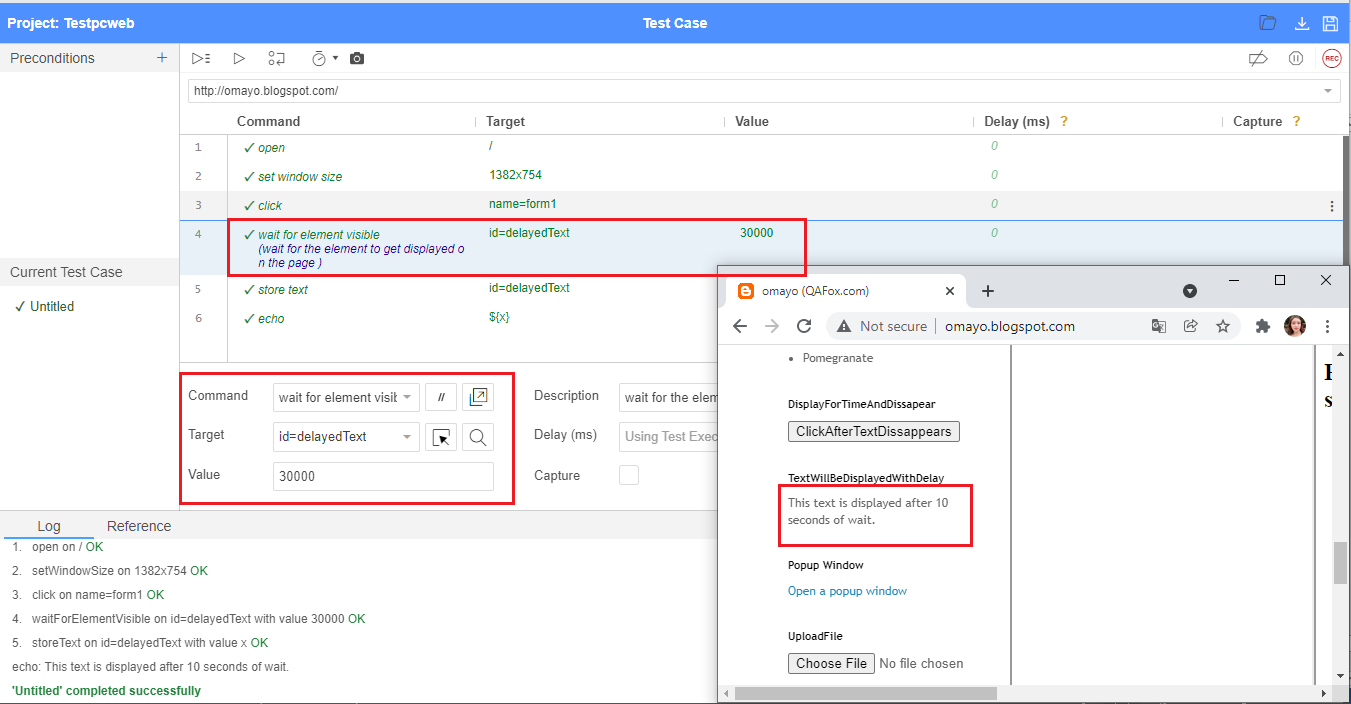
3.83. Wait for element visible command
Wait for element visible is one of the commands in ATOMP Studio.
The purpose of the wait for element visible command is to wait for the element to get displayed on the page i.e. If any required element on the application is by default not displayed and gets displayed in some time, we can use wait for element visible command to wait for the element to get displayed before performing any operation on the element.
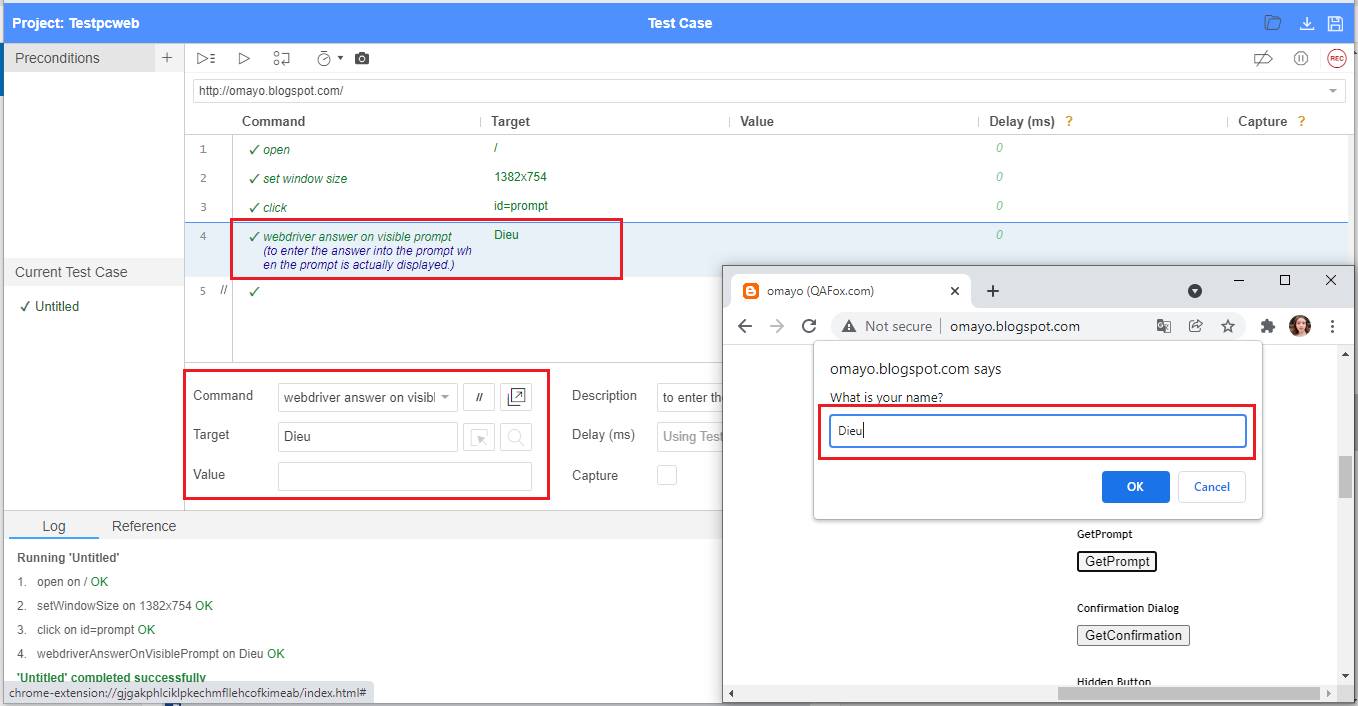
3.84. Webdriver answer on visible prompt command
Webdriver answer on visible prompt is one of the commands in ATOMP Studio.
The purpose of webdriver answer on visible prompt command in ATOMP Studio, is to enter the answer into the prompt when the prompt is actually displayed.
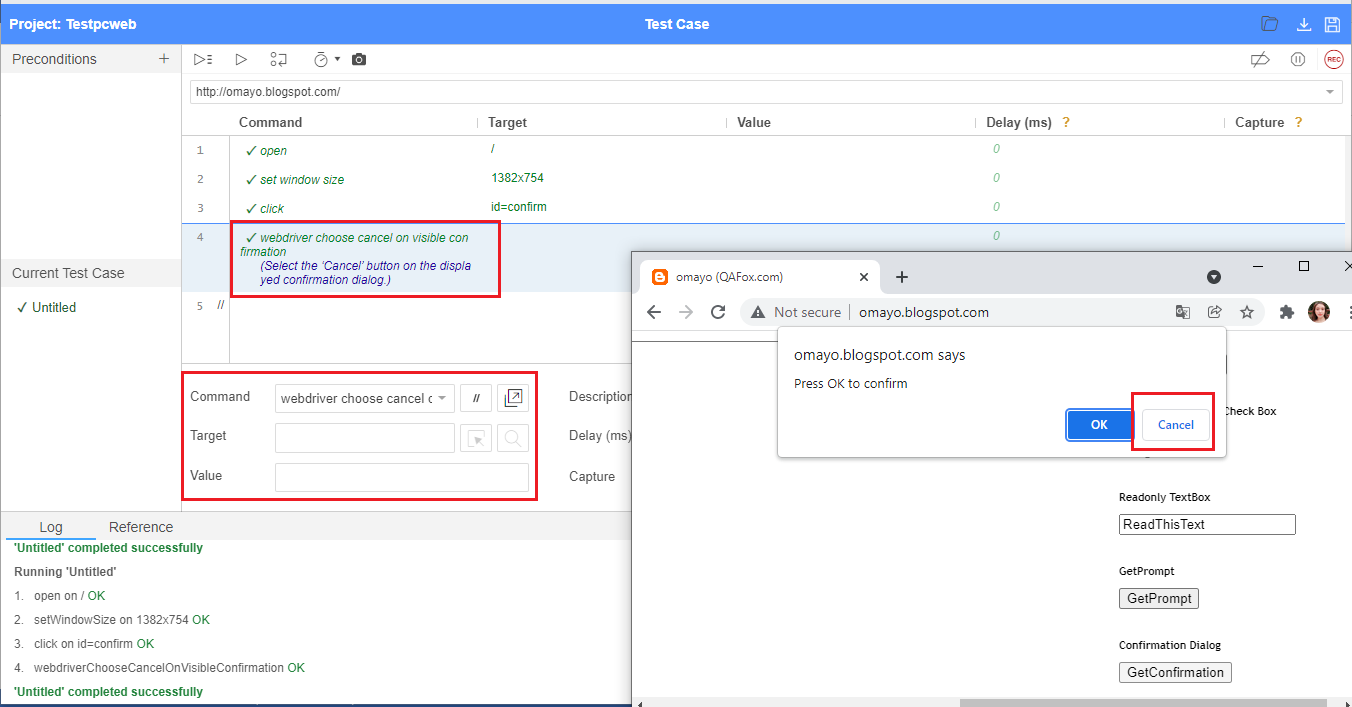
3.85. Webdriver choose cancel on visible confirmation command
Webdriver choose cancel on visible confirmation is one of the commands in ATOMP Studio.
The purpose of webdriver choose cancel on visible confirmation command in ATOMP Studio, is to select the ‘Cancel’ button on the displayed confirmation dialog.
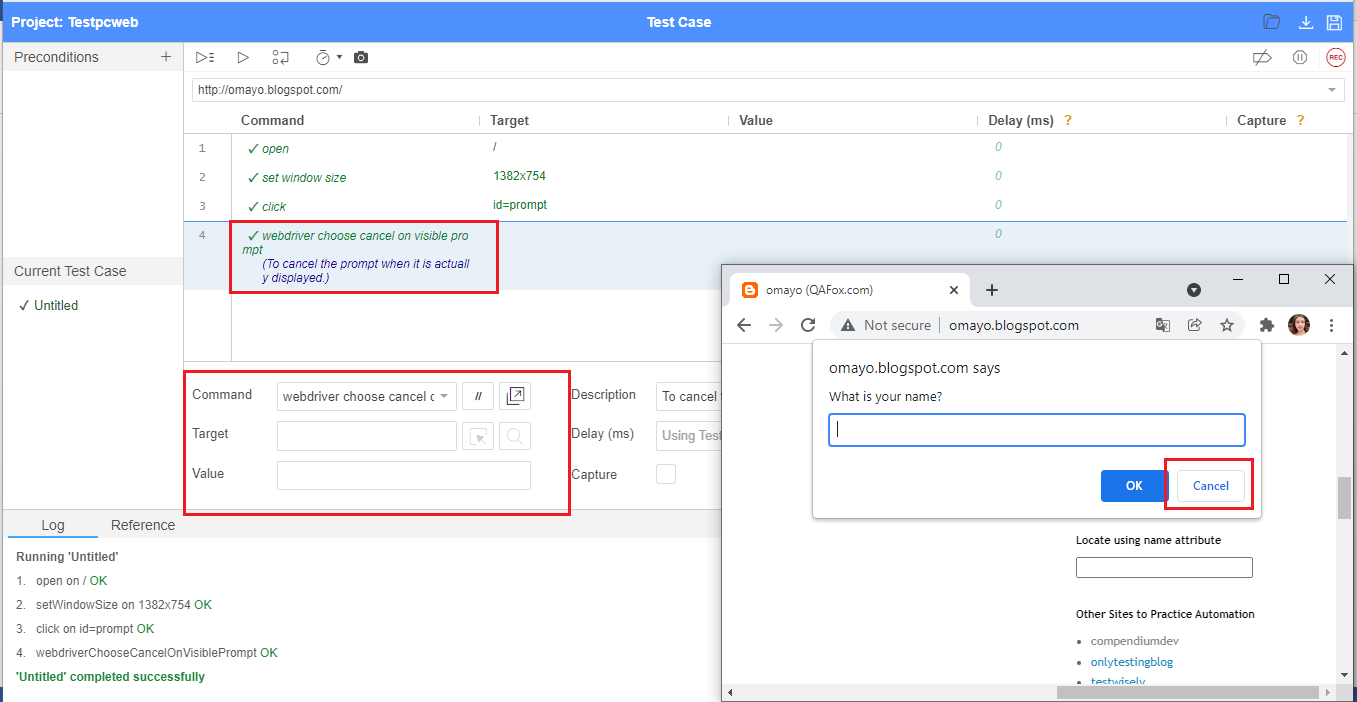
3.86. Webdriver choose cancel on visible prompt command
Webdriver choose cancel on visible prompt is one of the commands in ATOMP Studio.
The purpose of webdriver choose cancel on visible prompt command in ATOMP Studio, is to cancel the prompt when it is actually displayed.
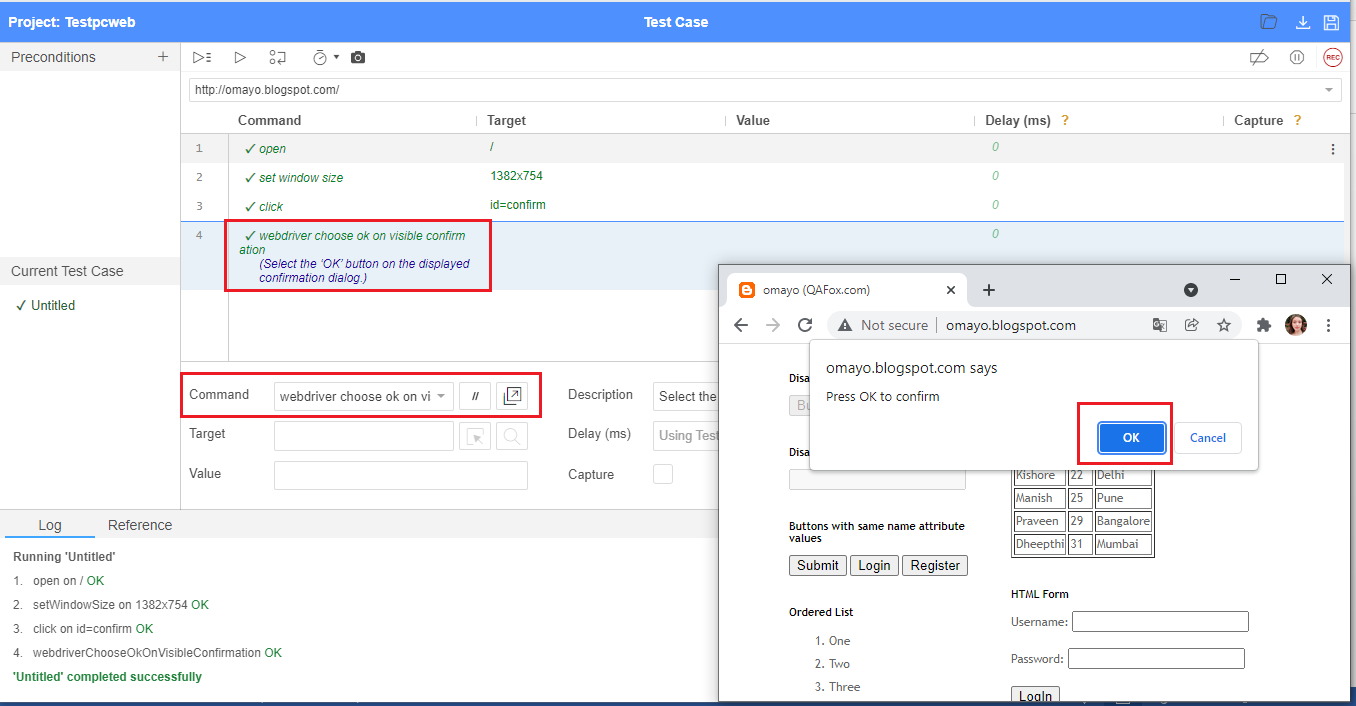
3.87. Webdriver choose OK on visible confirmation command
Webdriver choose ok on visible confirmation is one of the commands in ATOMP Studio.
The purpose of webdriver choose ok on visible confirmation command in ATOMP Studio, is to select the ‘OK’ button on the displayed confirmation dialog.
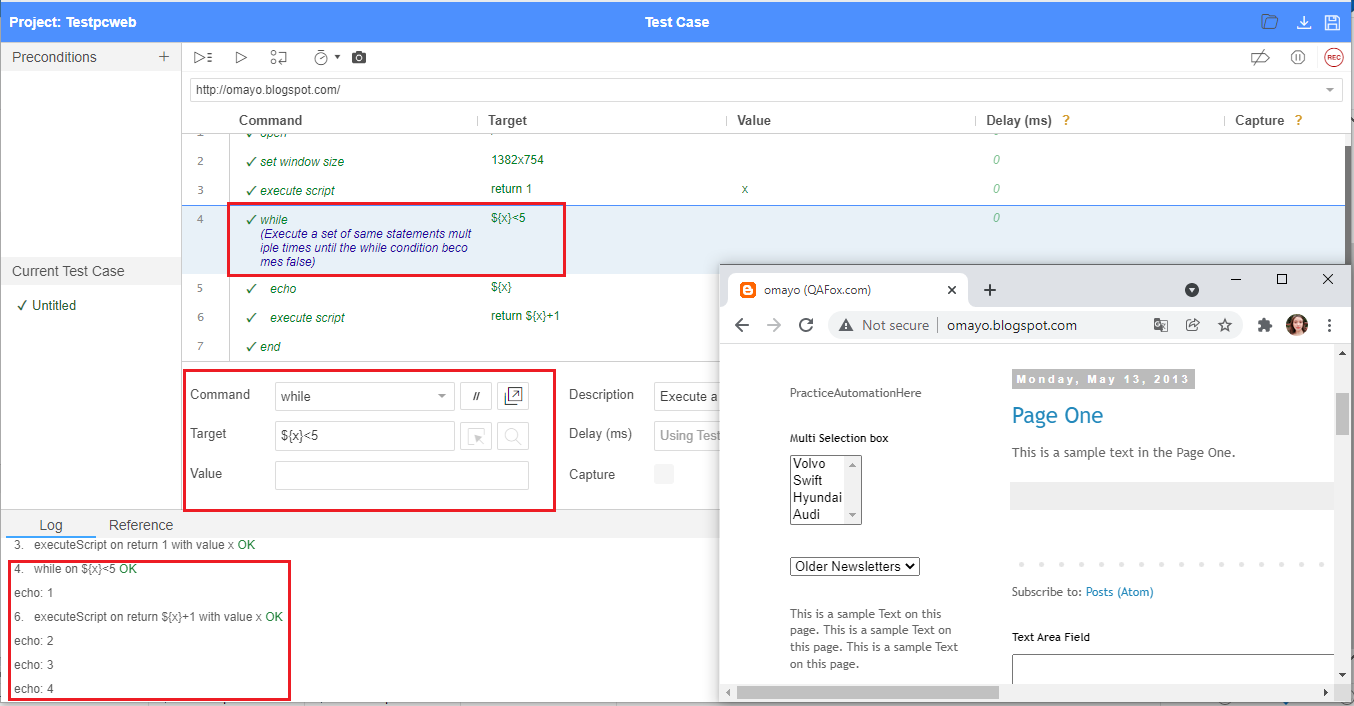
3.88. While command
While is one of the commands in ATOMP Studio and we can end it with end command.
While is the command in ATOMP Studio used for executing a set of same statements multiple times until the while condition becomes false.
3.89. Drag and drop to object command
Drag and drop to object is one of the commands in ATOMP Studio web.
The purpose of drag and drop to object command in ATOMP Studio web, is to drag an UI element and drop it at another UI element.
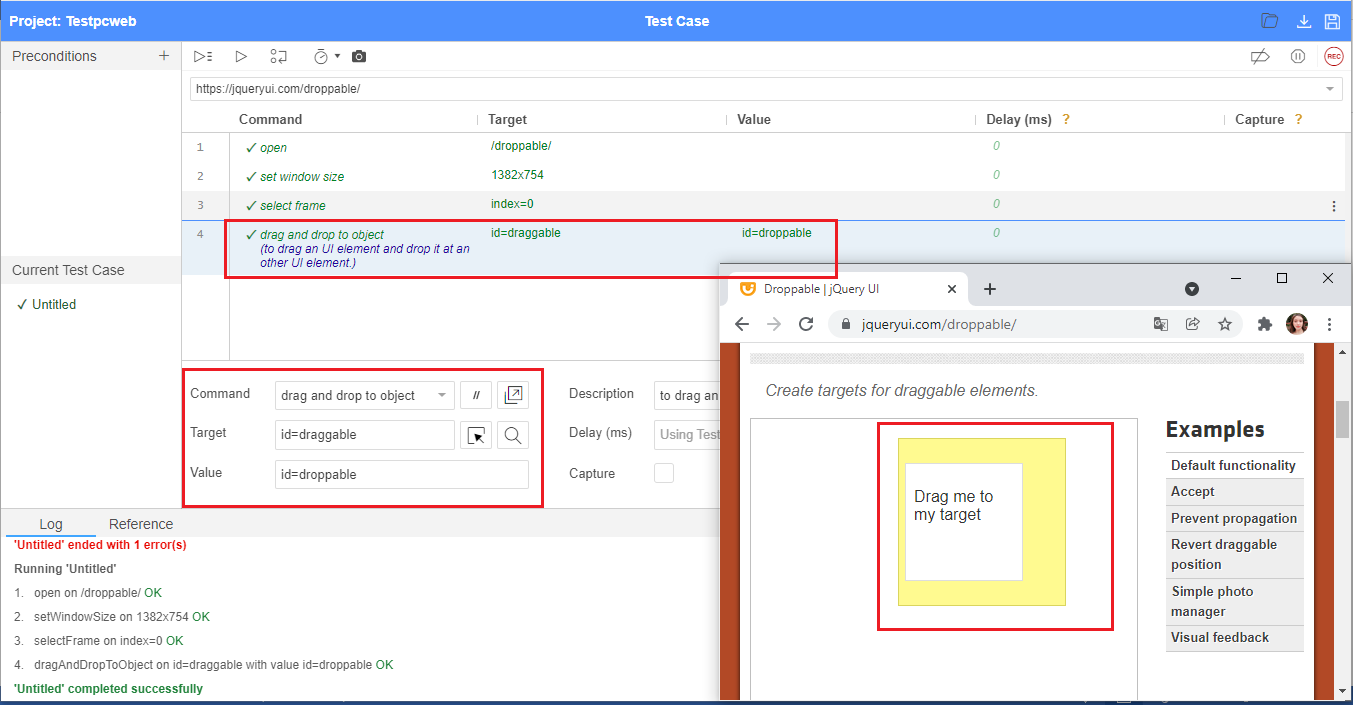
3.90. Select Frame Command
Select Frame is one of the commands in ATOMP Studio Web.
The purpose of select frame command in ATOMP Studio web, is to select the required frame before performing any UI element inside it.

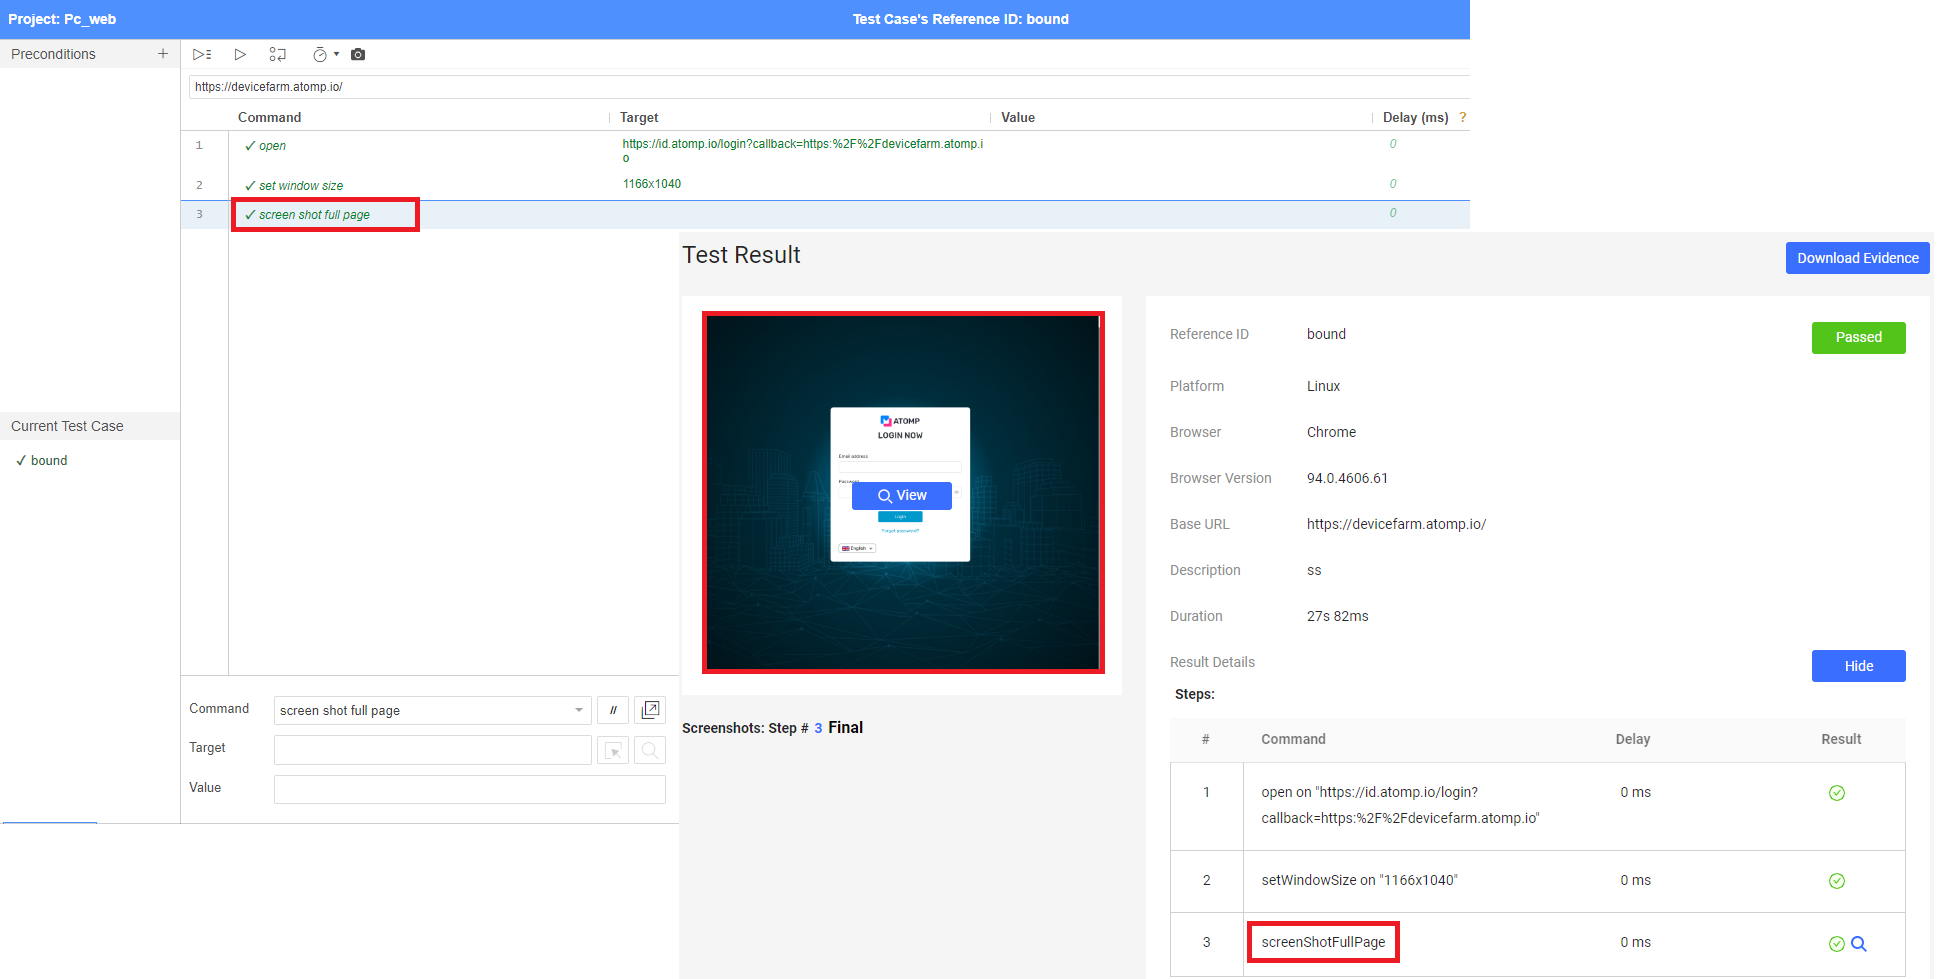
3.91. Screen shot full page
Screen shot full page is one of the commands in ATOMP Studio web.
The purpose of the Screen shot full page command in ATOMP Studio web is to capture full page to check overall layout.
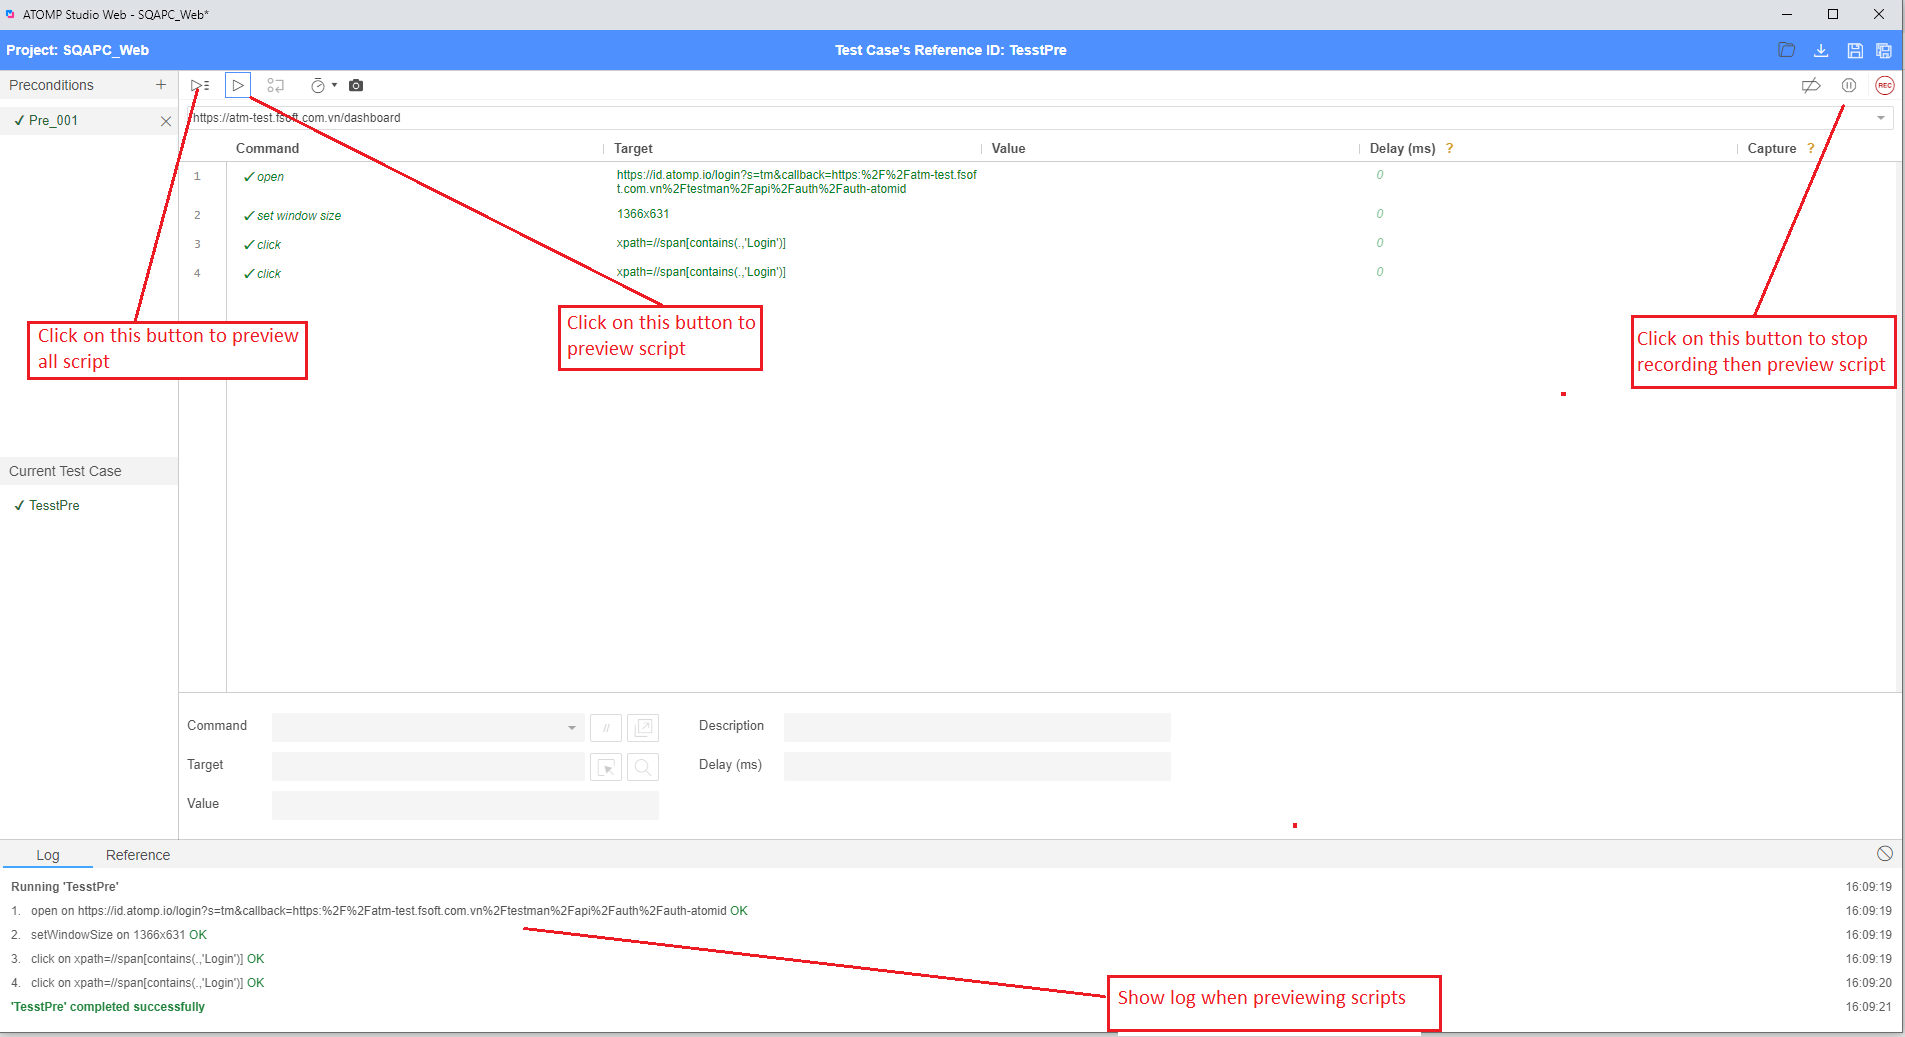
4. Preview script
Step 1: Click the [Stop] button to finish recording the test script.
Step 2: You can preview the created script by clicking on the  icon.
icon.
If you add precondition to test script, you can preview all precondition and test script by clicking on the  icon .
5. Save scripts
Step 1: Click on the [Save script] button -> A dialog will be displayed.
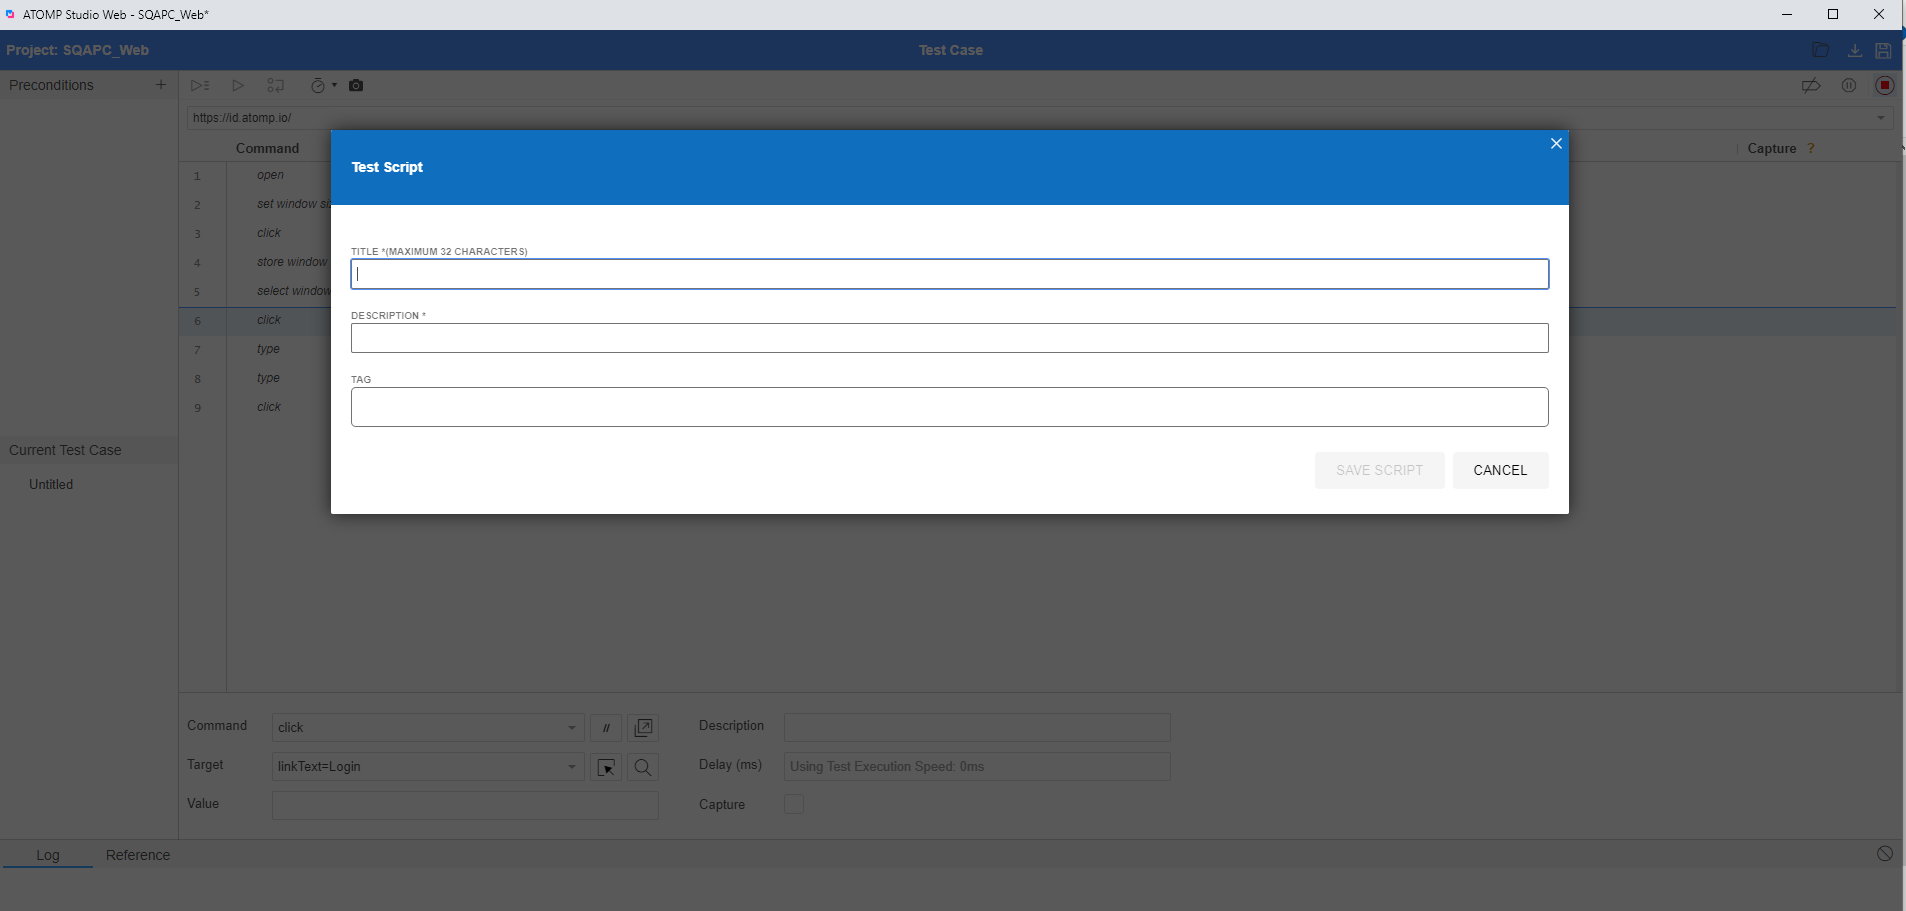
Step 2: Input the reference ID and description for the script.
Step 3: Click on the [Save Test Script] button.
- After a test script is saved, it can be found in the screen “Manage Test script” in Tester 4.0.
6. Edit script
- Users can edit the created script by following these steps:
From the “Manage Test Script” screen, select the “Edit” icon from the script you want to edit => ATOMP Studio web screen will be displayed => Perform editing test script just like creating a normal script.