Part 3: Execute Script with Tester 4.0
A. Execute script for Mobile
I. Set up Executable files for the project
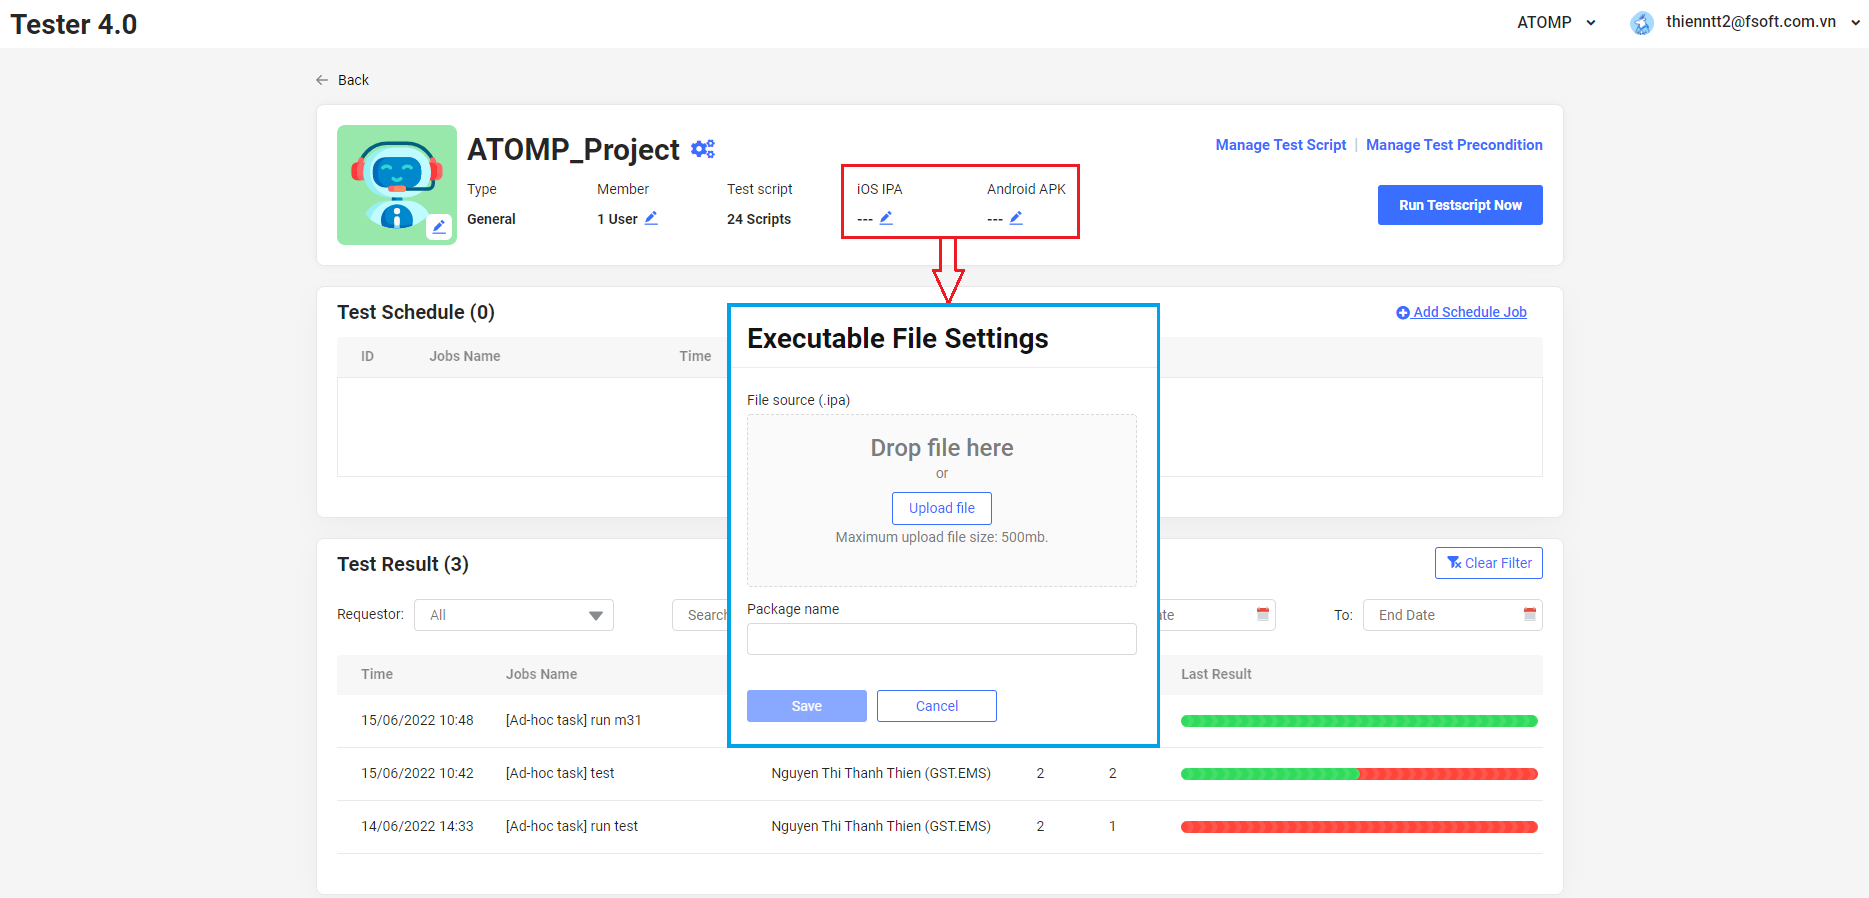
Before executing a test script, we can set-up the executable files (apk or ipa) for the application.
Step 1: Select the option upload file IPA or APK from the Project Detail screen.
Step 2: Upload the file.
Step 3: Input the package name.
Step 4: Click on the [Save] button.
II. Execute a Script and check the test result
1. Run Now
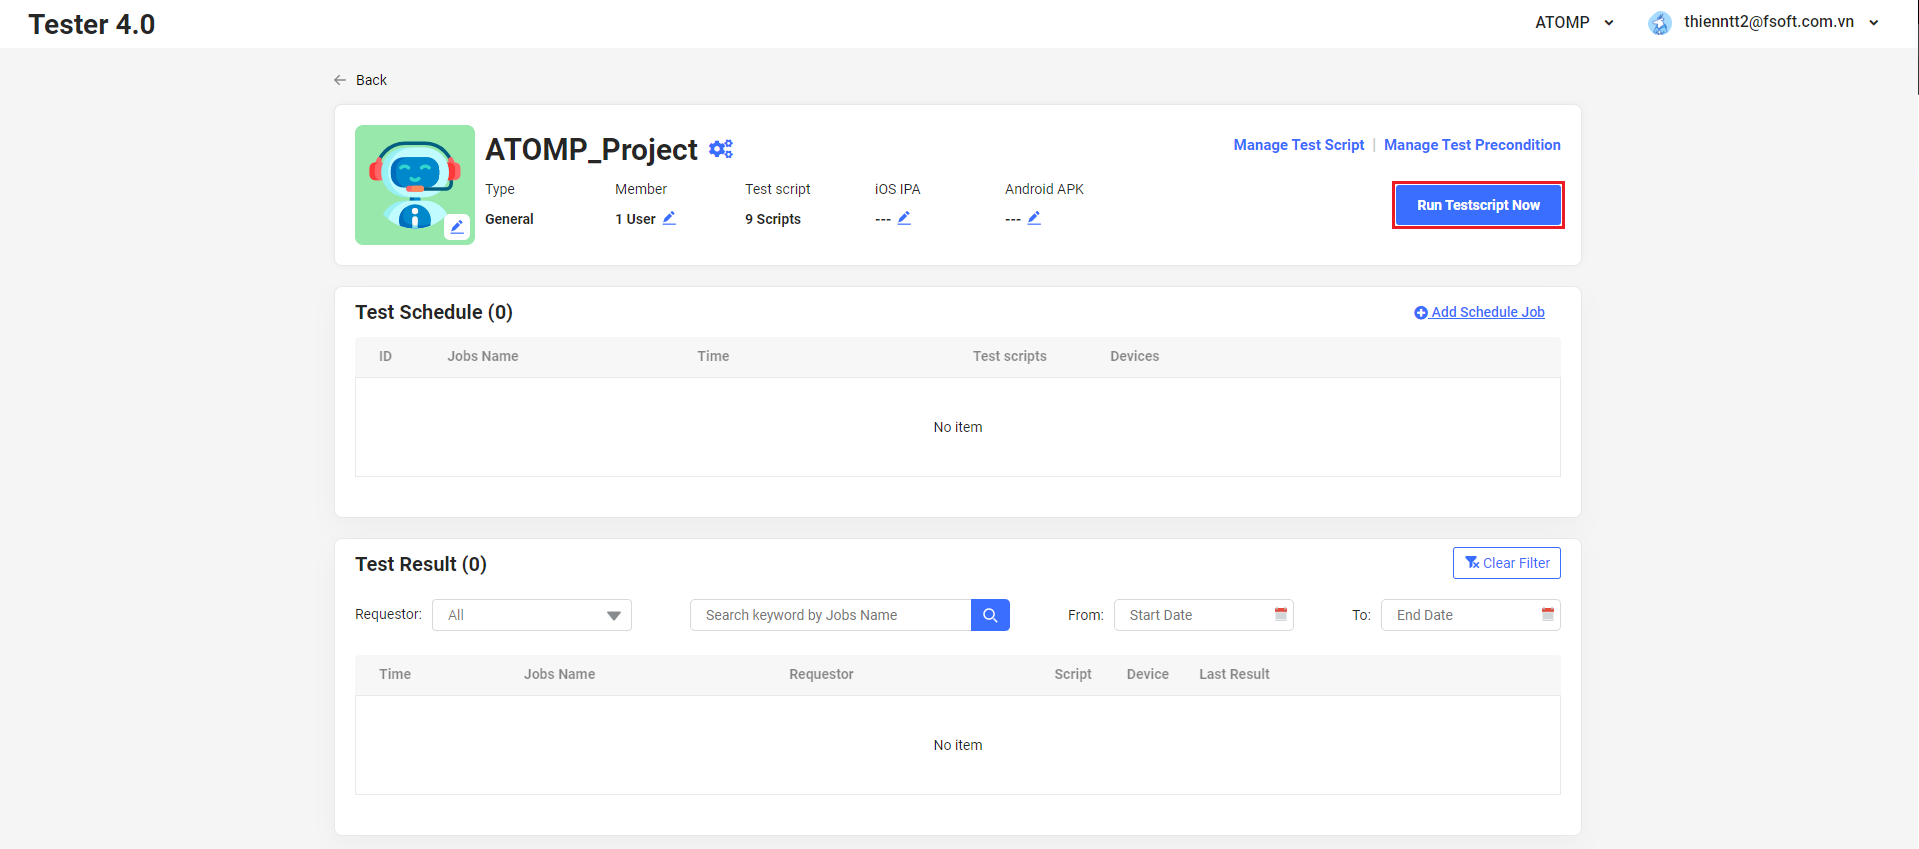
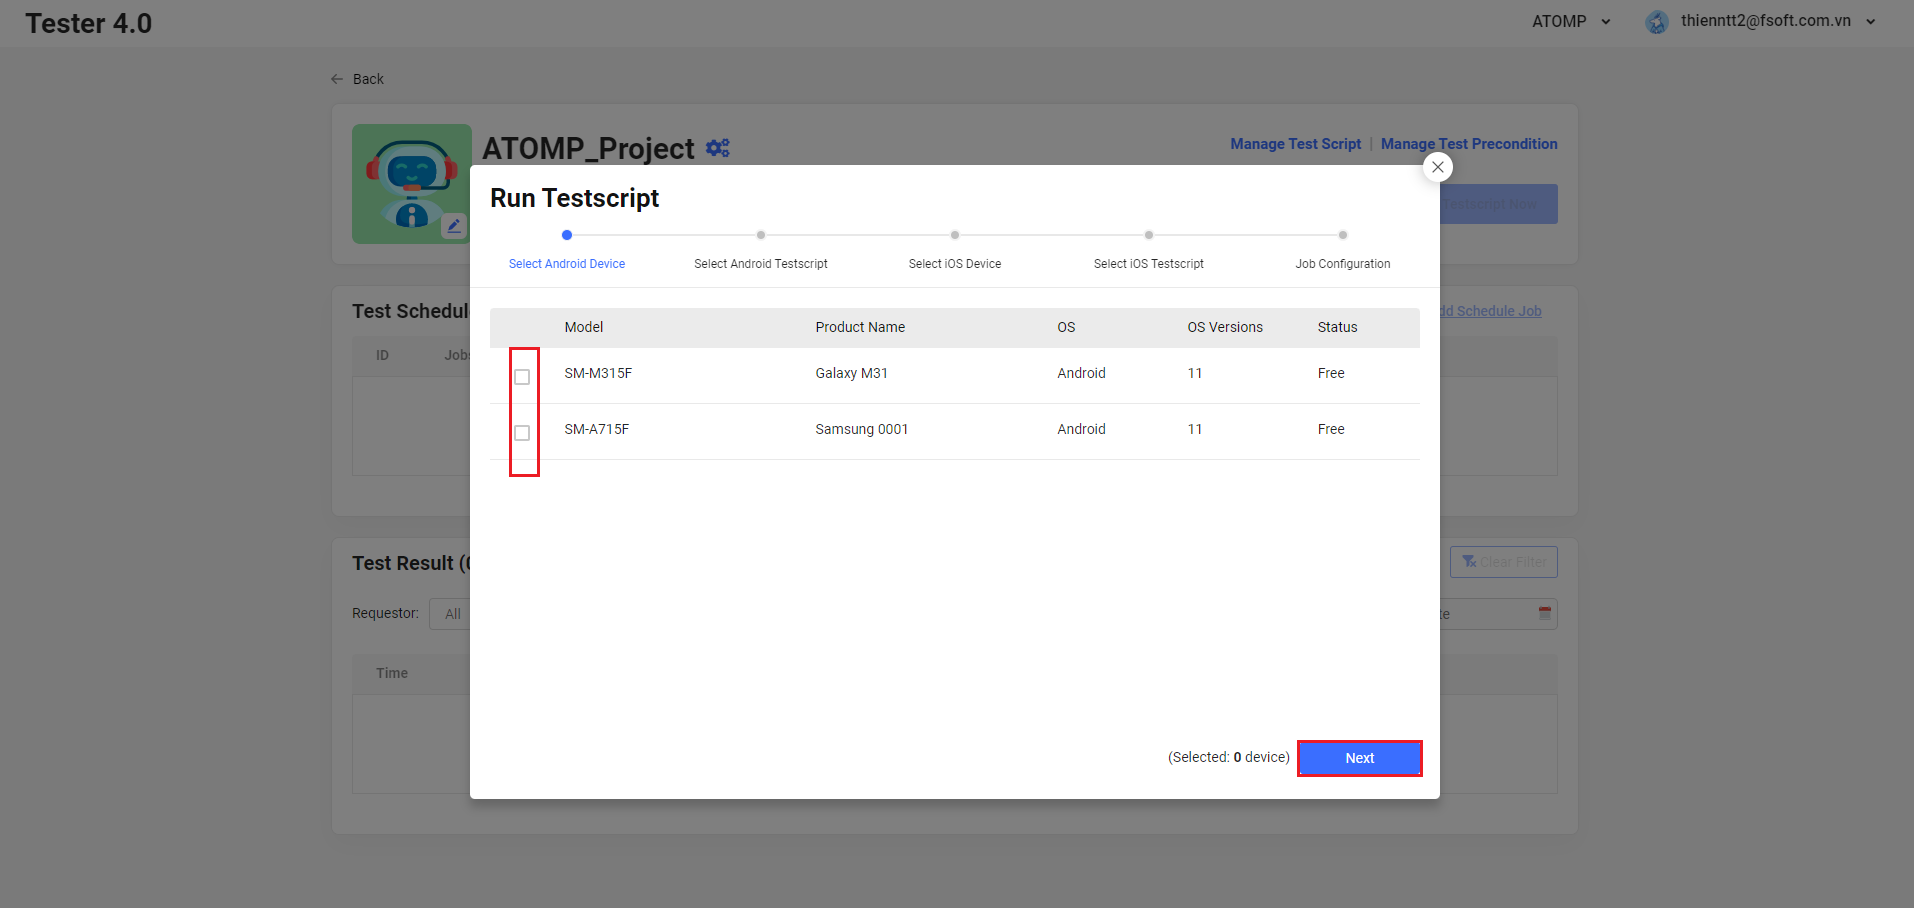
Step 1: Click on the button [Run Test Script Now] -> The popup Run Test Script will be displayed.
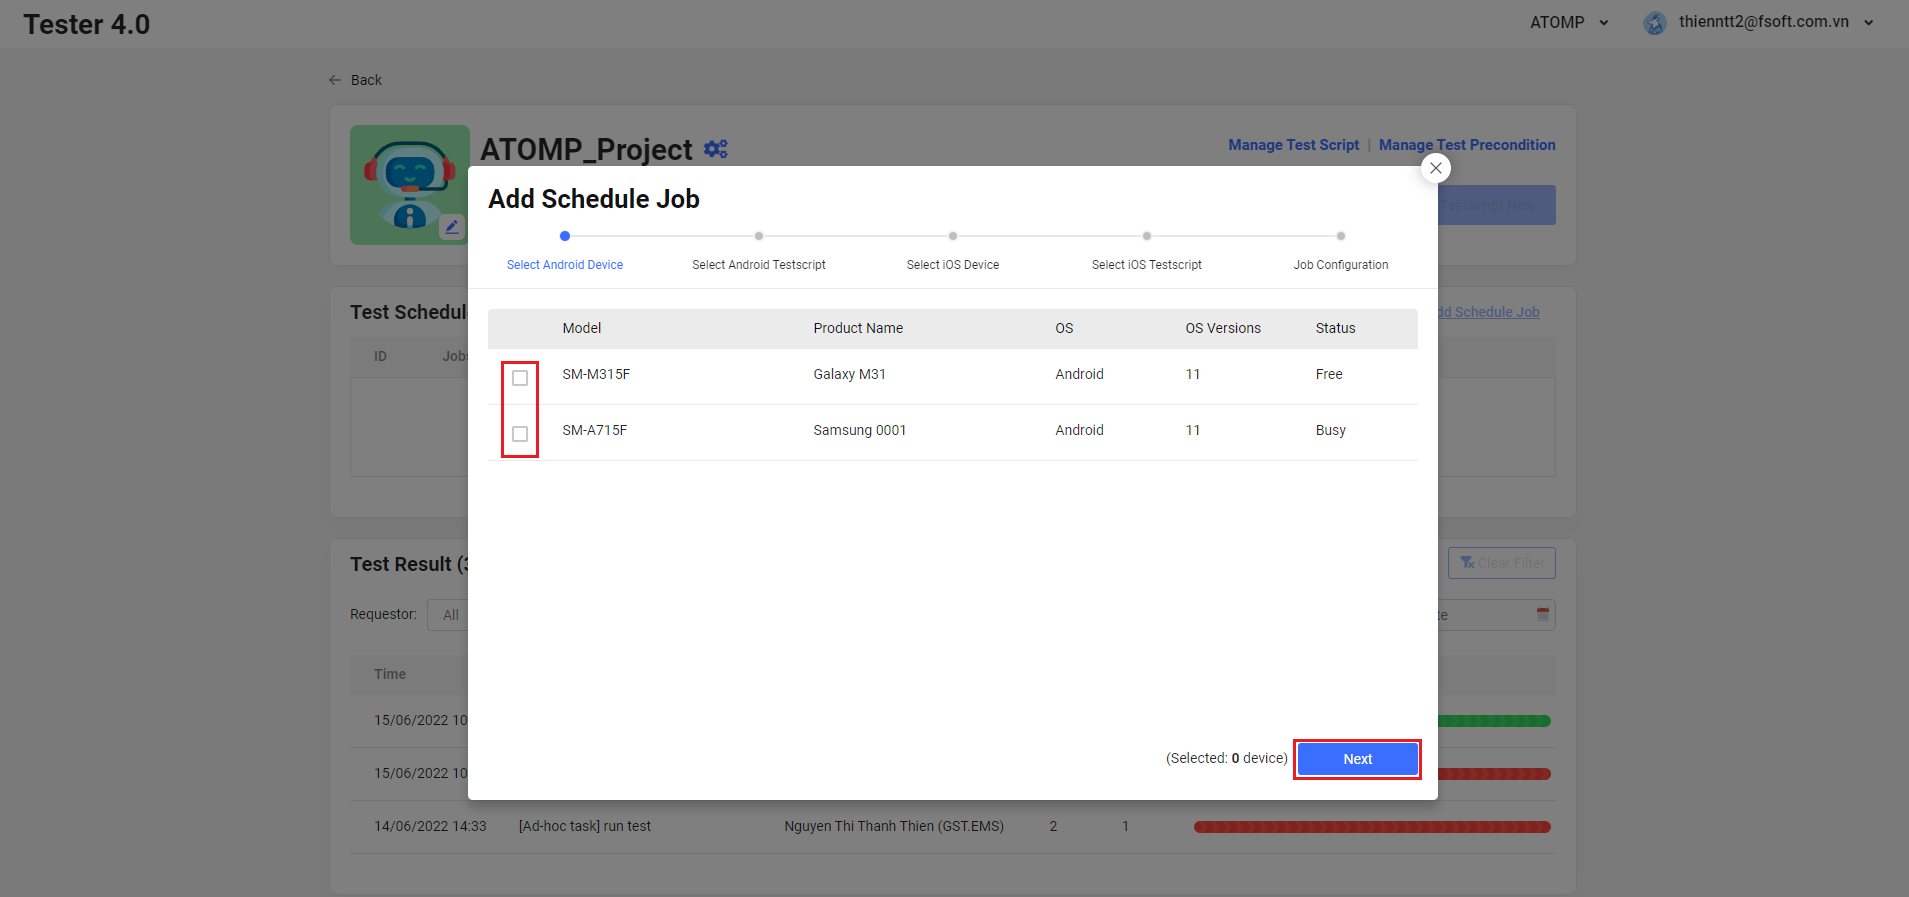
Step 2: Select Device (In the Run Test Script popup, select one or more Android devices)-> Click on the [Next] button.
Step 3: Select Test Script (After selecting Android devices, the popup list of Android test scripts will be displayed –> Select one or more scripts that the users want to run –> Then click on the [Next] button).

Next, we can select iOS devices and iOS test scripts, similarly to step 2, 3 with Android.
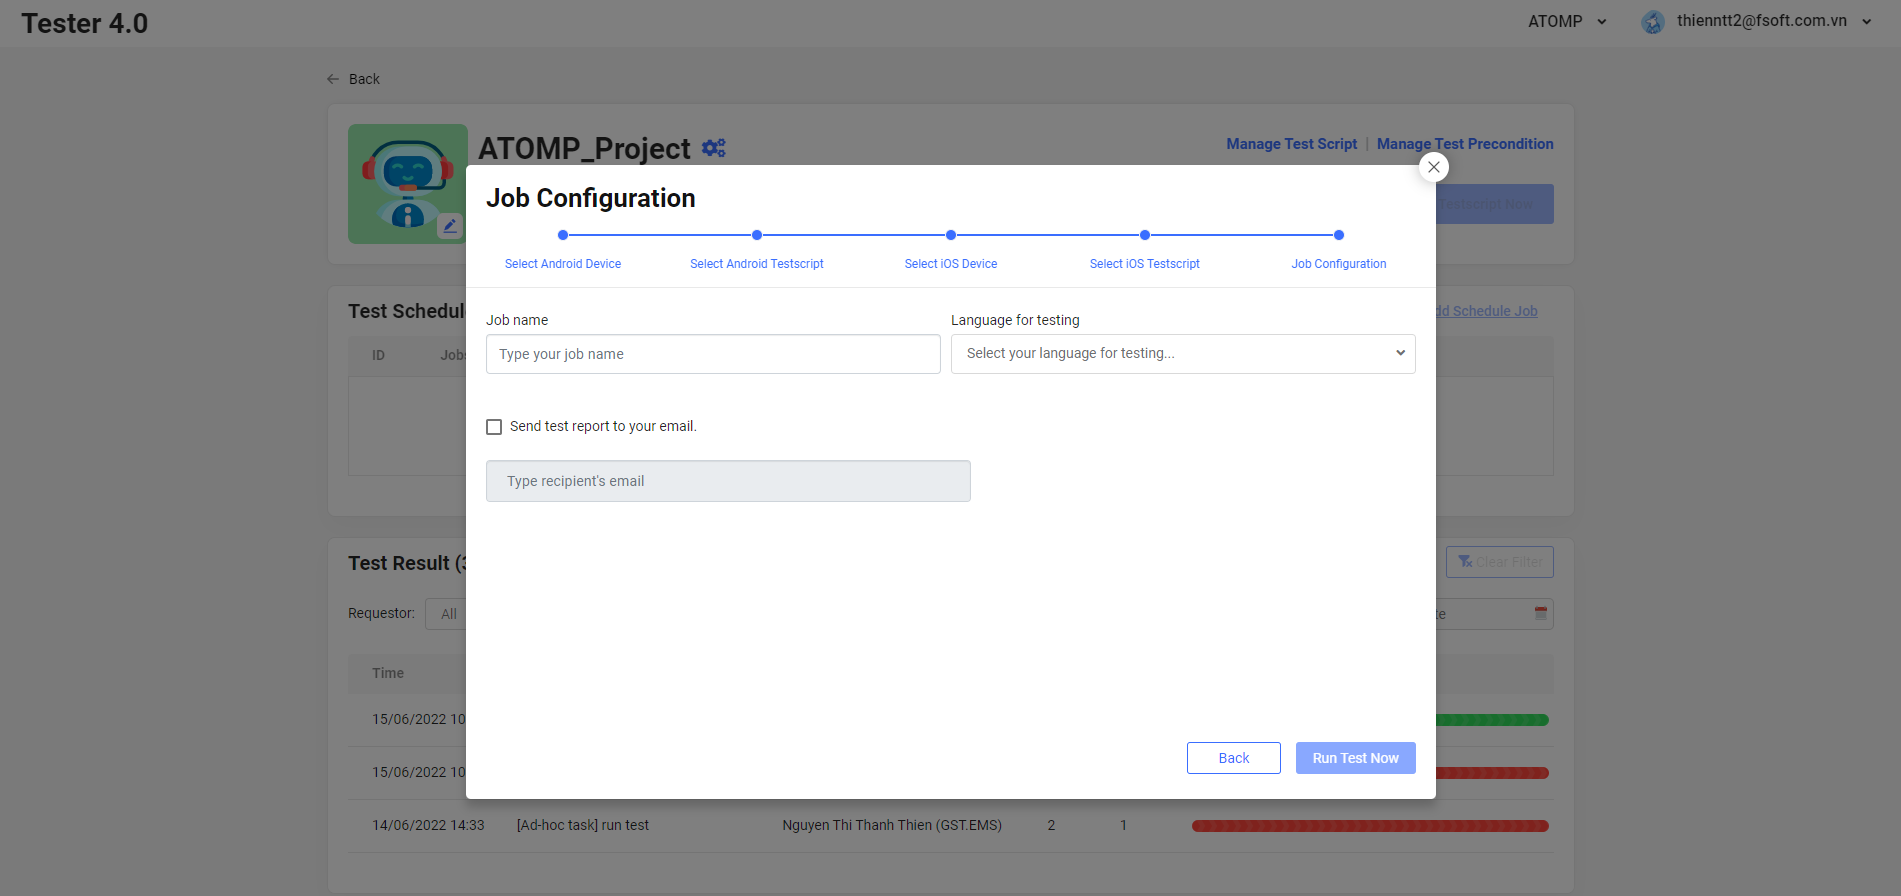
Step 4: Select test language(s).
- Input a Job name and select test language(s).
- Click on the button [Run Test Now].

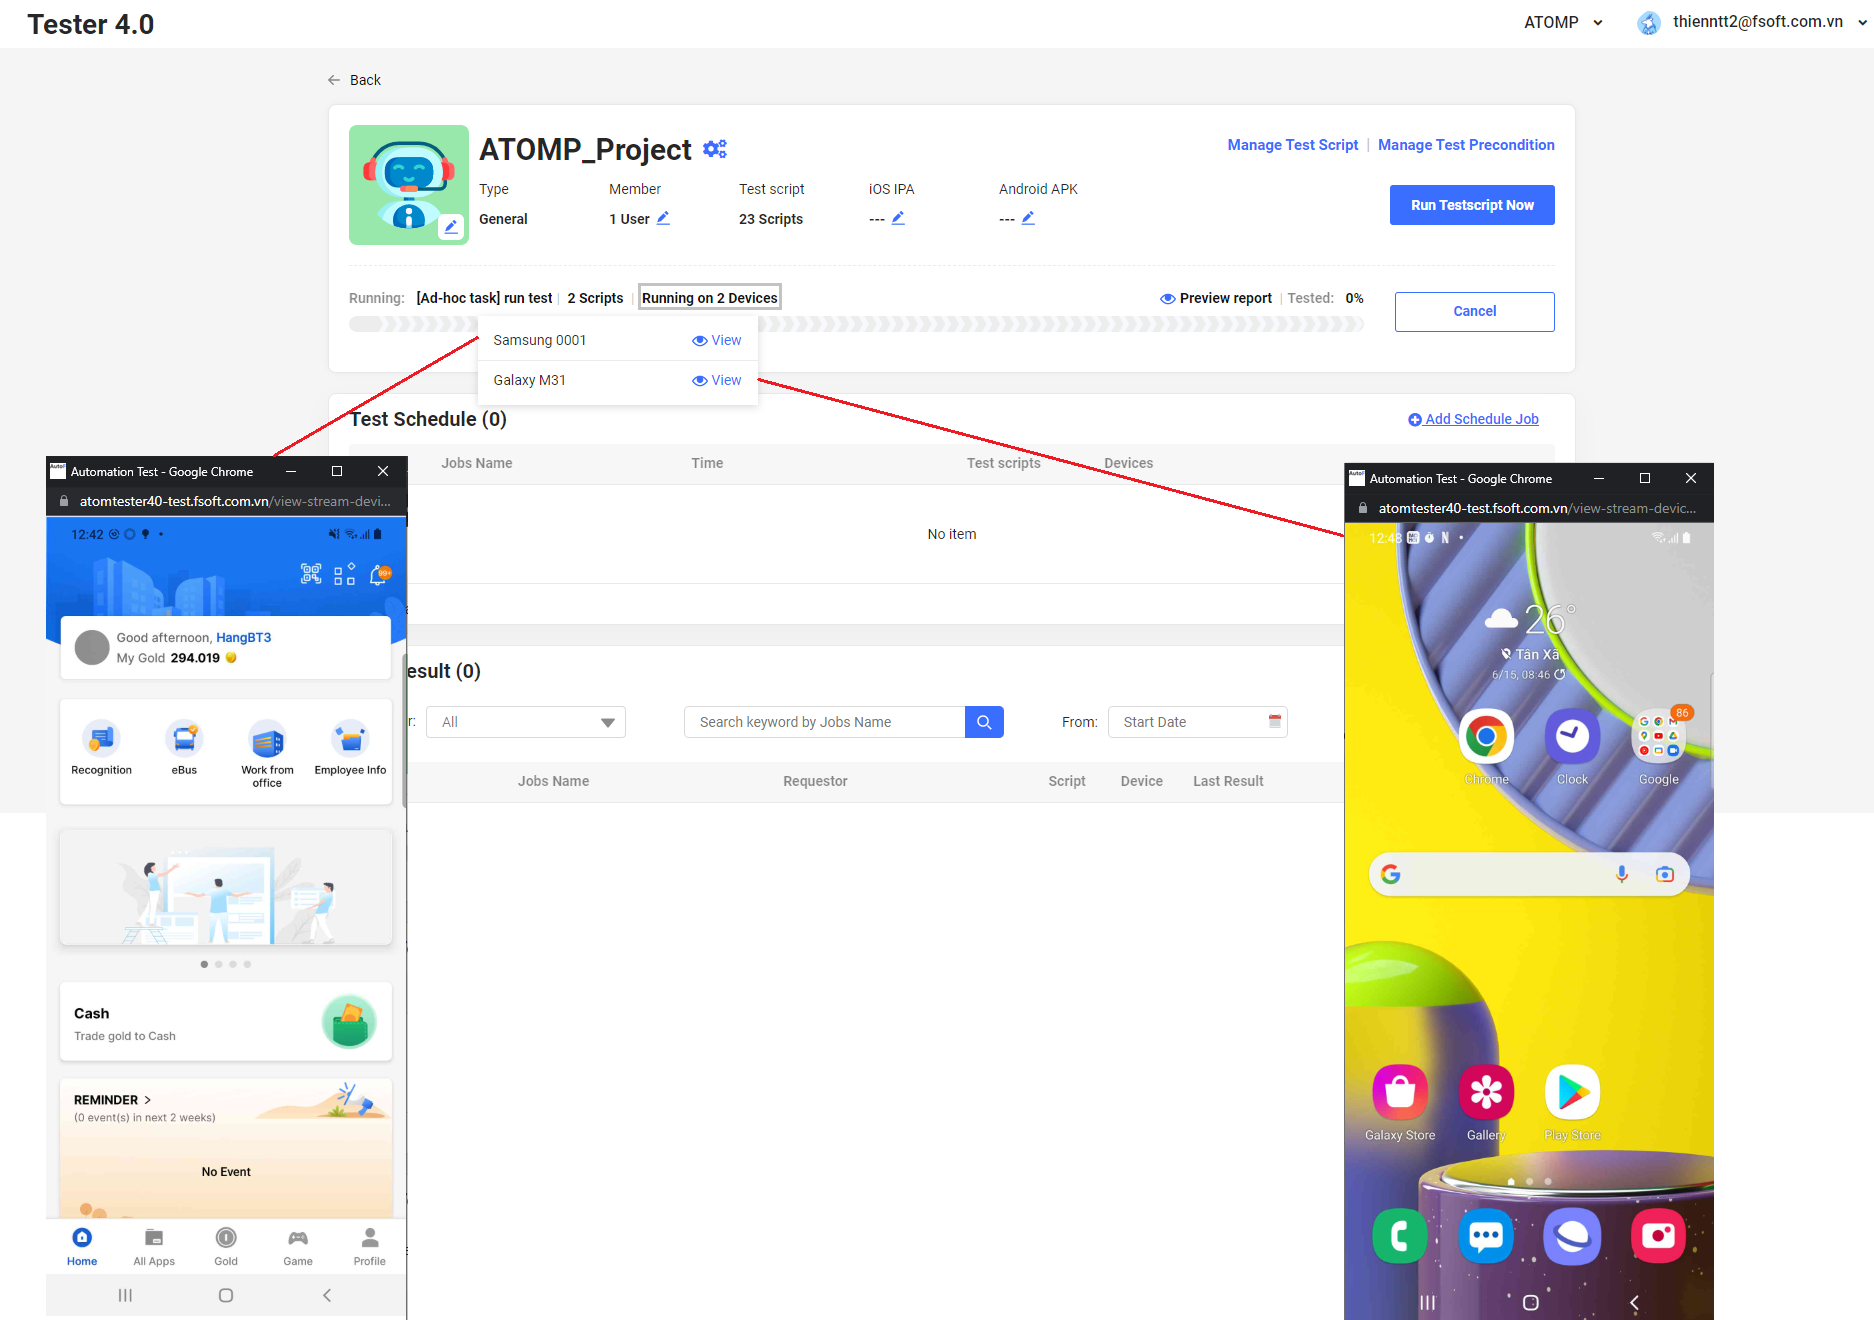
Step 5: View running test script(s) (Show the correct number of devices and the name of each device selected for running from step 2 -> Click on the [View] button next to each device name to show the streaming screen of that device).
Step 6: After the test script execution is finished: The Test Report will be shown in the Project Detail screen. To view the detail of a Test report: click on each test report item in the list.

2. Run a script On Schedule.
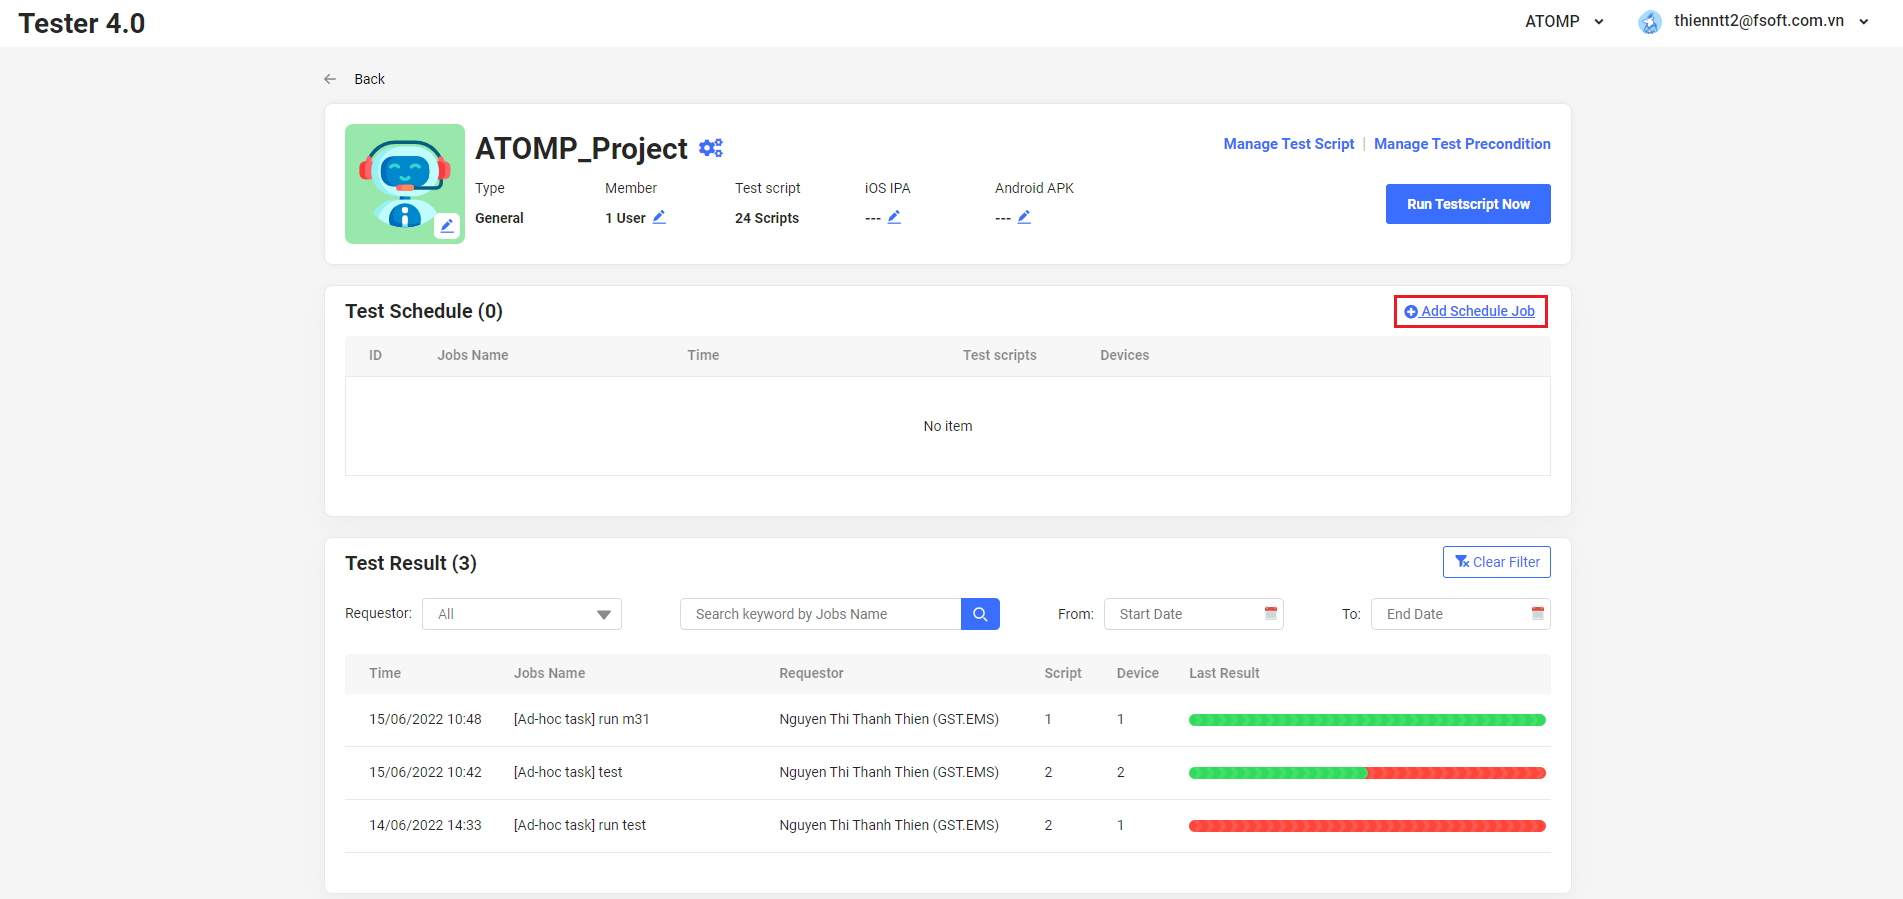
Step 1: Click on the [Add Schedule Job] button.
The select devices & test scripts popup (similar to the “Run Now” feature) will be displayed.
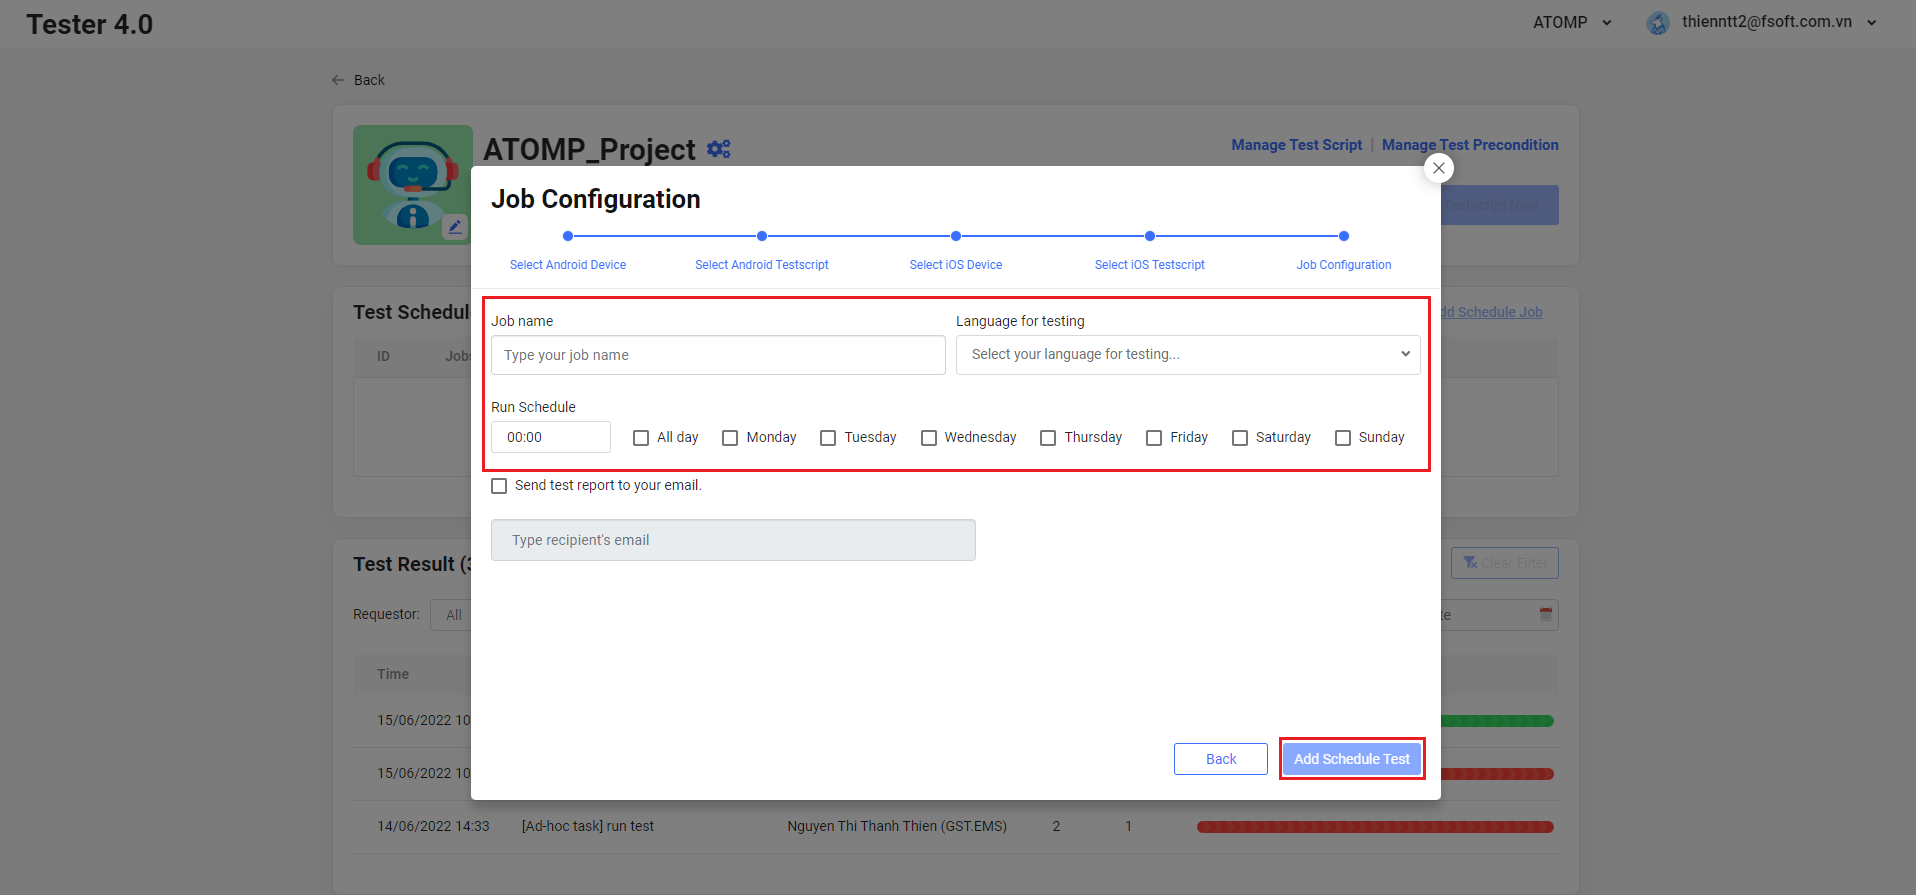
Step 2: Setting the time and date to run test scripts automatically:
2.1. Input the Job name.
2.2. Select test language(s).
2.3. Select a time to run test scripts: including the time and the day of the week.
2.4. Click on the [Add Schedule Test] button.
After finishing adding a Schedule, at the scheduled time, the selected test scripts will be executed and the test result will be saved.
3. Check the test result
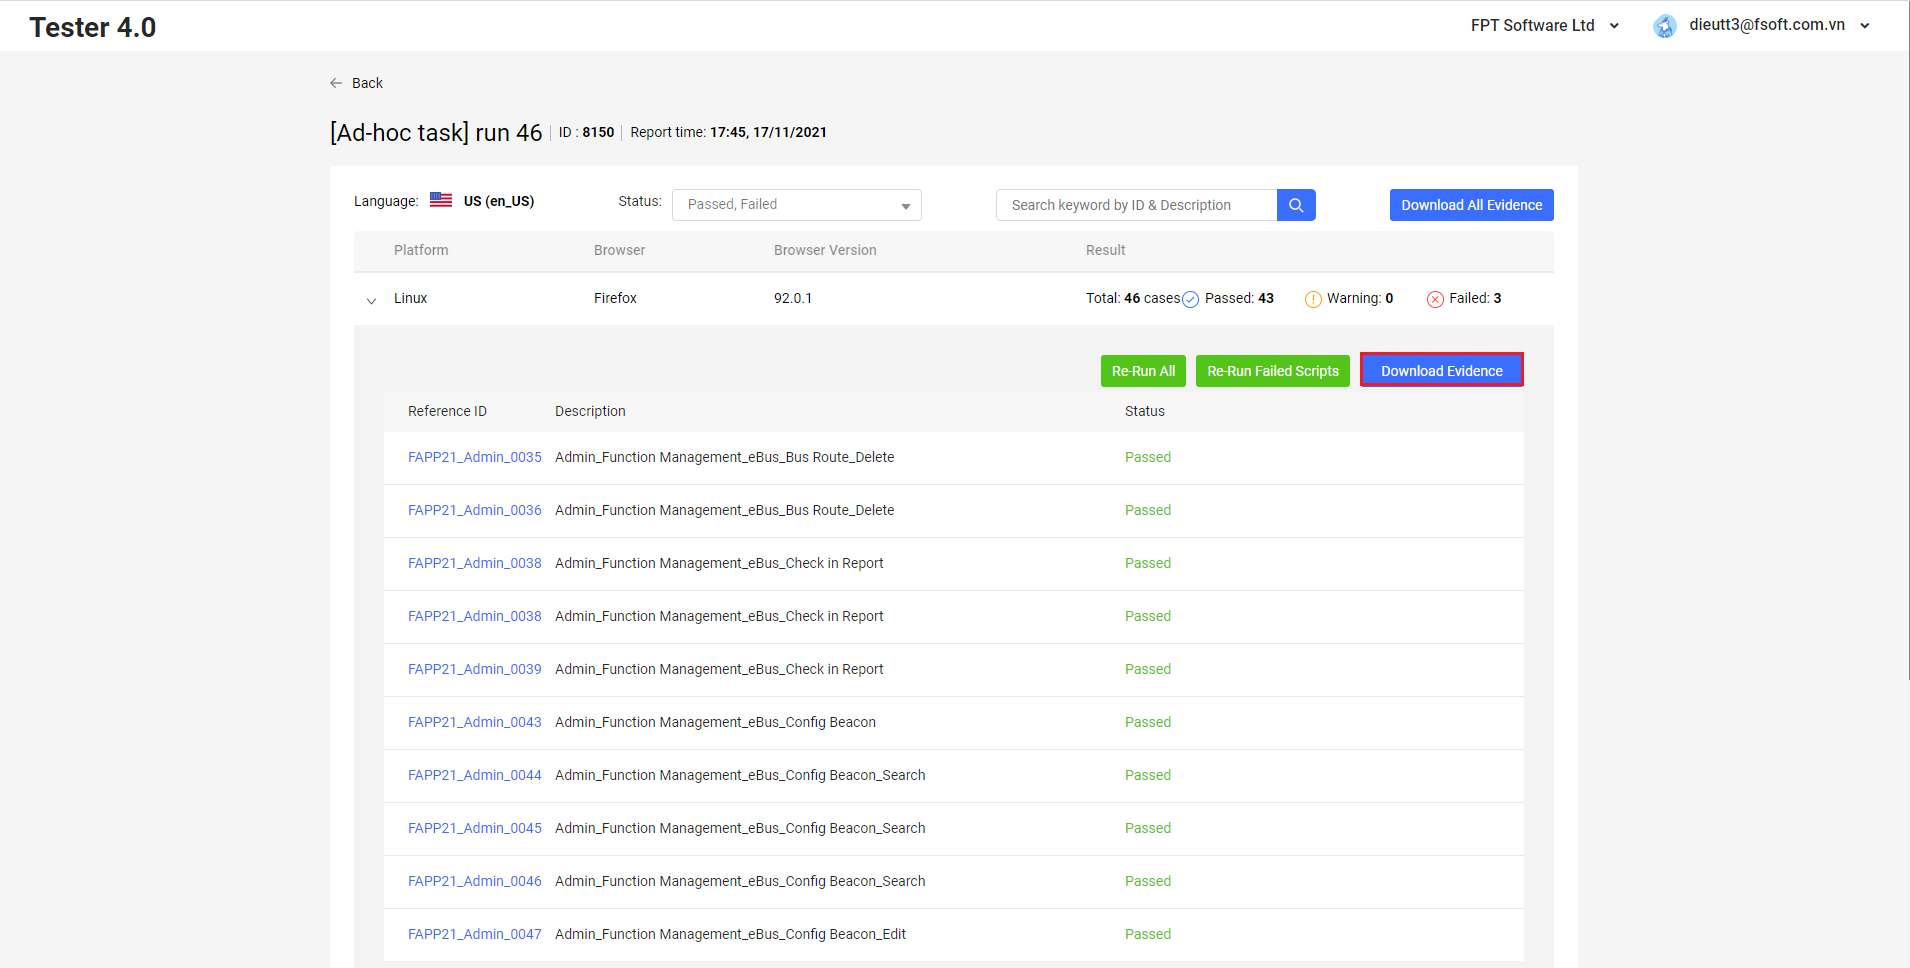
After the test script execution is finished, the Test Report will be shown in the Project Detail screen.
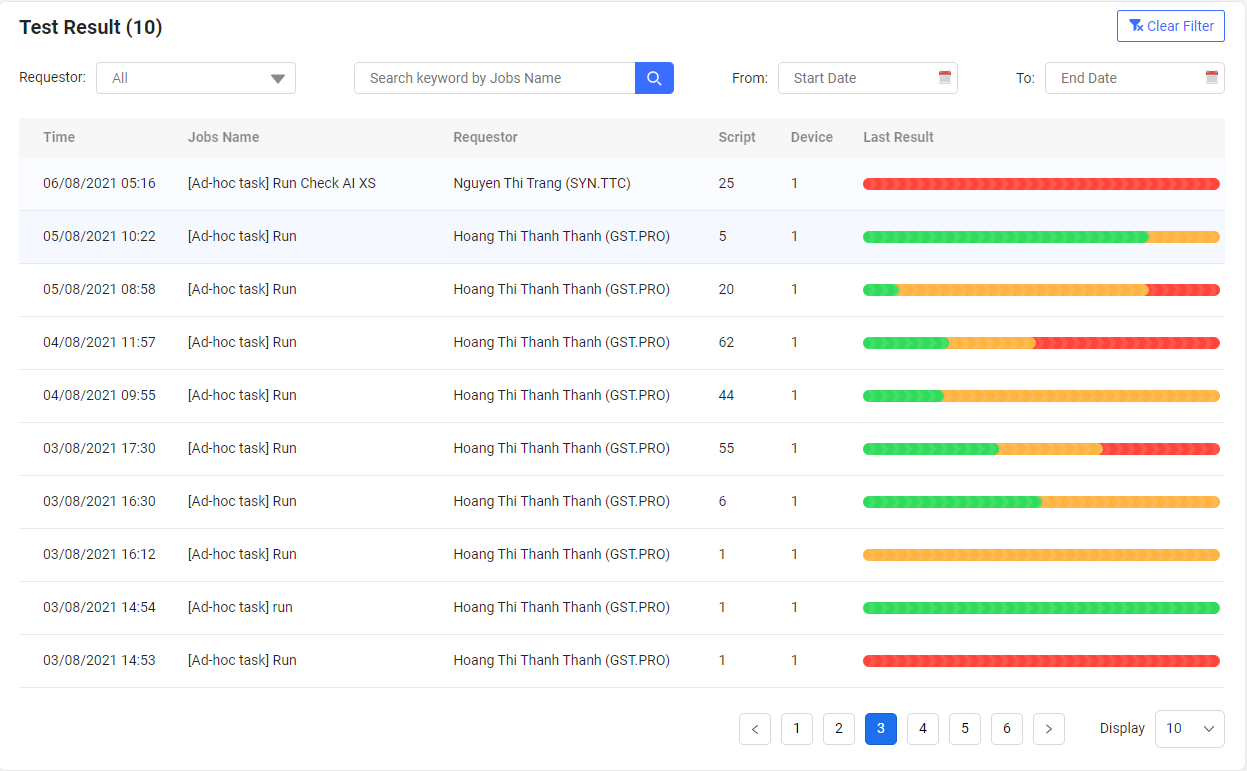
To view the detail of a Test report: click on each test report item in the list.
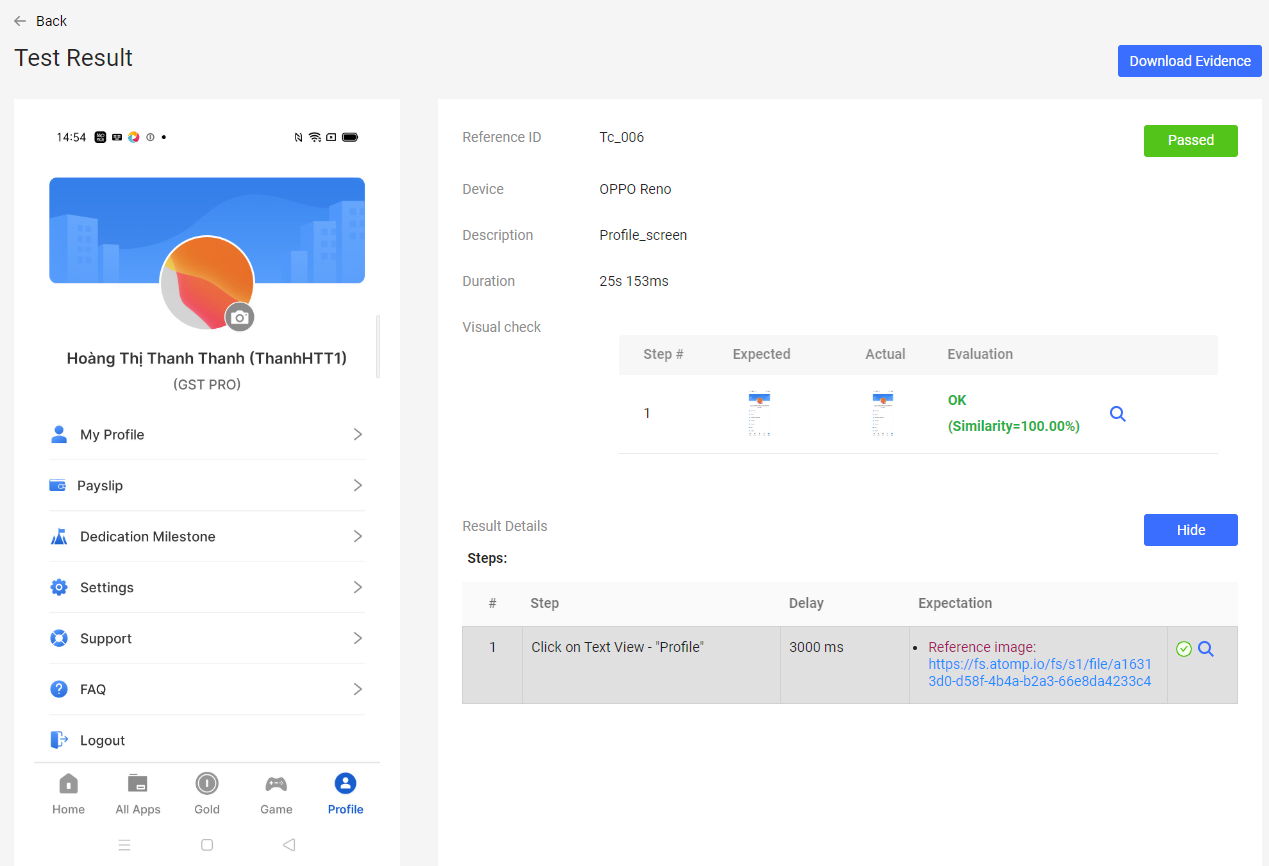
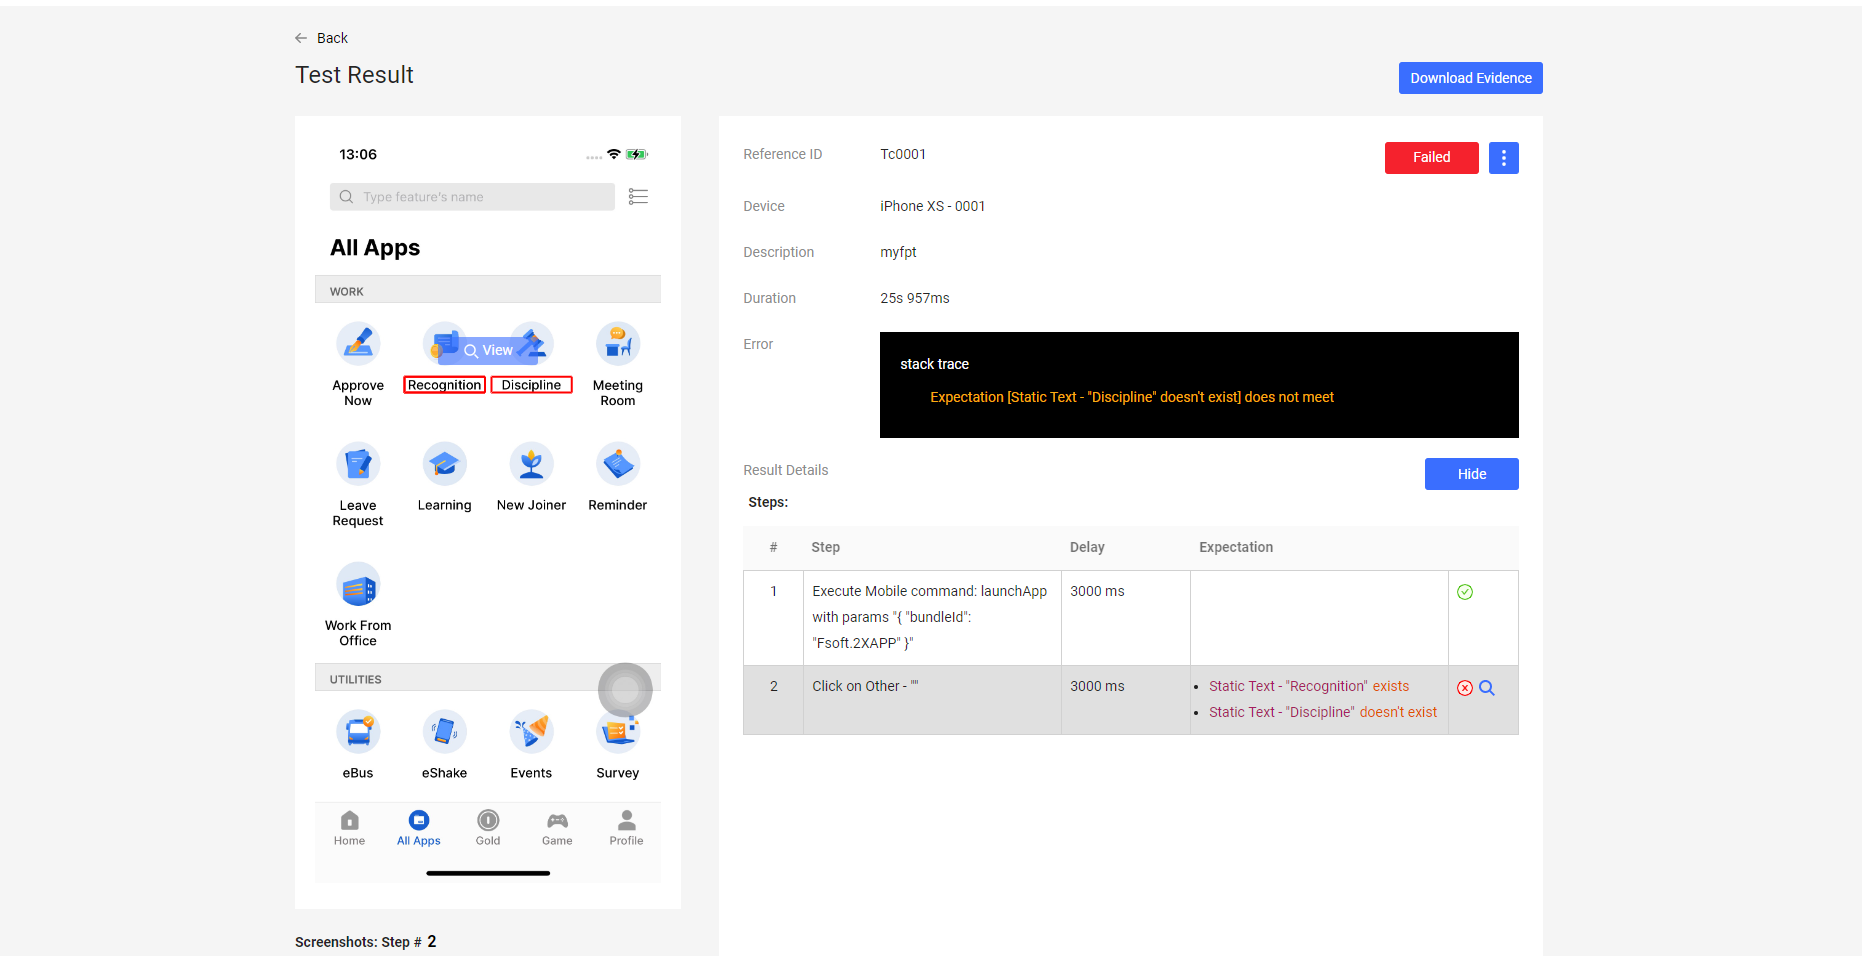
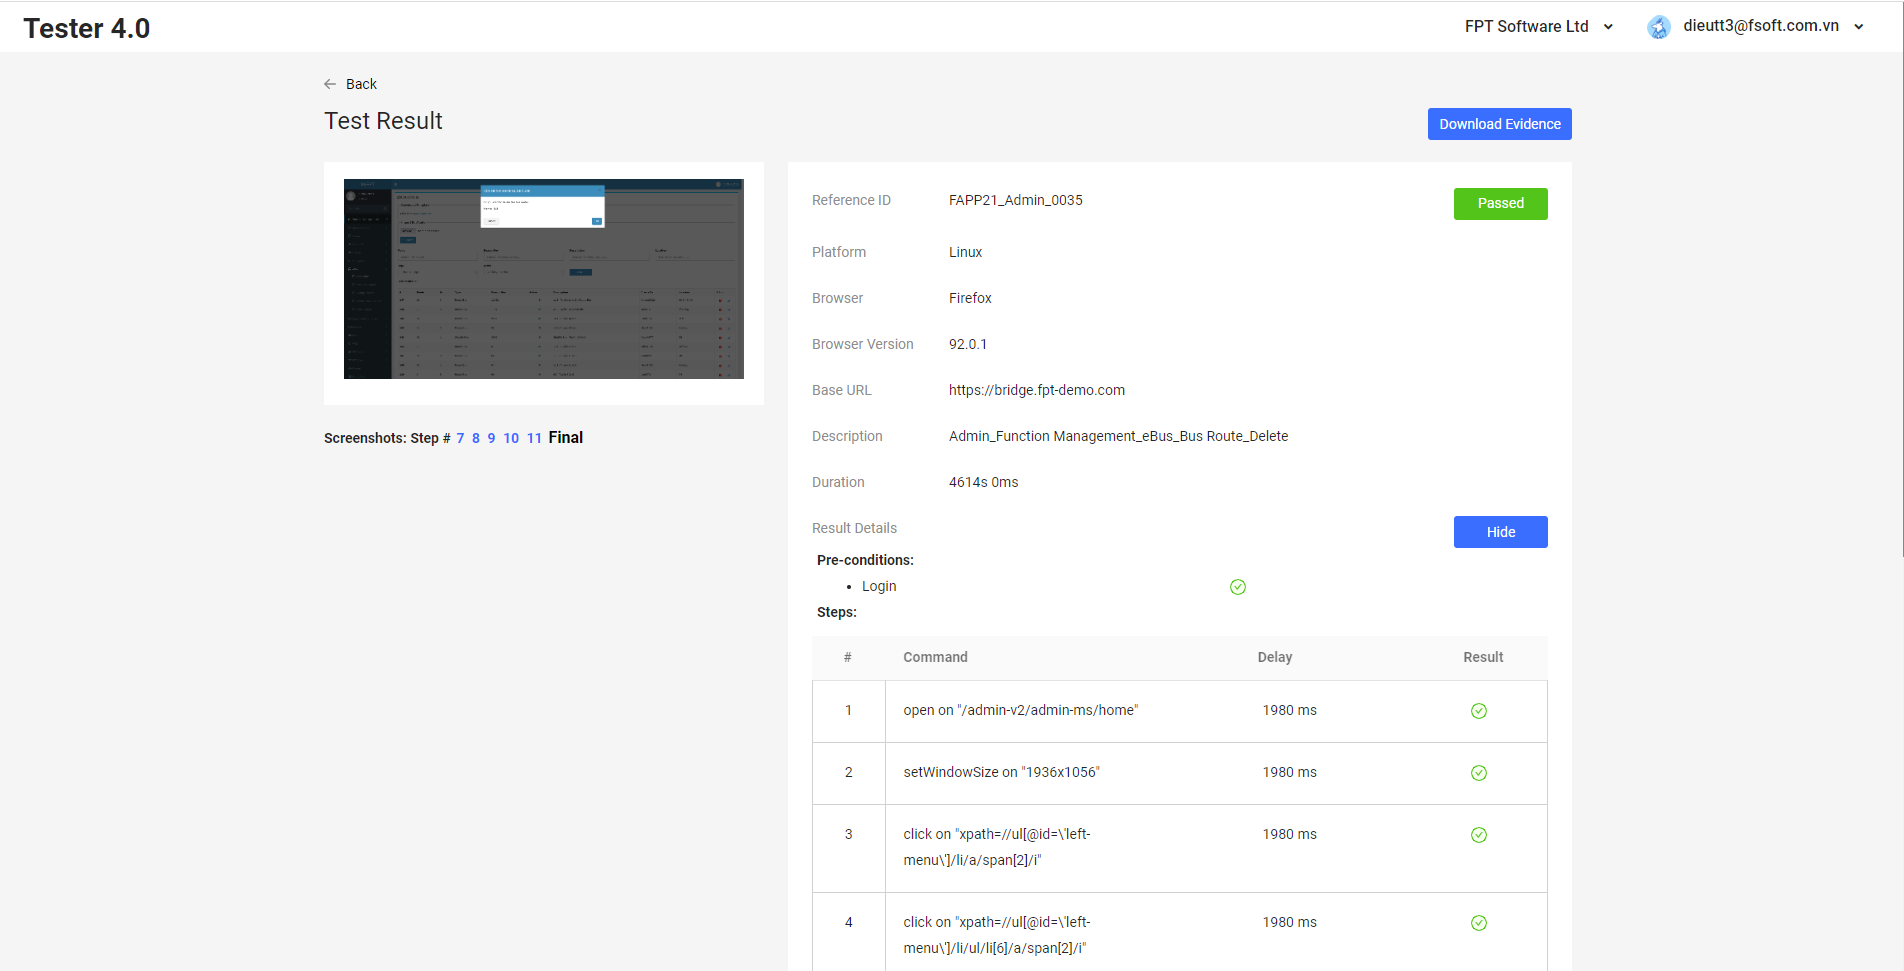
There are 2 types of results: Pass and Fail.
- Pass: Script works, no script errors, test script return result exactly as expected.
- Failed: There was a script error or an input error, not getting results from Tester 4.0. Or there is no script error but Tester 4.0 returns result different from expectation. If the result is fail, the system will display detail of error and error step.
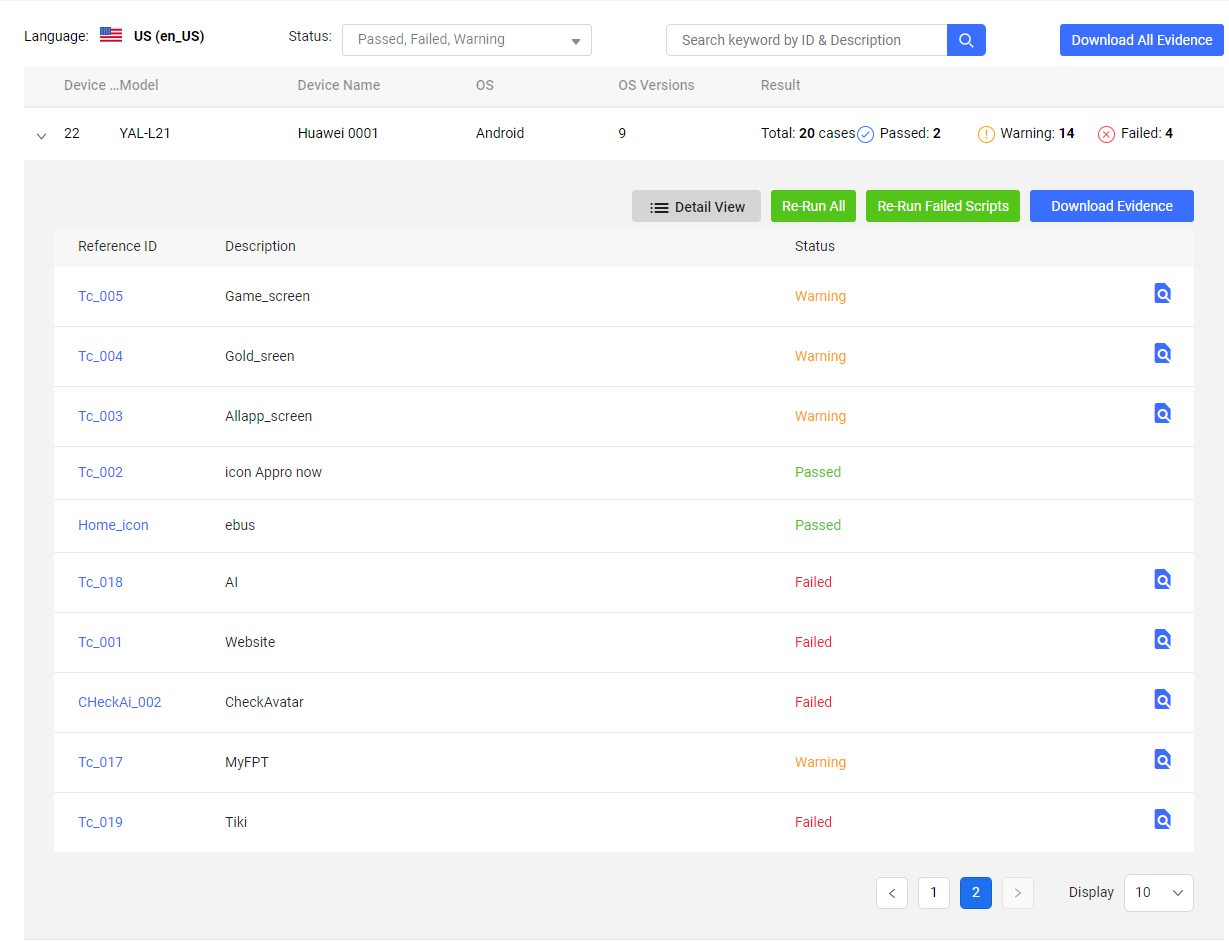
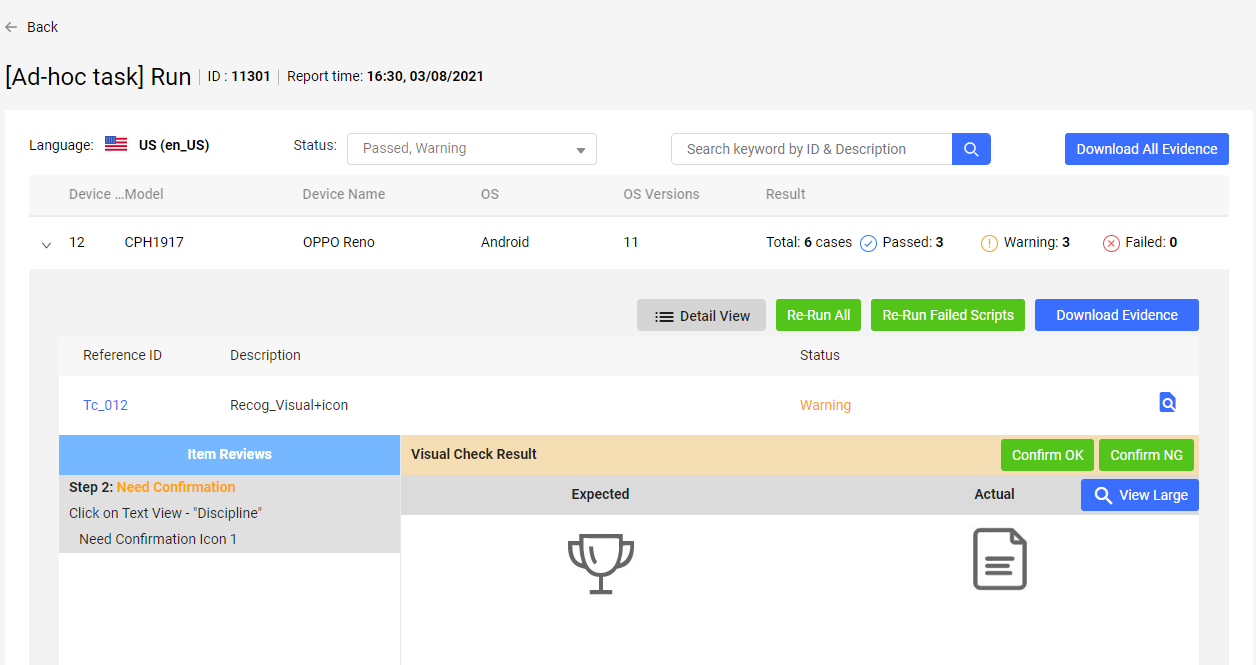
If user use AI to check the expectation in test script, it will have more result: Warning. The script works, there are no script errors, the AI returns the results (but not the Input Error), but the AI’s result is that something is wrong. Specifically: An element’s image comparison function returns FAILED. When the result is warning, the user needs to confirm the result.
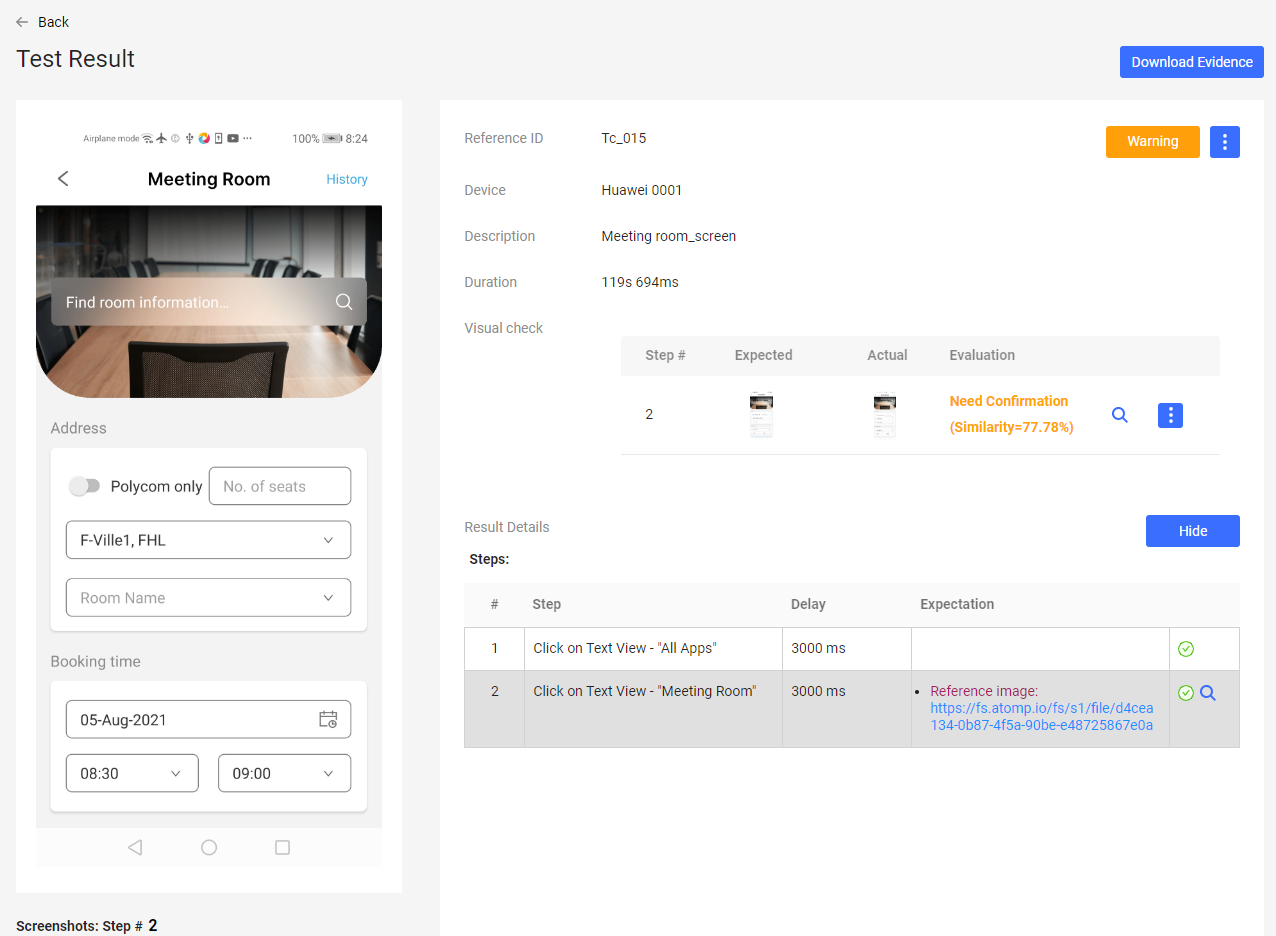
AI when comparing 2 screen shots will give the same ratio of 2 images, the value runs from 0 to 100%.
Tester 4.0 define a Threshold level so that if it is below this level, it is considered a problem. For example, if Threshold setting is 95% then:
- A.I returns 2 images that are more 95% similar -> no problem.
- A.I returns 2 images with the same 95% or less -> considered “problematic” =>Warning.
At the moment, the Threshold setting is 95%.

When the result is Warning, user needs confirmation by following steps:
Step1: Clicking on  icon then dropdown list will be shown.
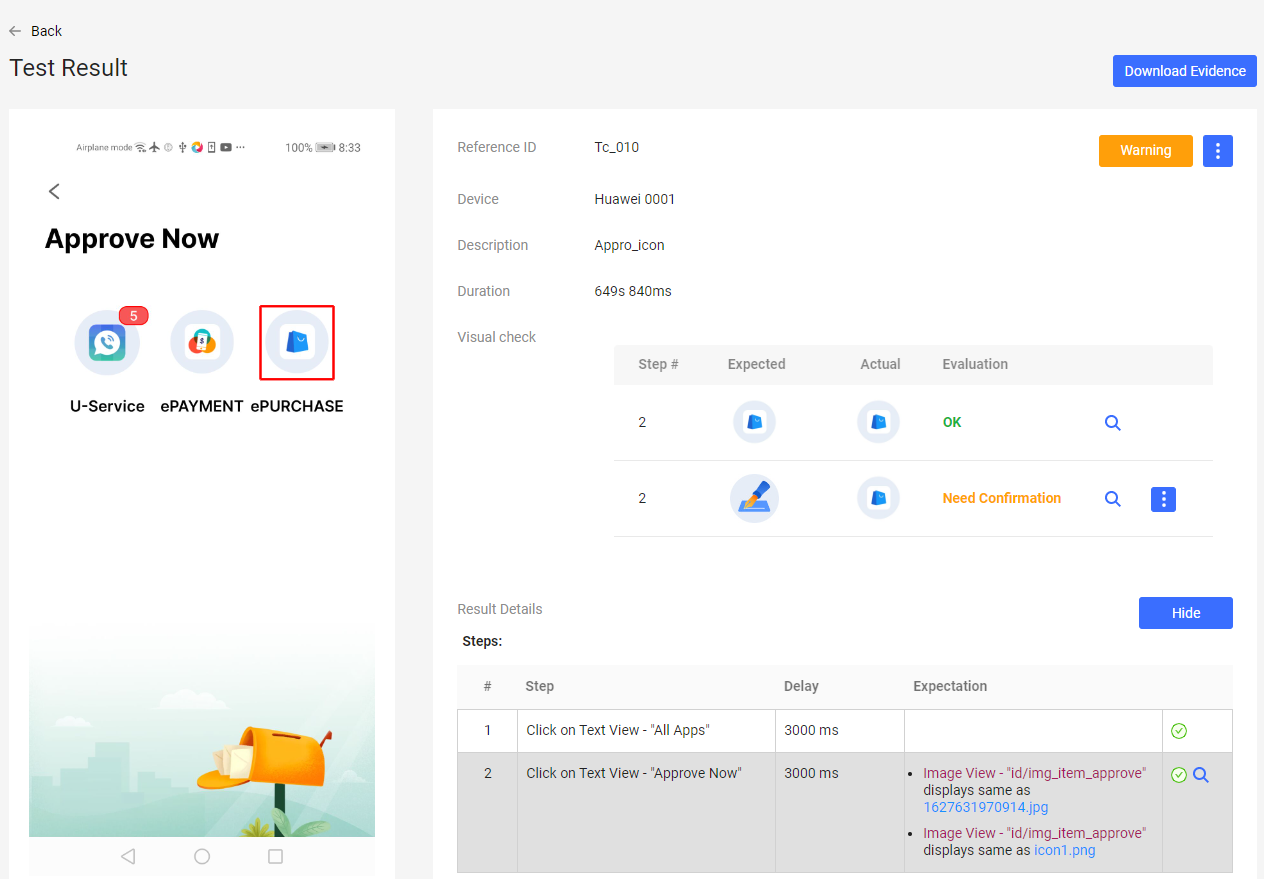
Step 2: If user wants to confirm OK, please click on [Confirm OK] button. Popup Note for this confirmation will be displayed. User inputs the reason then clicks on [Confirm] button. The result of test script will change from warning to pass.
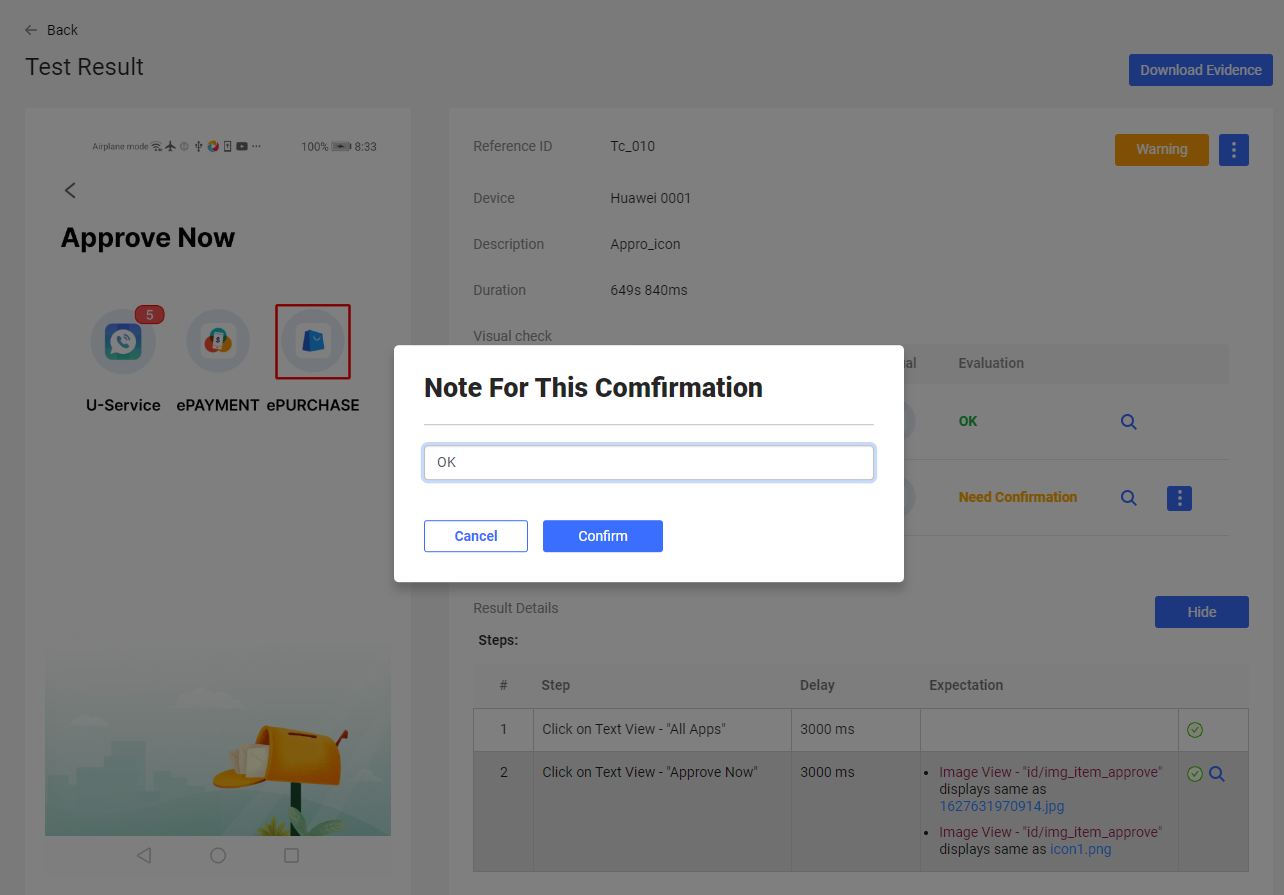
Step 3: If user wants to confirm NG, please click on [Confirm NG] button. Popup Note for this confirmation will be displayed. User inputs the reason then clicks on [Confirm] button. The result of test script will change from Warning to Failed.

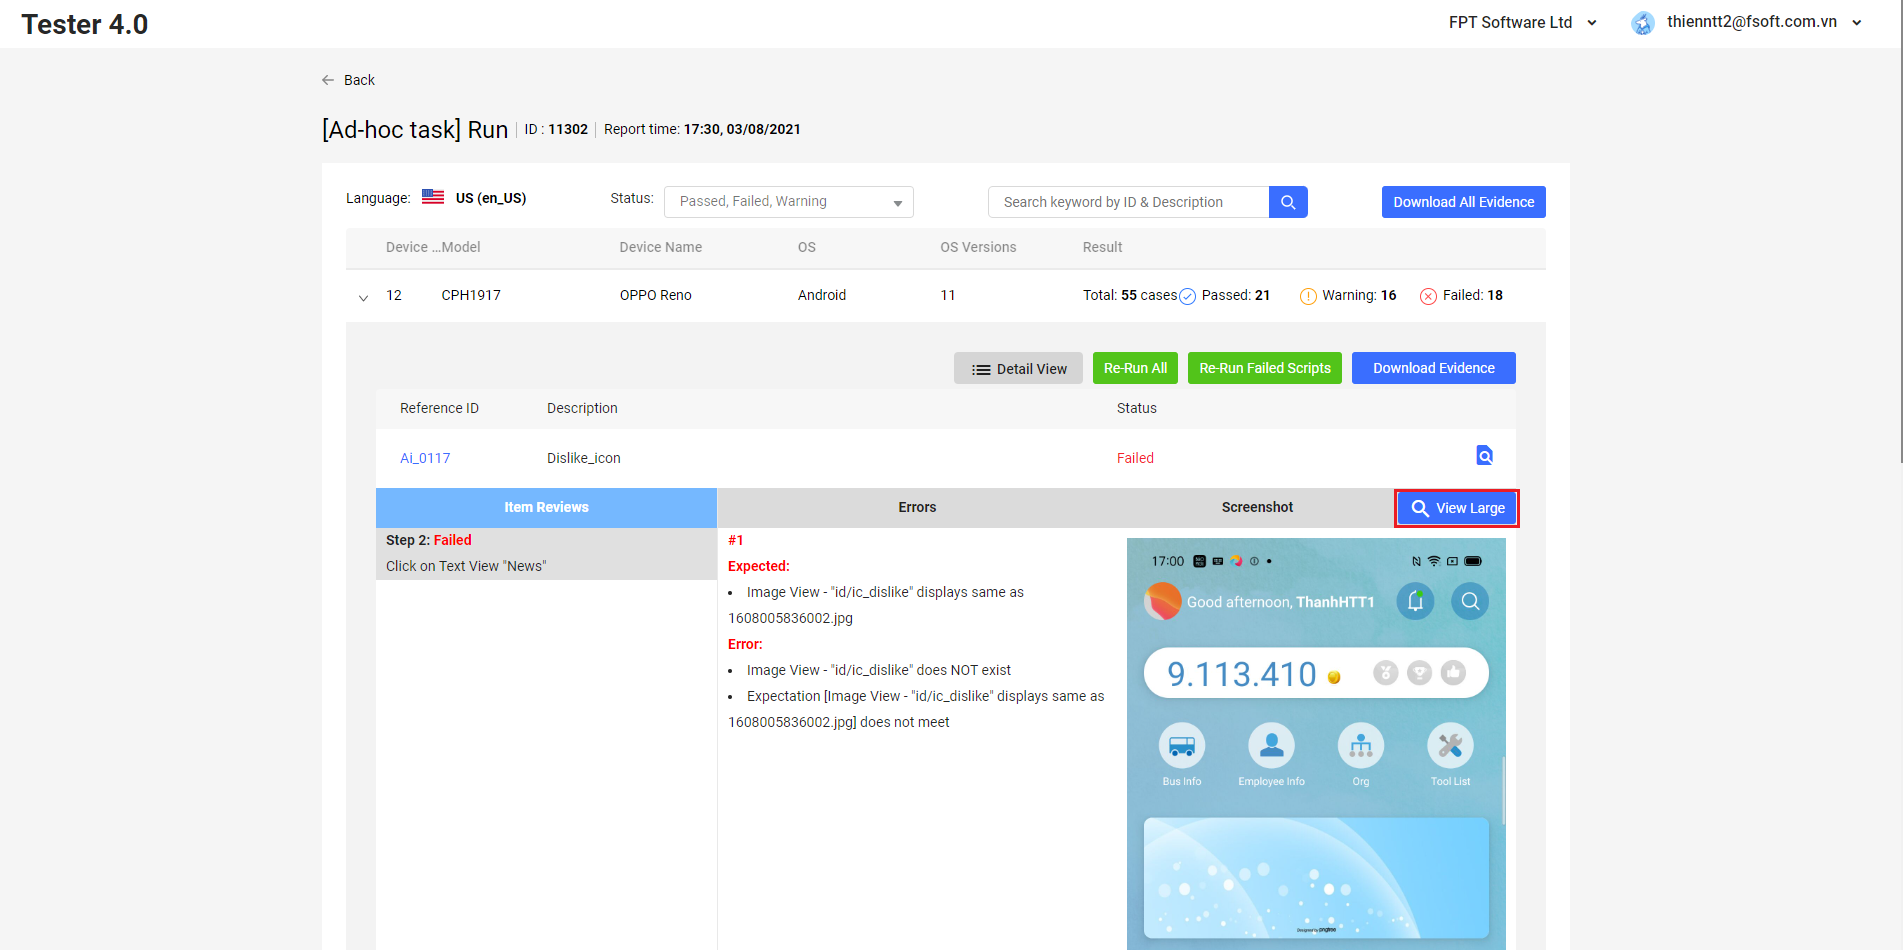
4. Quick review
Quick review function helps users to quickly view test script with failed and warning results.
After the test script execution is finished, the Test Report will be shown in the Project Detail screen.
To view the detail of a Test report, please click on each test report item in the list. The report of job will be shown. If the user wants to review the test results quickly, please click on [Detail view] button.

After selecting detail view mode, test scripts with failed or warning results will show error steps and steps using AI visual check.
To view image full screen, please click the [View large] button.
With test script with warning result, user can confirm test result quickly on the quick view screen by clicking on [OK] or [NG] button.

User can click on [List view] button to review test report to see the report in the original list form.

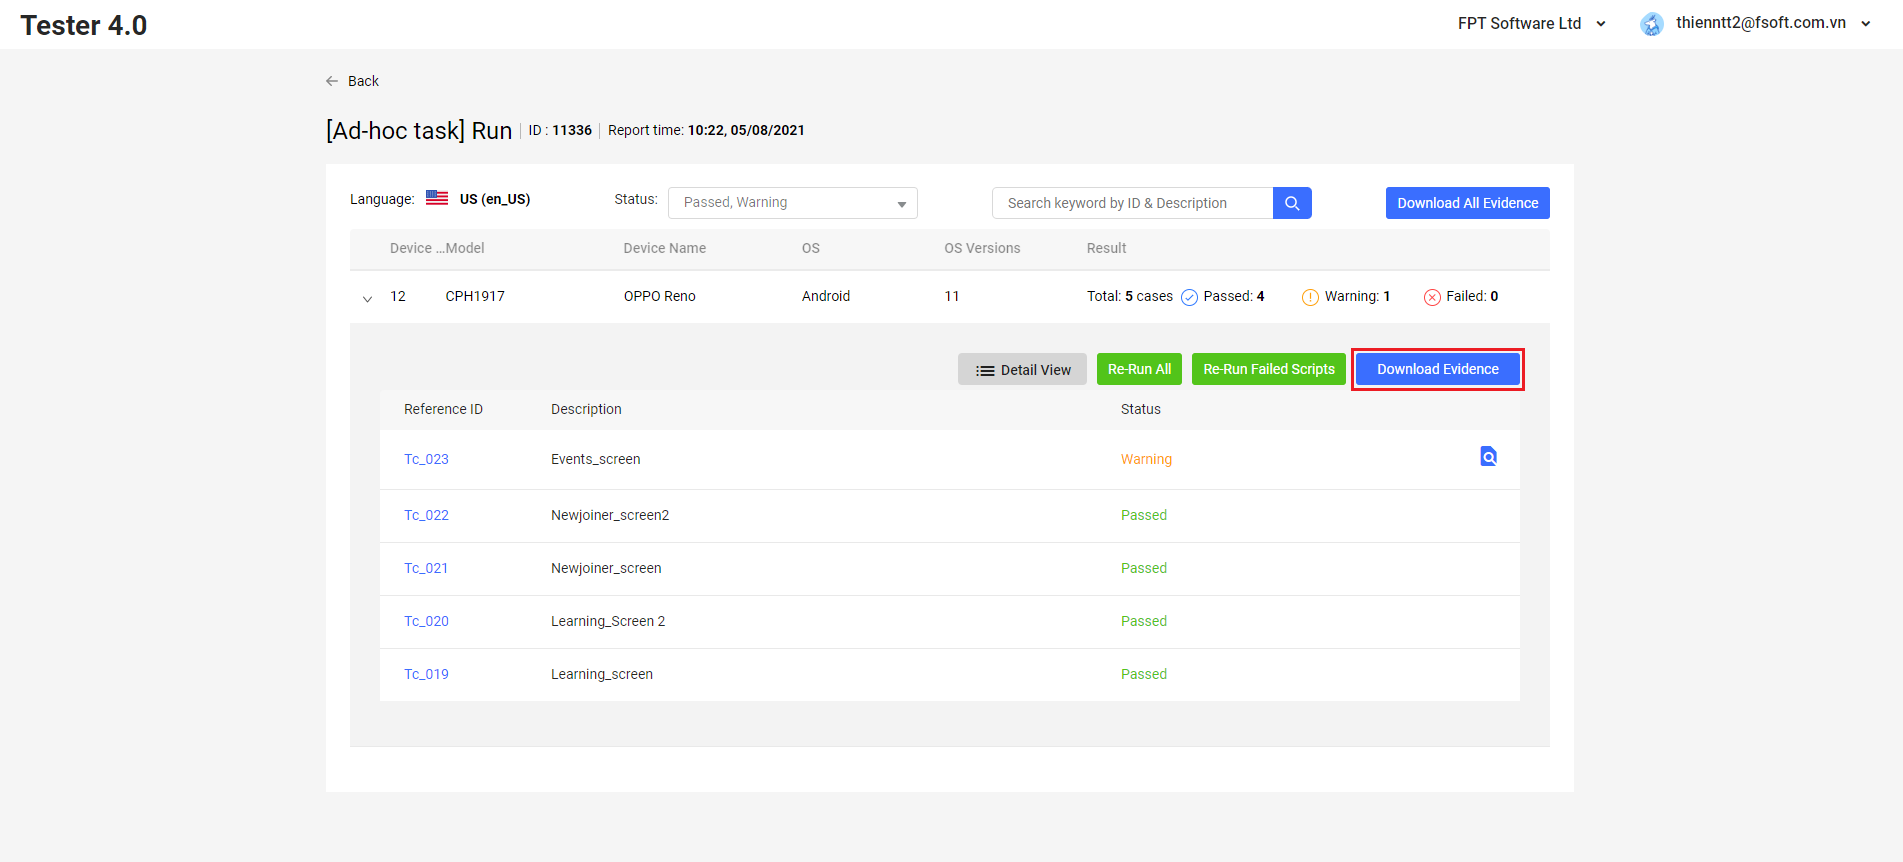
5. Download evidence
On the test report detail screen, click on [Download evidence] button-> click on [Download Evidence] button. Then Tester 4.0 will send to you an email when the process is completed.
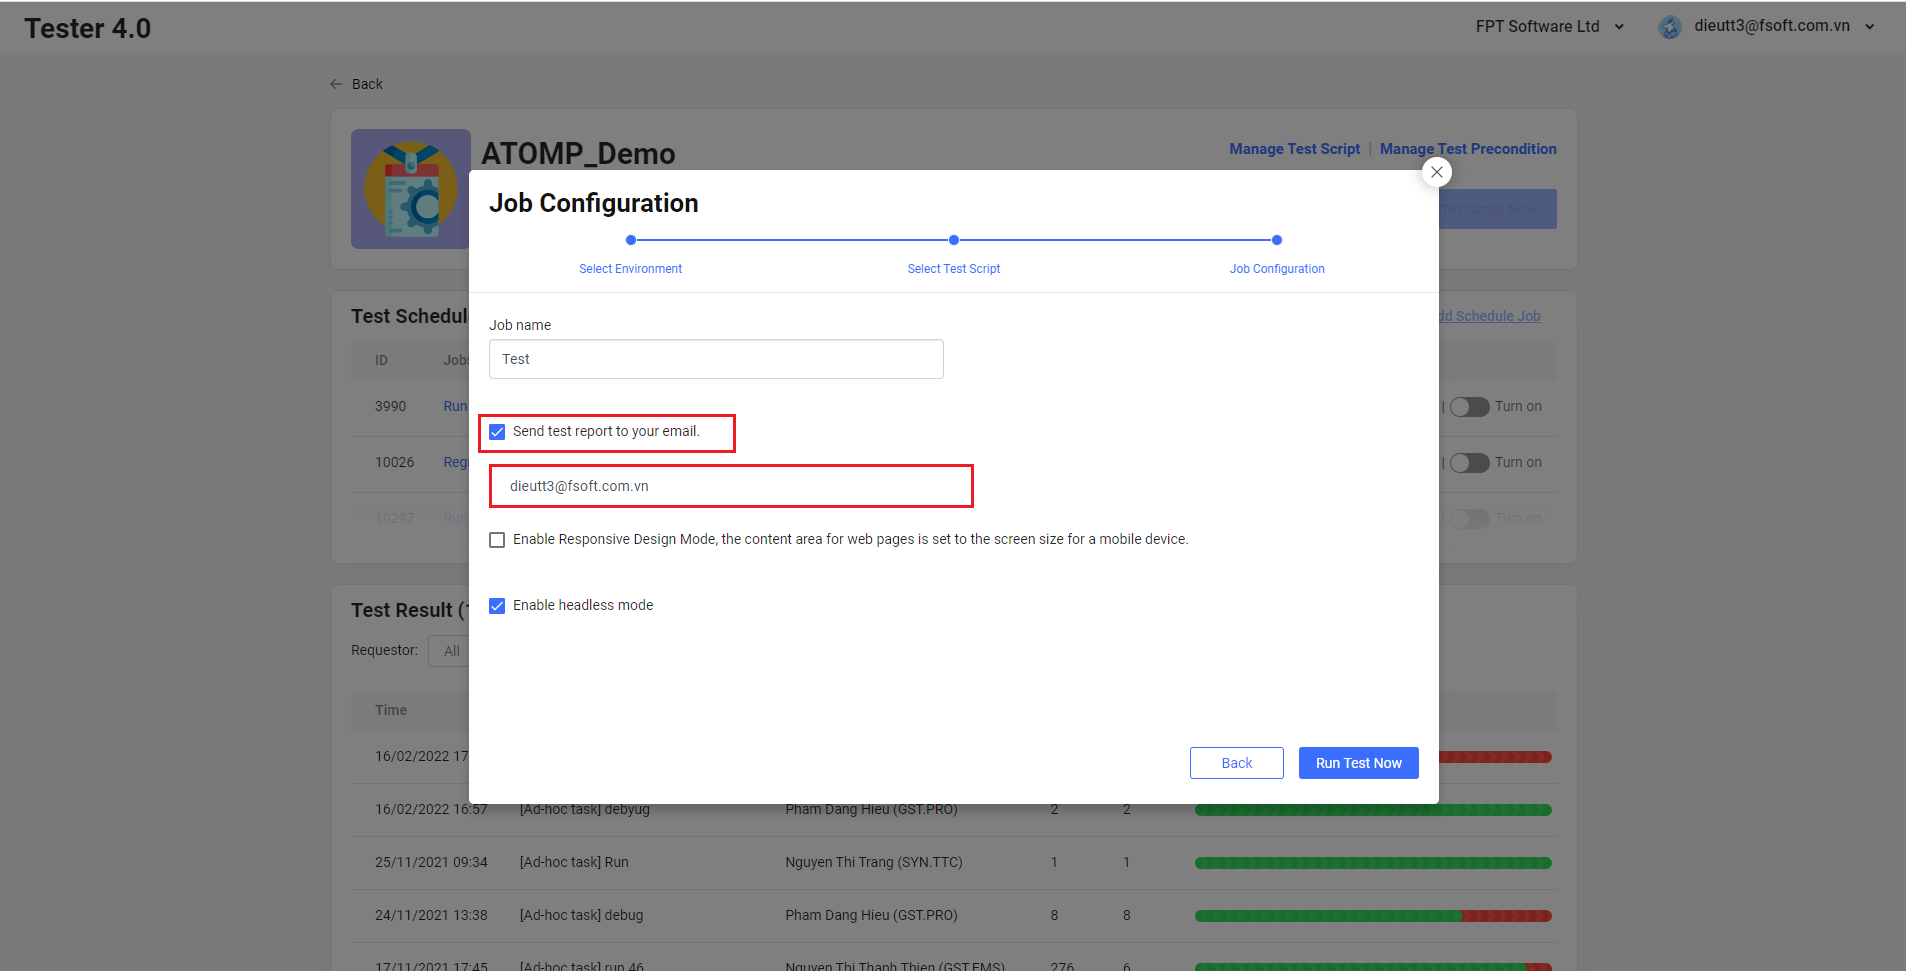
6. Send mail
To receive test report, after selecting test scripts and devices, you tick on Send test report to your email and input recipient’s email. Then Tester 4.0 will send test report to you when test scripts run completely.
III. Export – Import Test Script
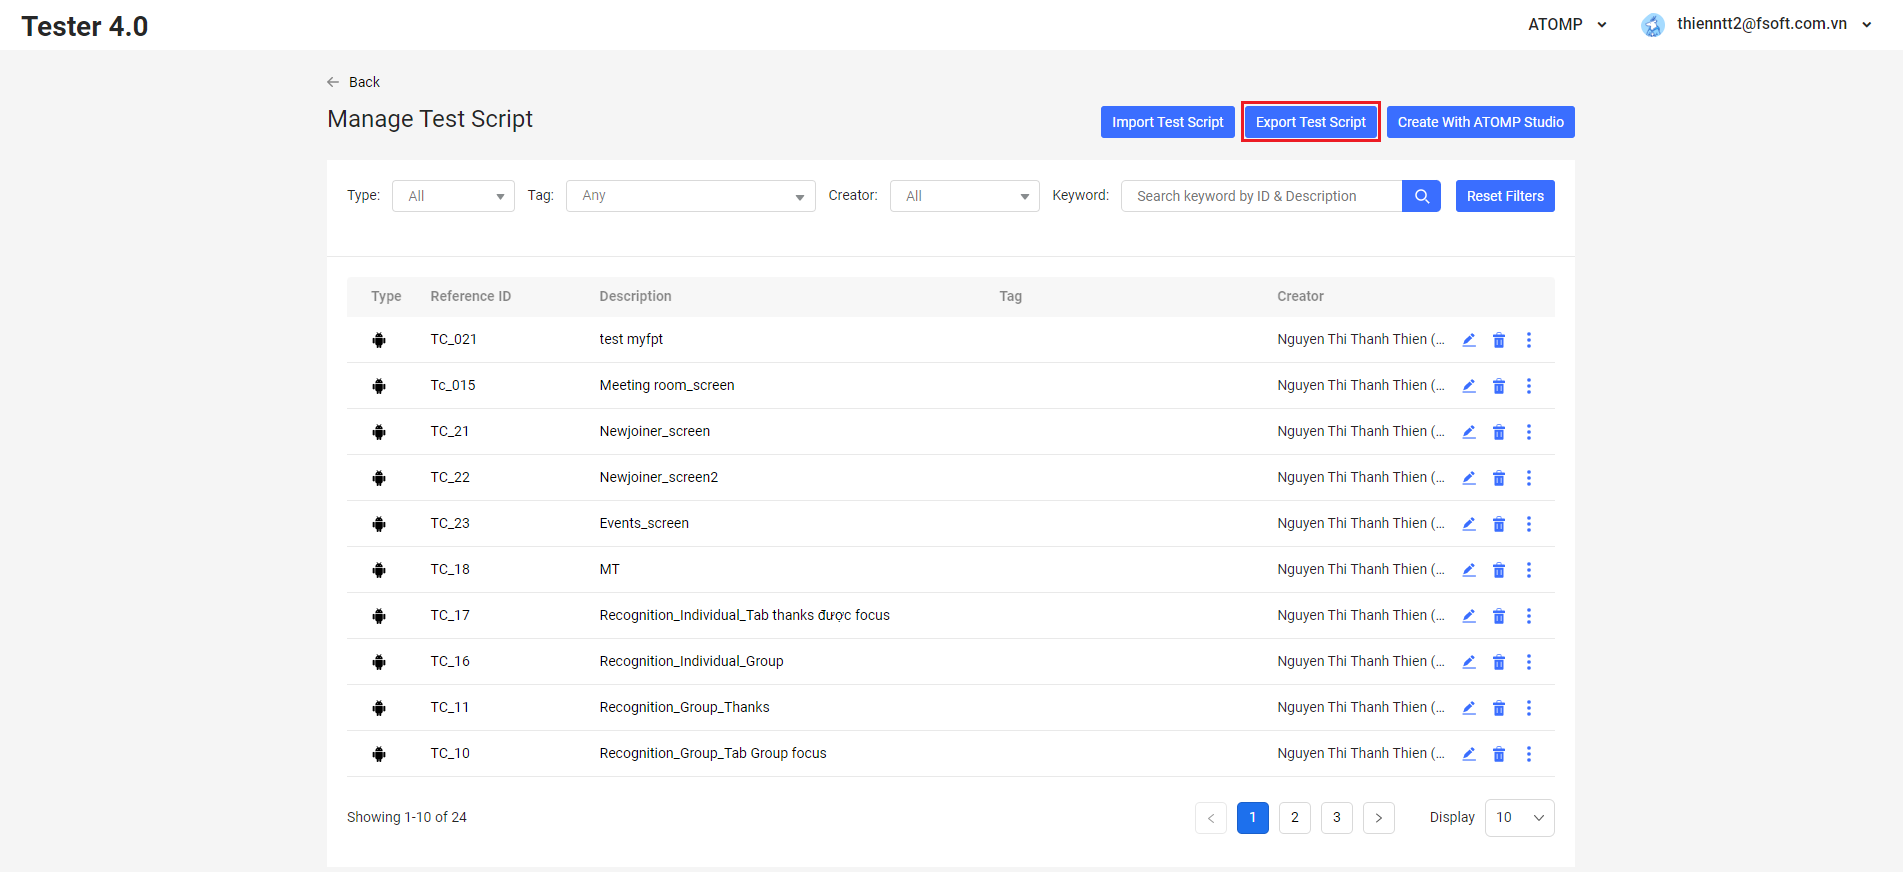
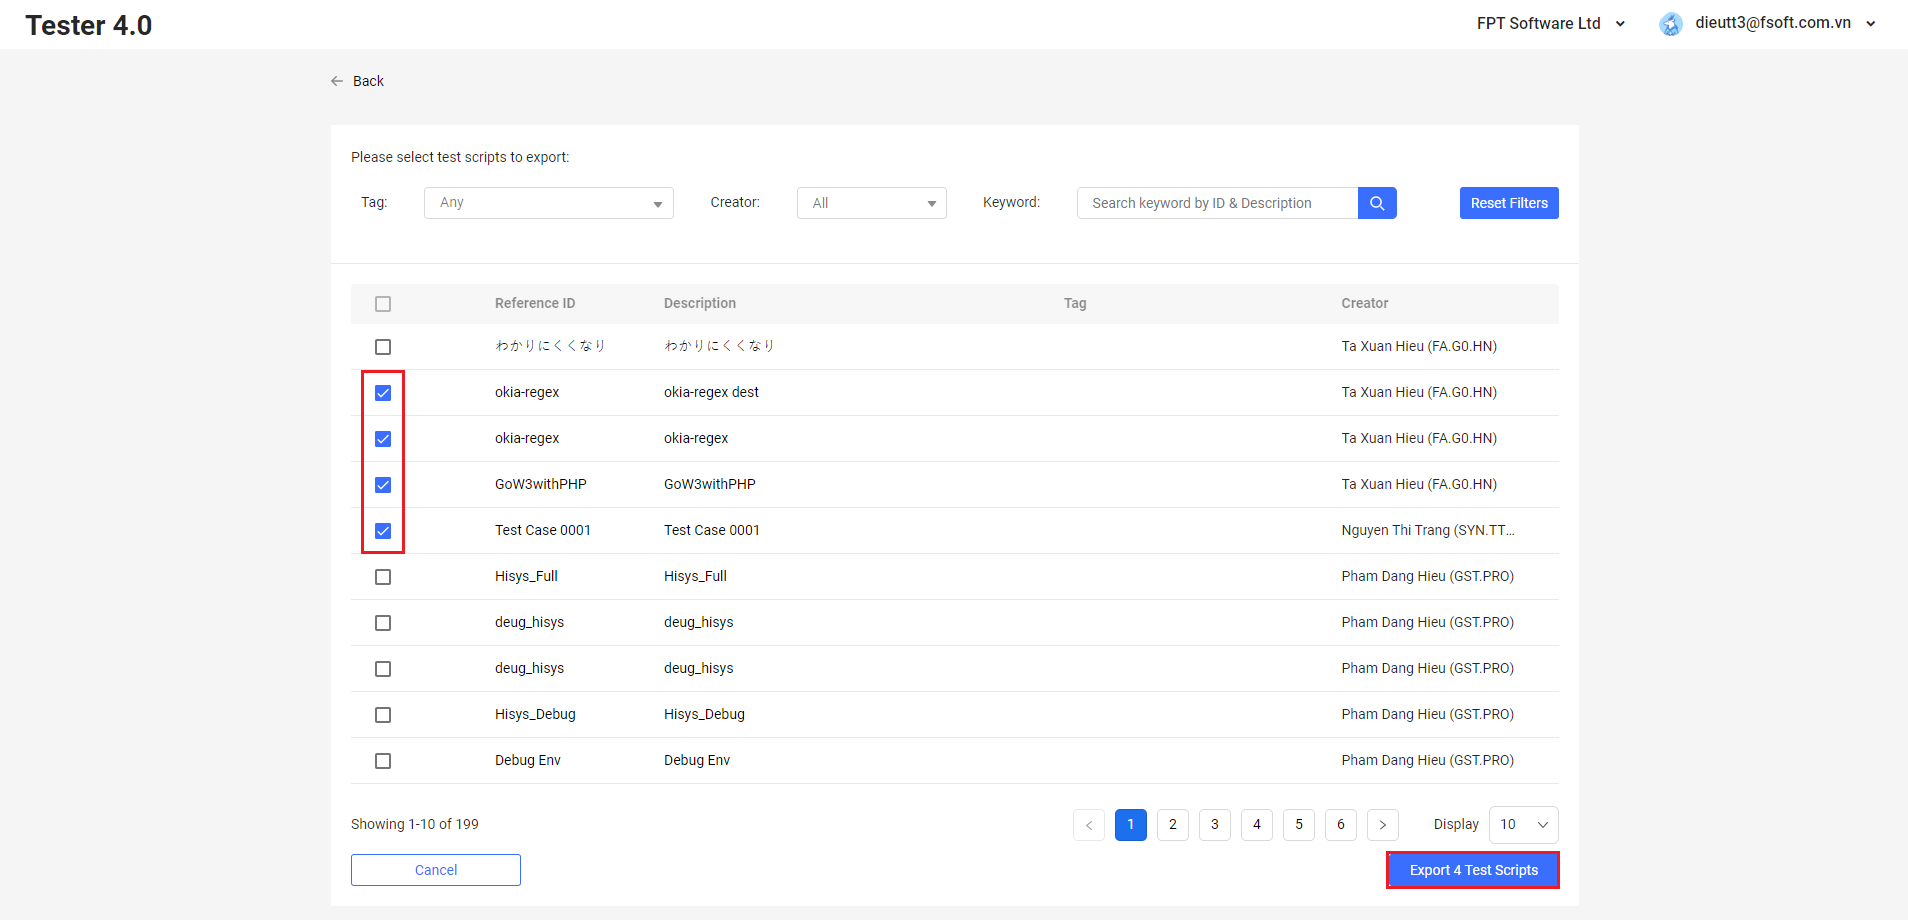
1. Export Test Script
After successfully creating the test script, if you want to export the generated test script, you can follow these steps:
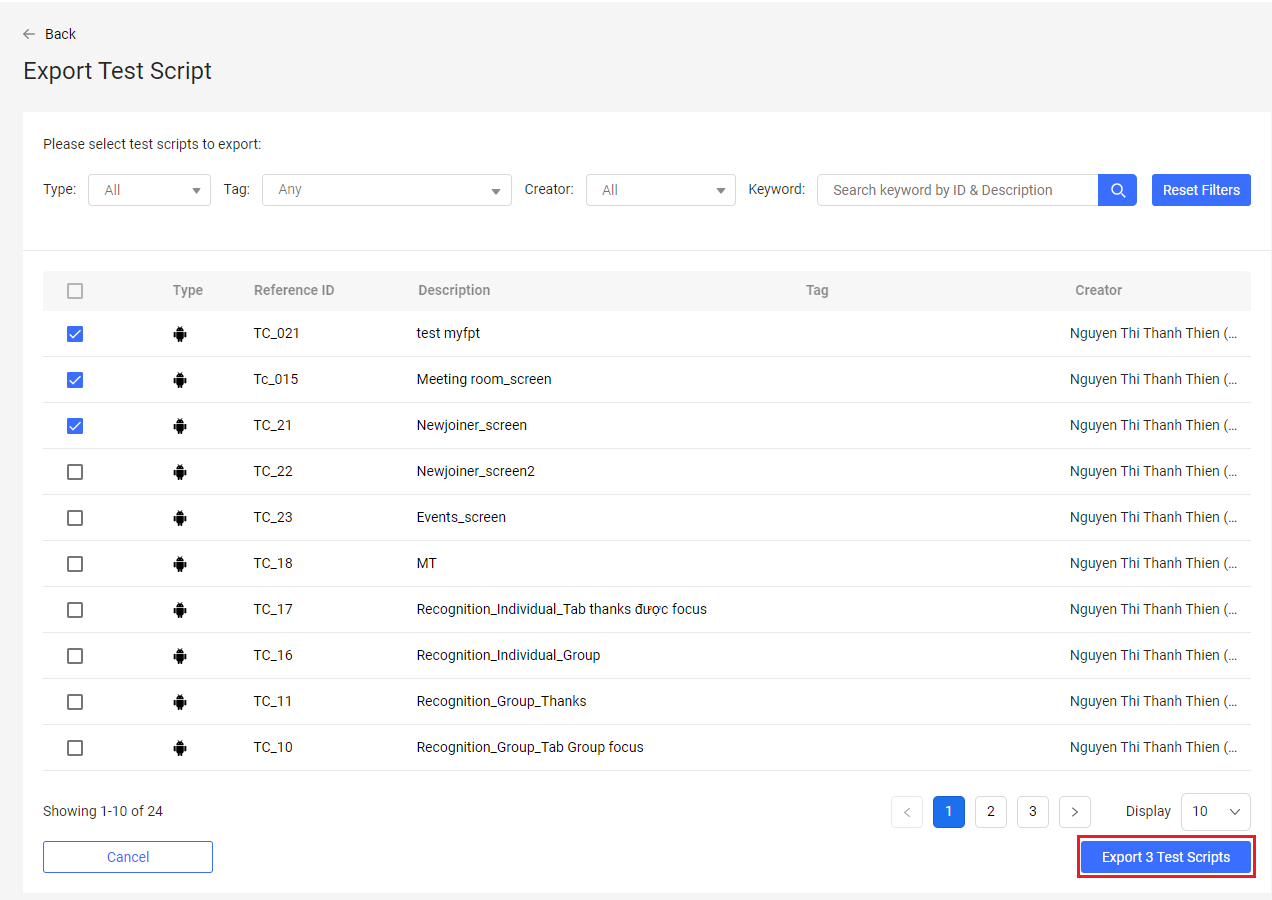
Step 1: From the “Manage Test script” screen, click on the “Export Test script” button to switch to the “Export Test Script” screen.
Step 2: Select the test scripts you want to export, then click the on the [Export X Test script] button (X is the number of test scripts you want to export).
2. Import Test Script
If you already have a test script file, you can import the file by following these steps:
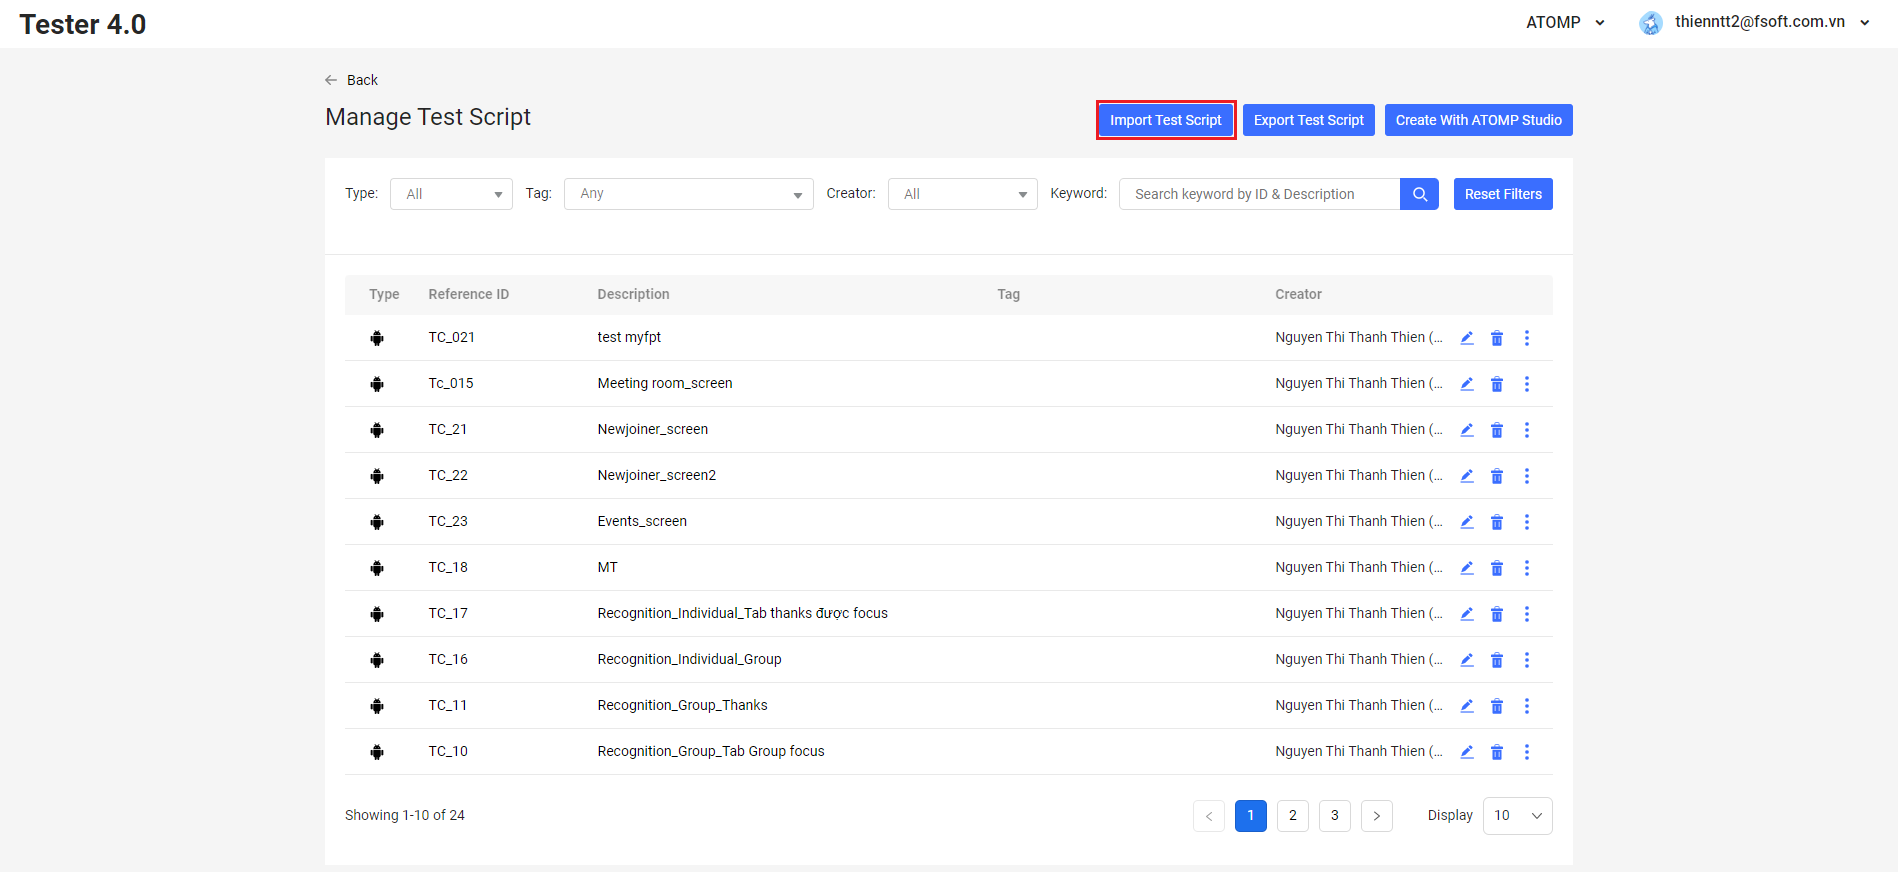
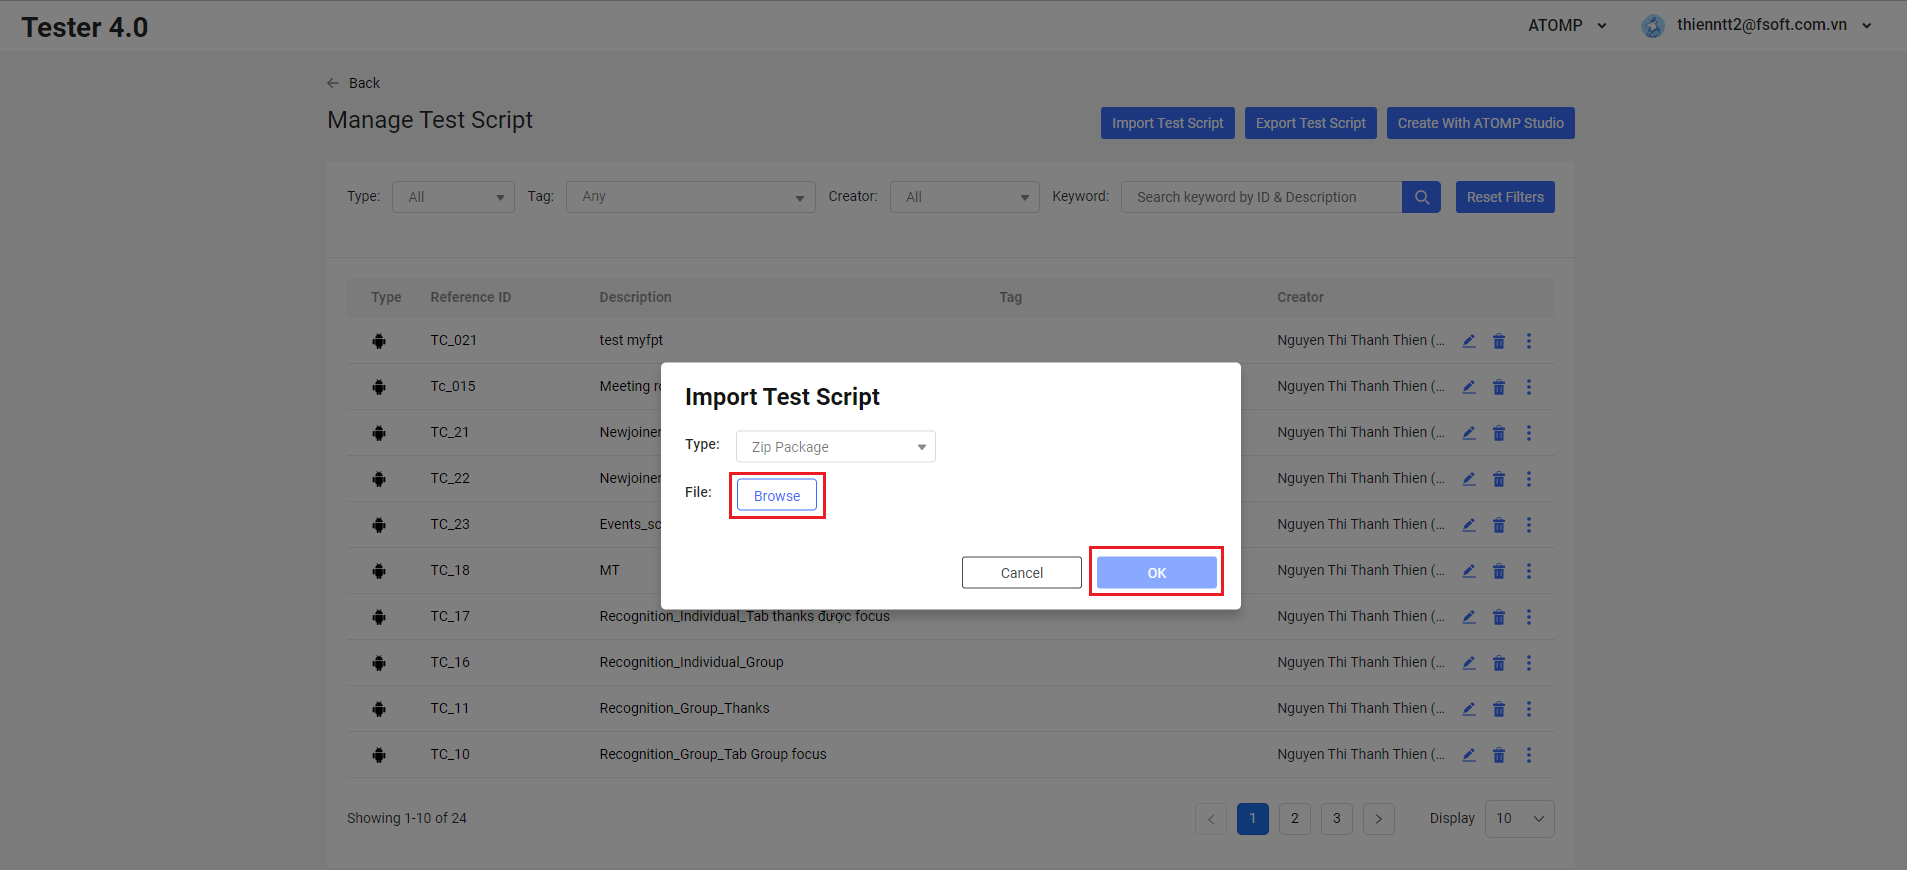
Step 1: From the “Manage Test script” screen, click on the “Import Test script” button to open the “Import Test script” popup.
Step 2: Click on the [Browser] button, then select the test script file you want to import, then click the [OK] button.
B. Execute script for PC Web
I. Execute a Script and check the test result
1. Run Now
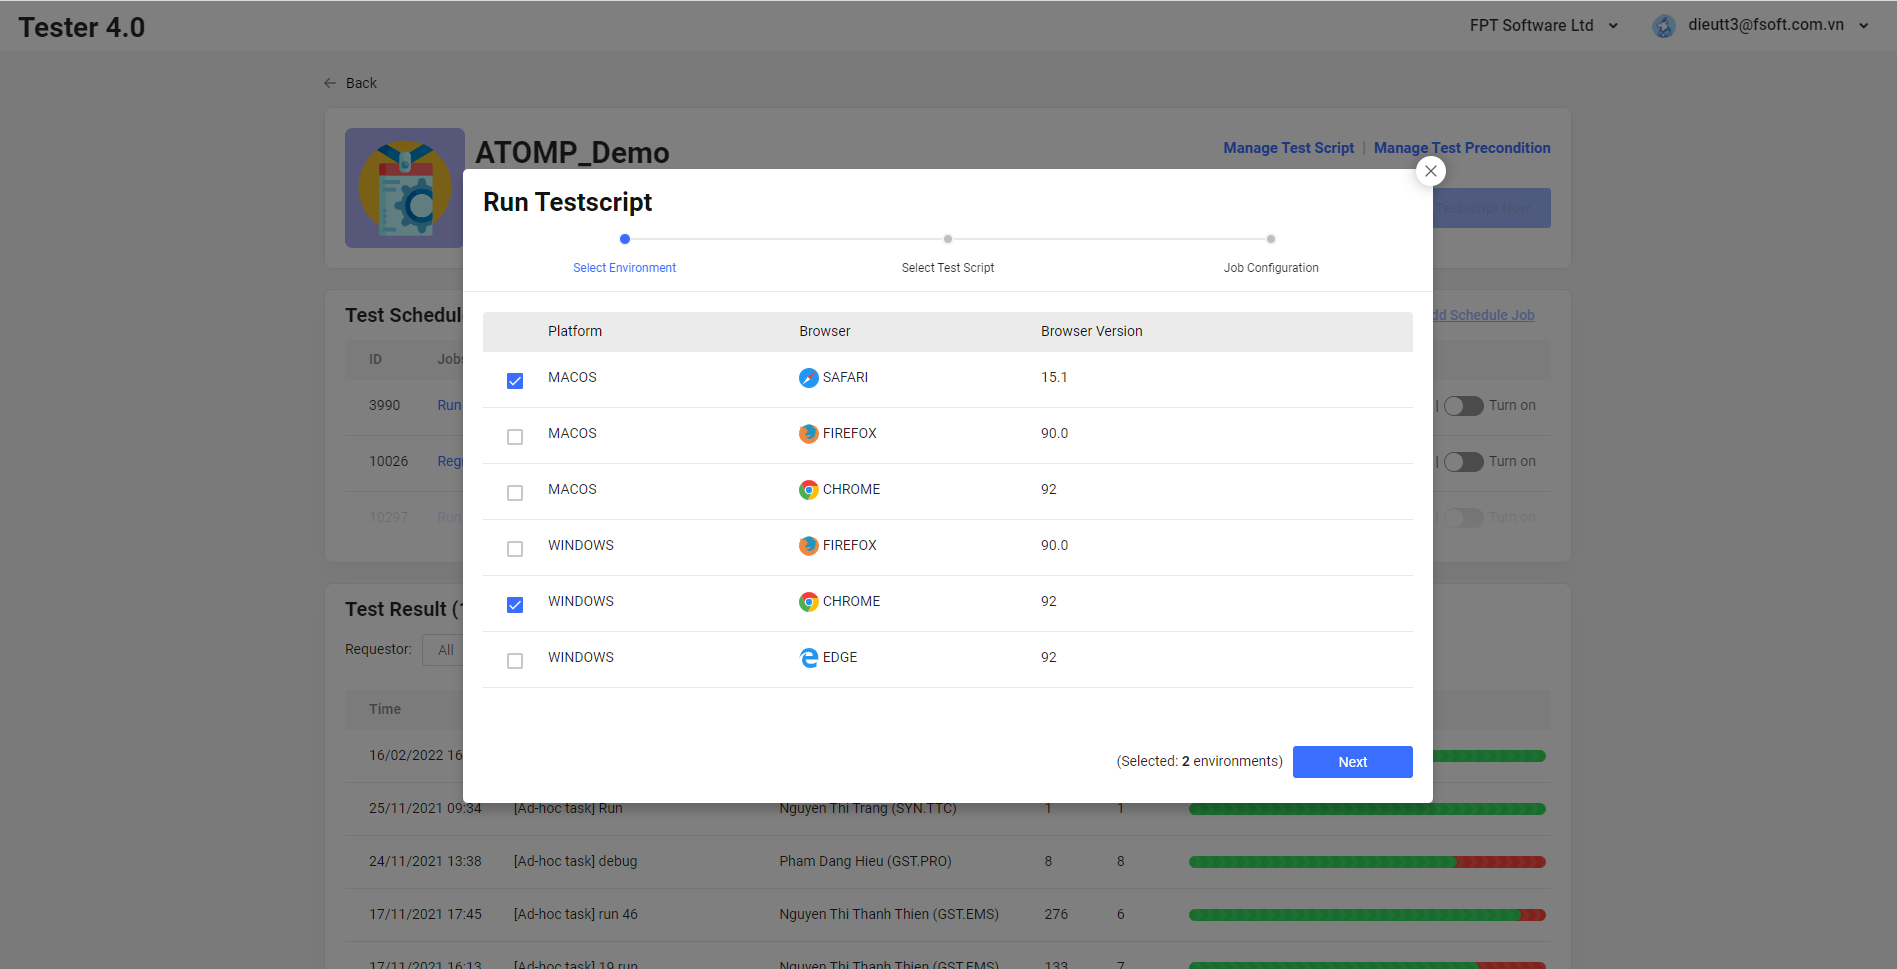
Step 1: Click on the button [Run Test Script Now] -> The popup Run Test Script will be displayed.

Step 2: Select environment -> Click Next button.
Step 3: Select Test Script -> Select one or more scripts that the users want to run -> Then click on [Next].

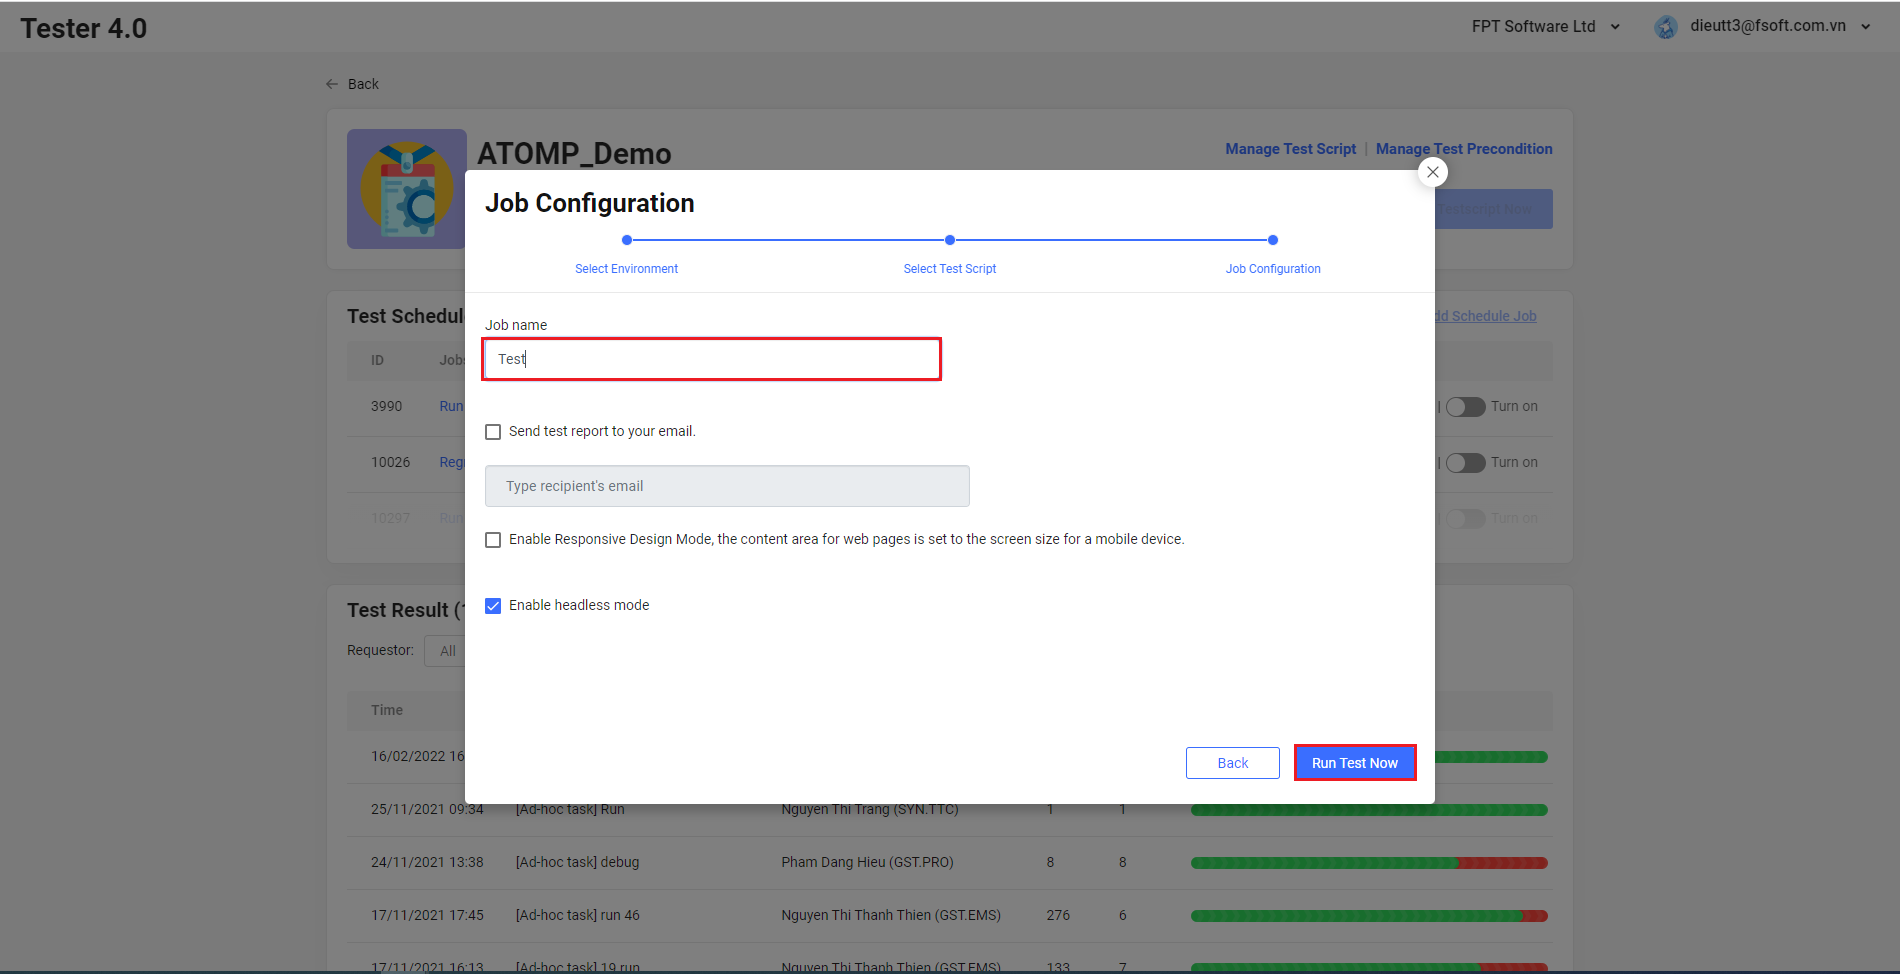
Step 4: Input a Job name -> Click on the button [Run Test Now].
Step 5: View running test script(s) (Show the correct number of browsers and the name of each browser selected for running from step 2).
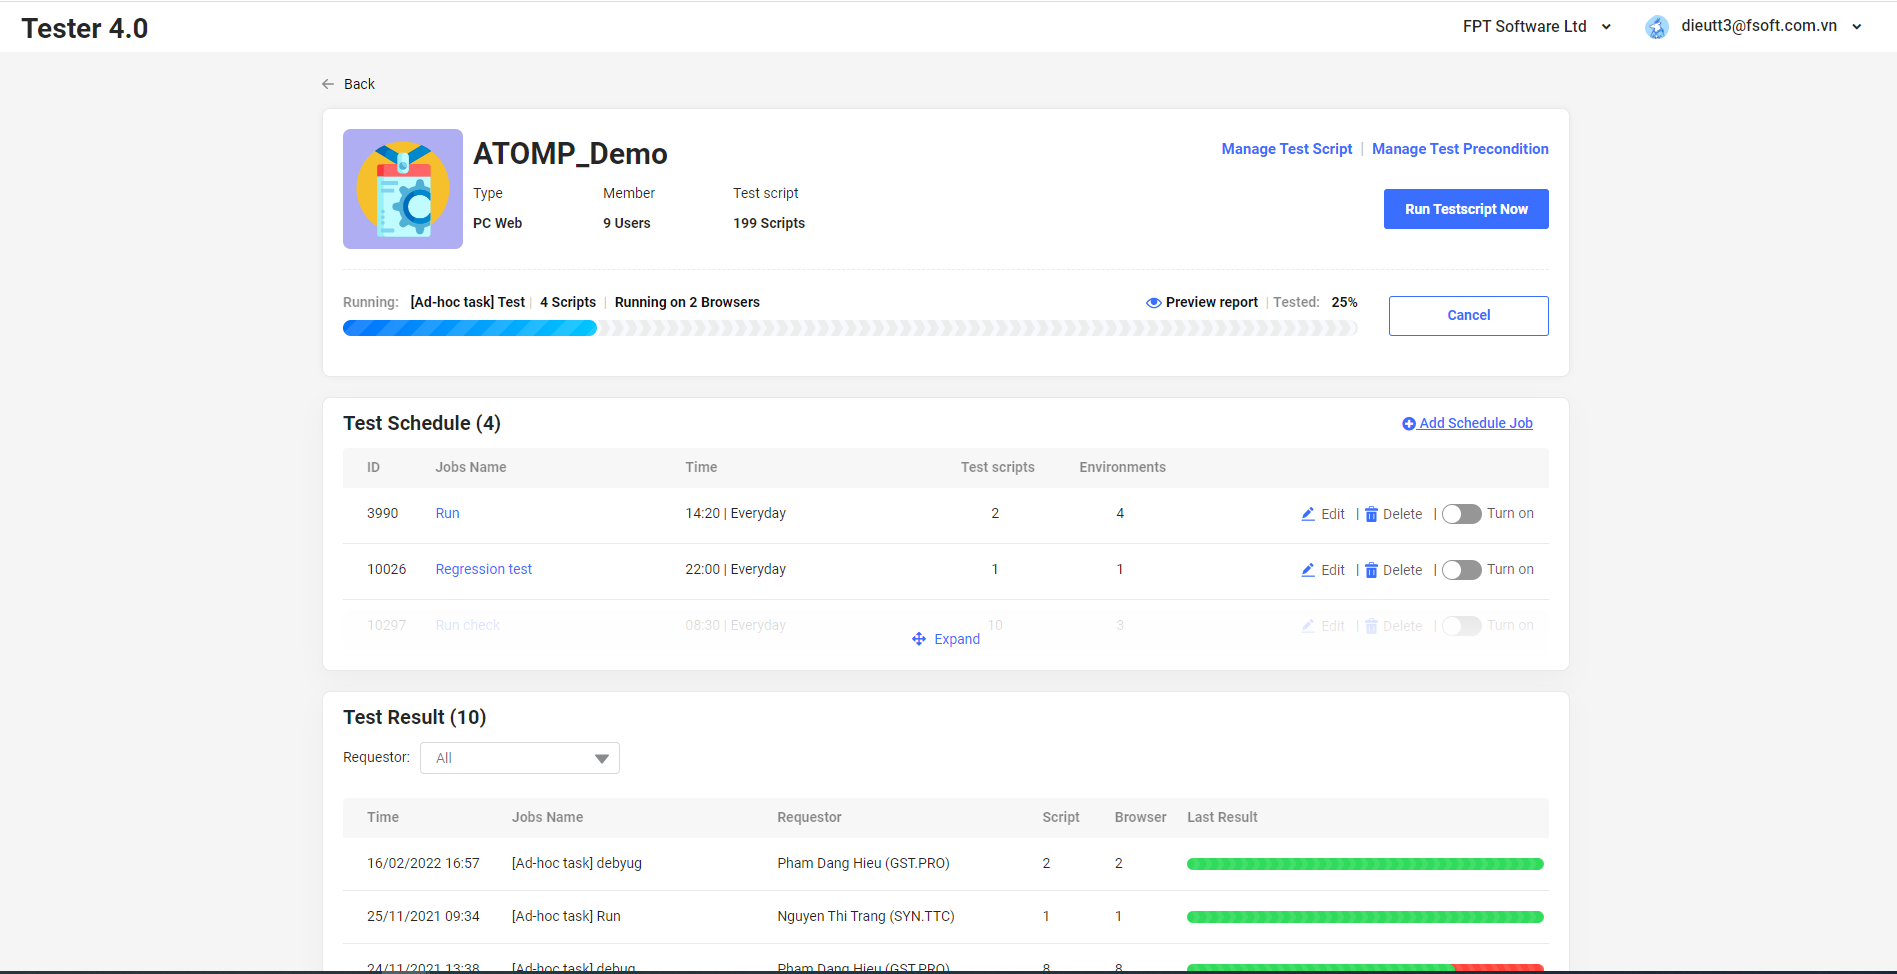
Step 6: After the test script execution is finished: The Test Report will be shown in the Project Detail screen.
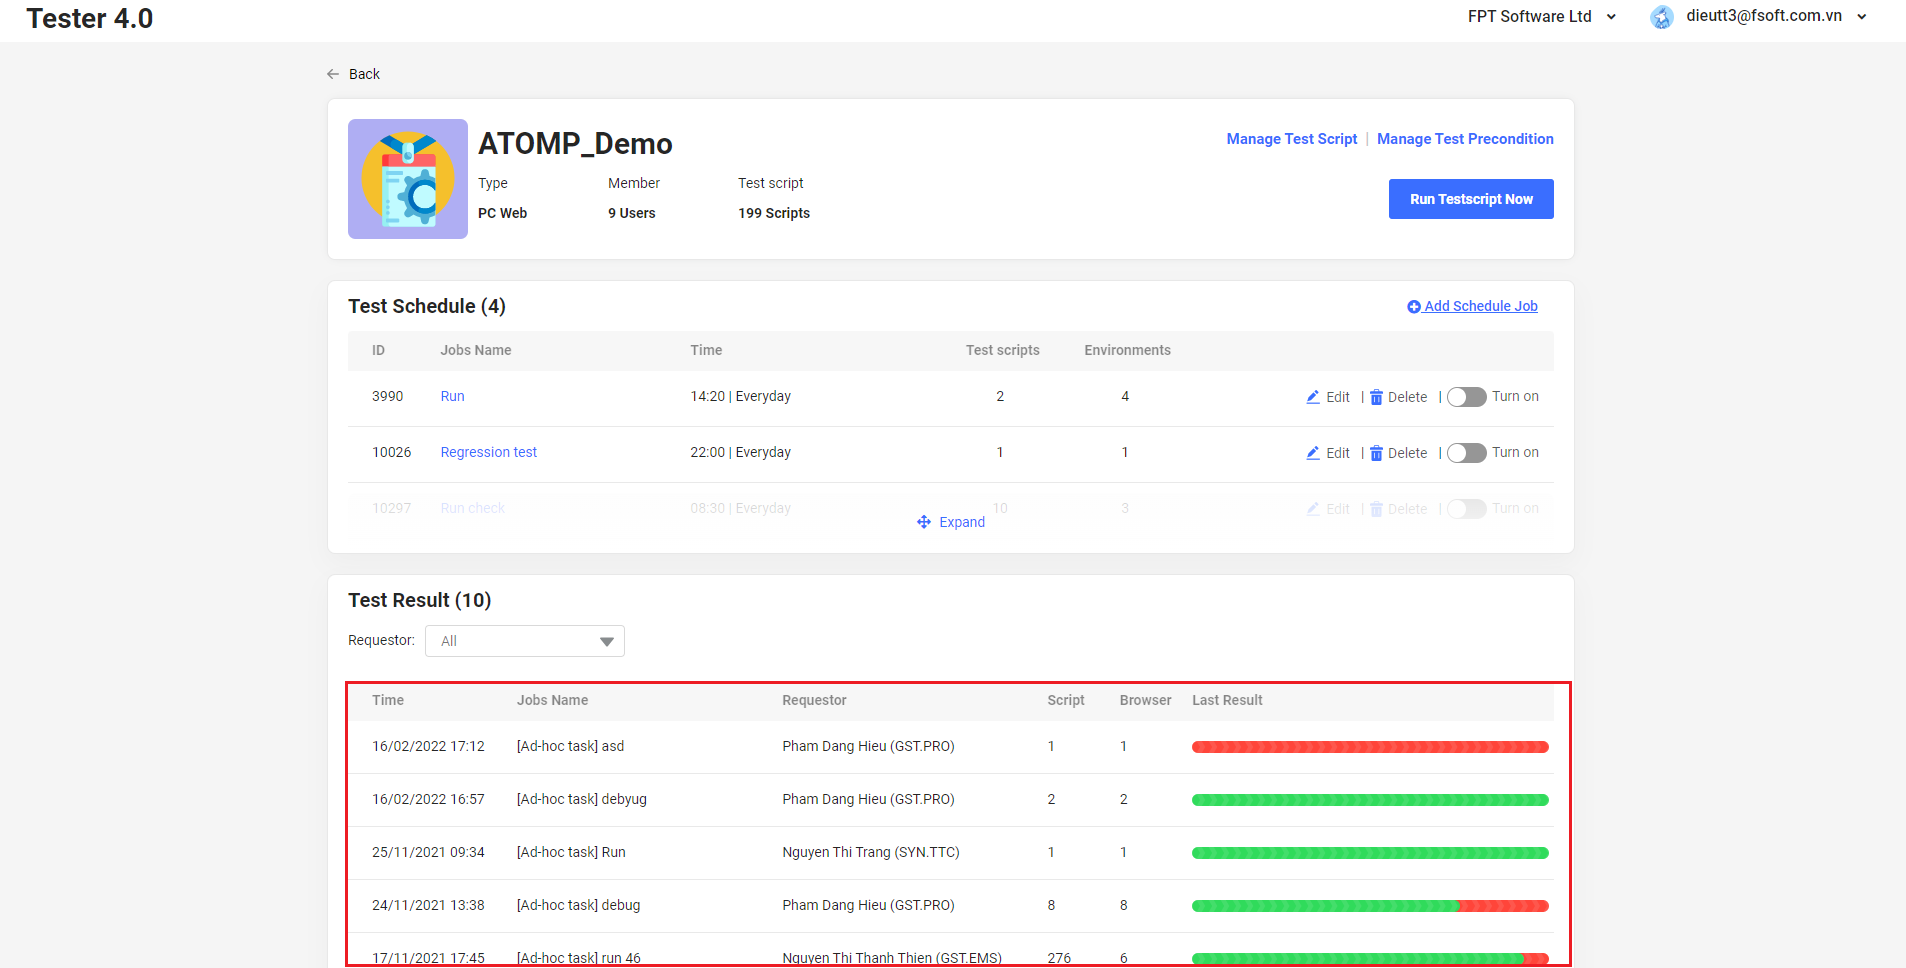
To view the detail of a Test report: click on each test report item in the list.

2. Run a script On Schedule
- Run a script On Schedule same with “Run Now” feature (follow 1. Run Now).
3. Check test result
Checking test result is same with checking test result in Studio Mobile.
4. Download evidence
On the test report detail screen, click on [Download evidence] button then click on [Download Evidence] button. Then Tester 4.0 will send to you an email when the process is completed.
5. Send mail
To receive test report, after selecting test scripts and environments, you tick on Send test report to your email and input recipient’s email. Then Tester 4.0 will send test report to you when test scripts run completely.
II. Download-Add Test Script
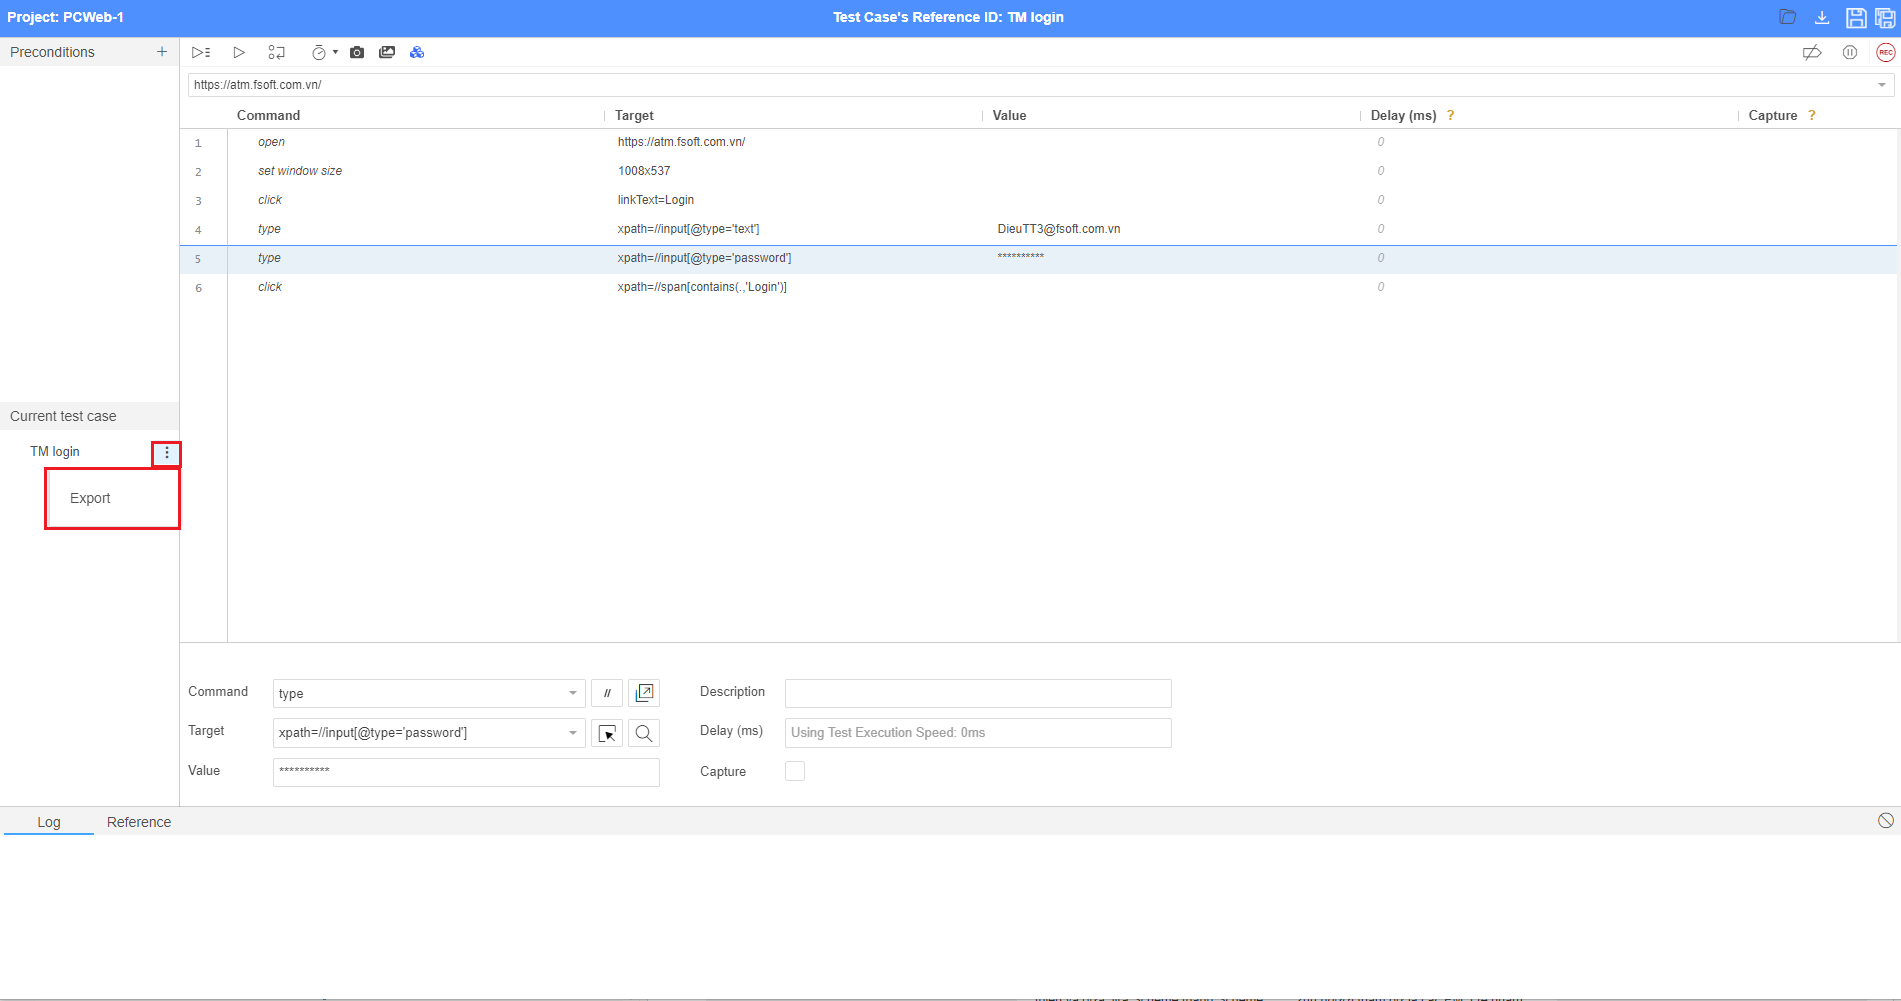
1. Download test script
After successfully creating the test script, if you want to export the generated test script:
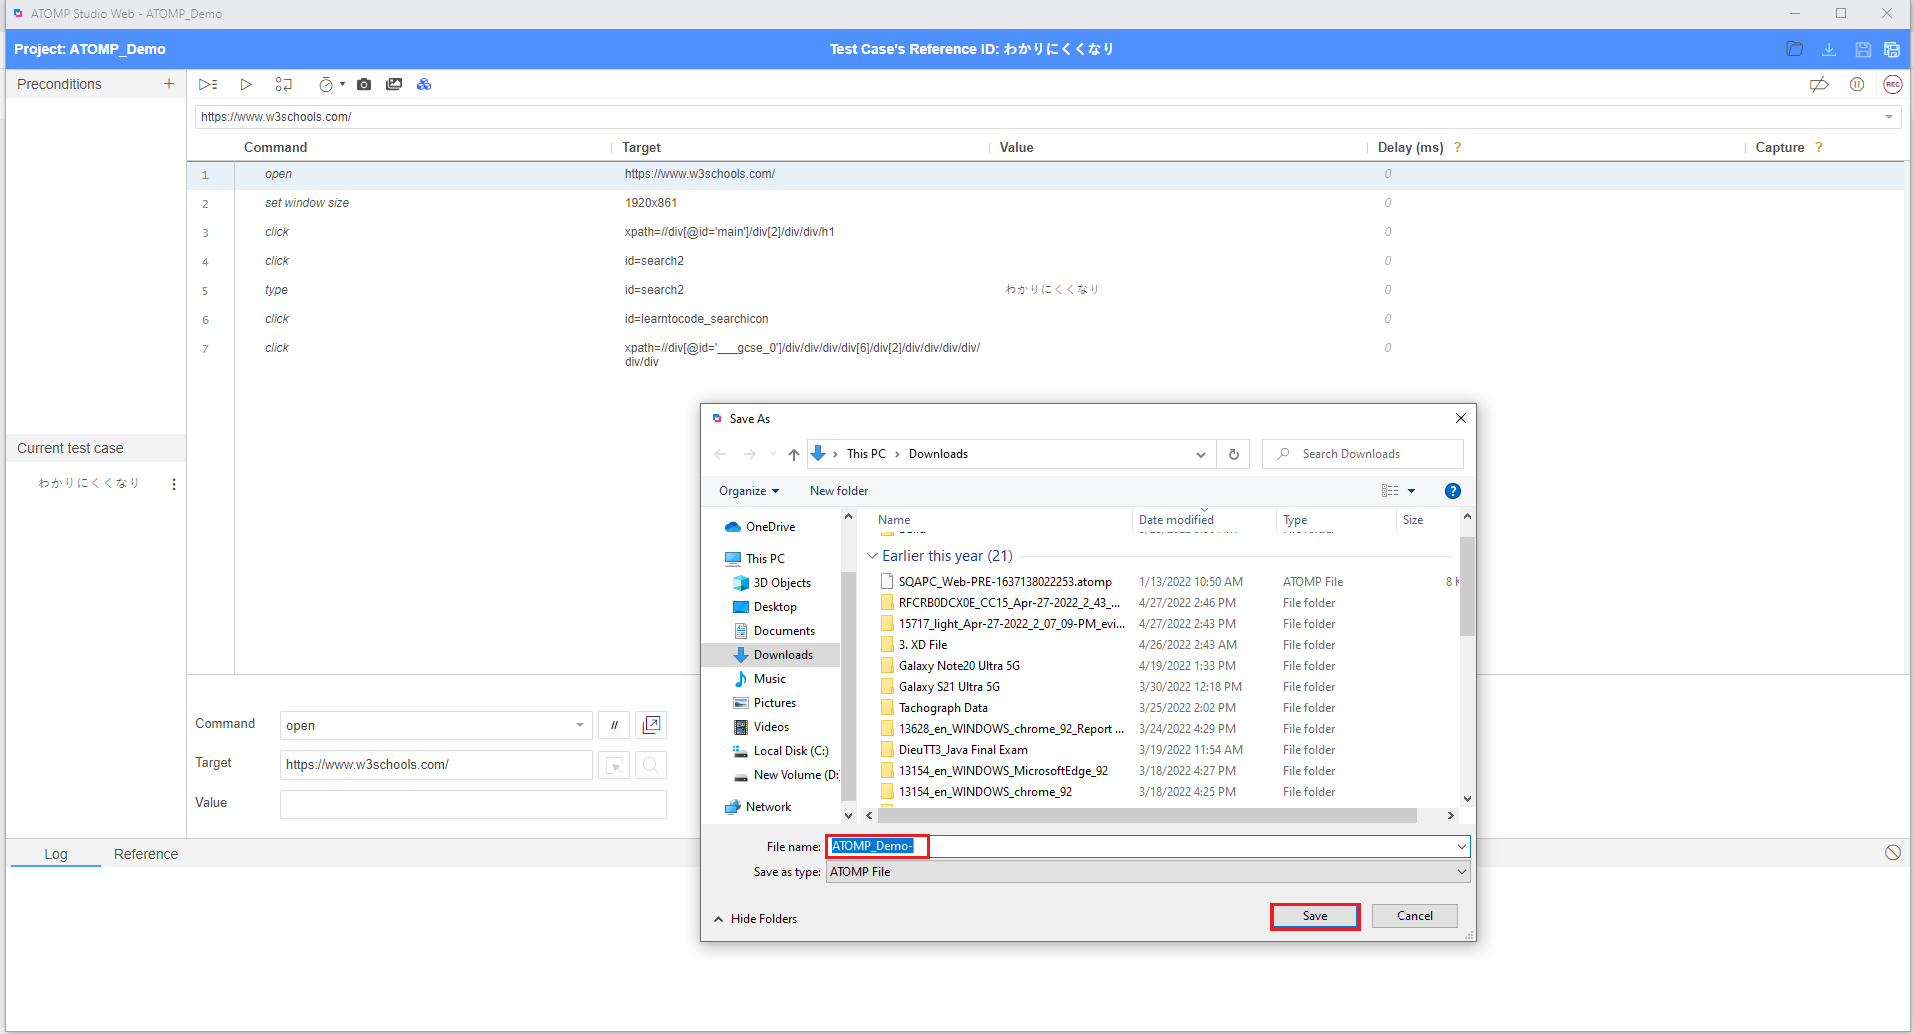
Step 1: Click on  icon to download test script.
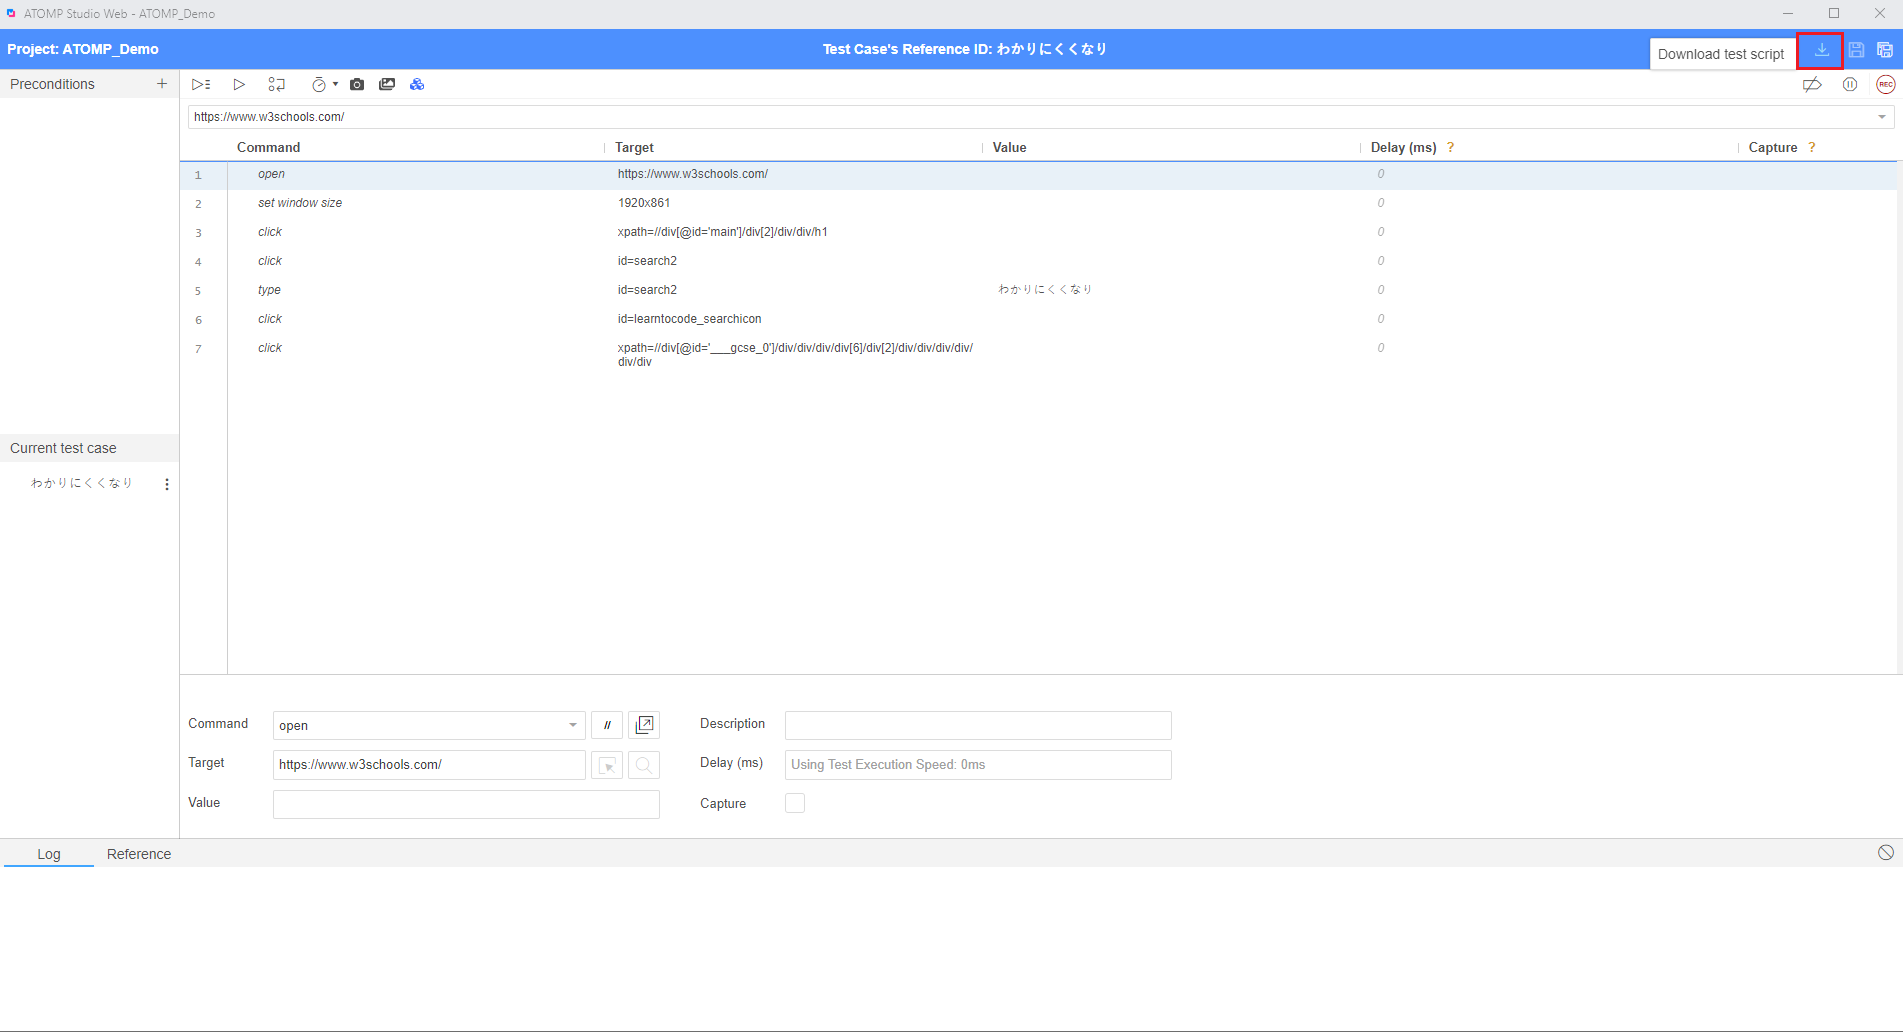
Step 2: Select folder to save script.
2. Add test script
If you already have a test script file, you can add the file by following these steps:
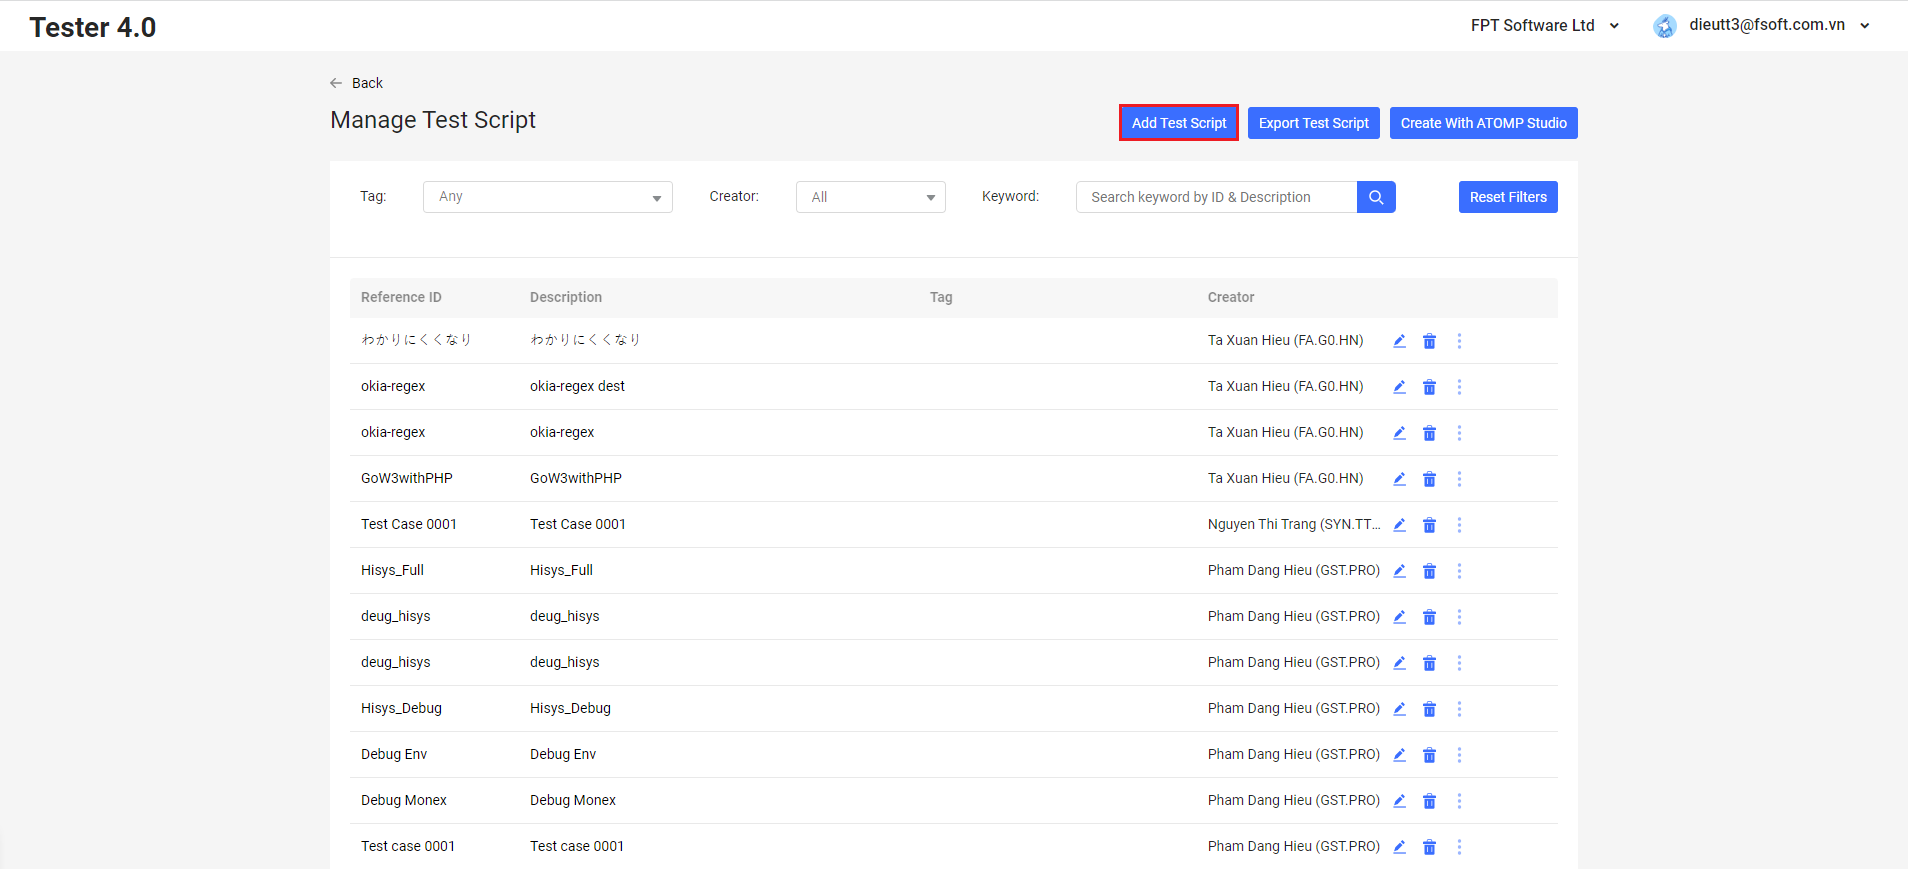
Step 1: From the “Manage Test script” screen, click on the “Add Test script” button to open the “Add Test script” popup.
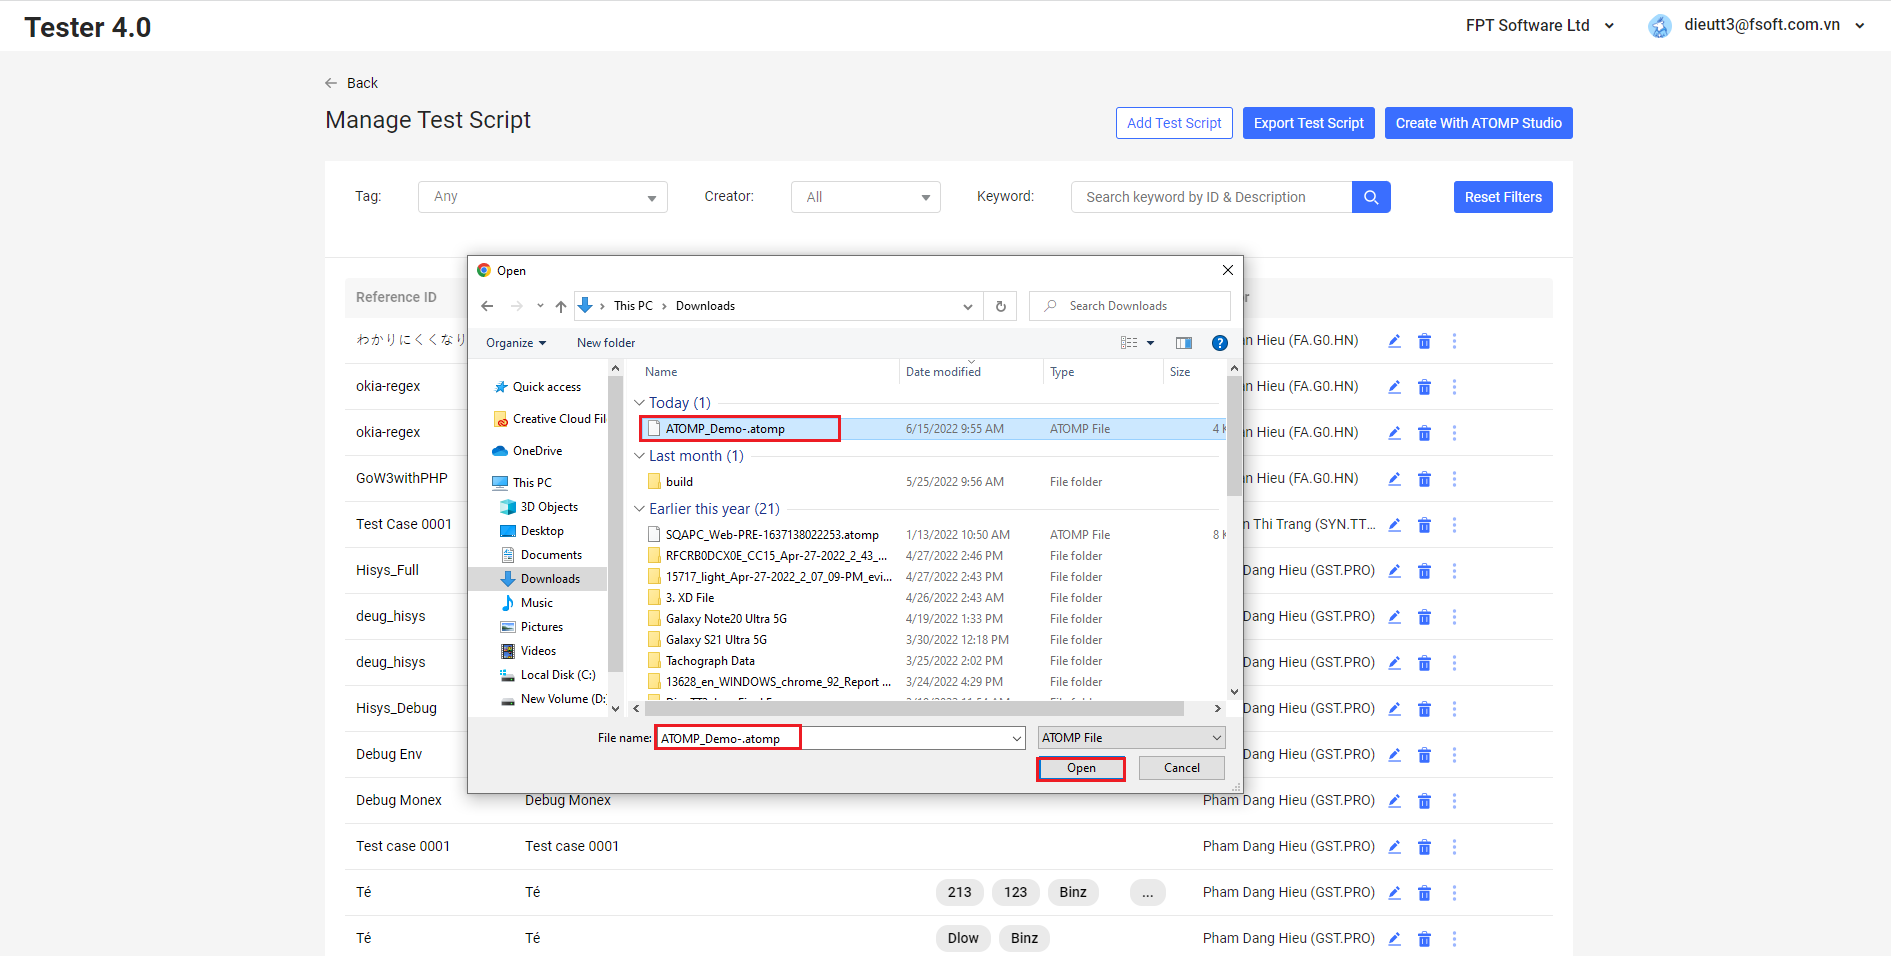
Step 2: Select the test script file you want to import (file extension .atomp), then click the [Open] button.
3. Export Test Script
After successfully creating the test script, if you want to export the generated test script, you can follow these steps:
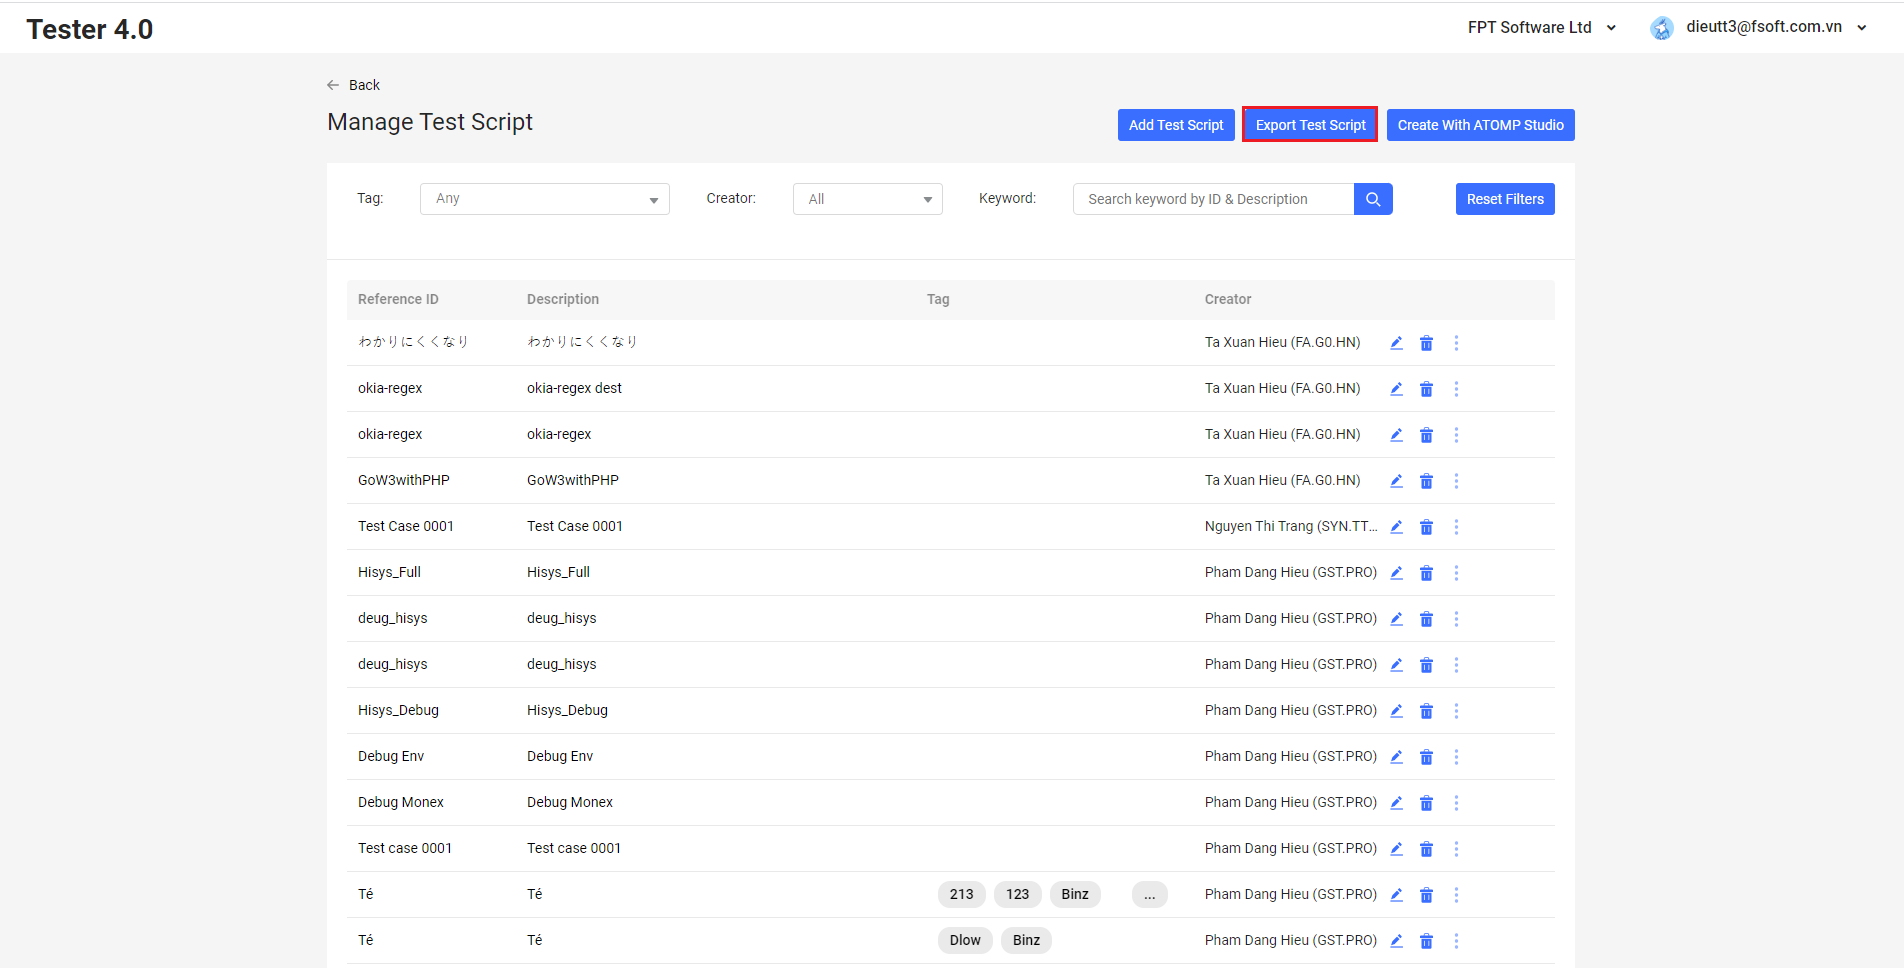
Step 1: From the “Manage Test script” screen, click on the “Export Test script” button to switch to the “Export Test Script” screen.
Step 2: Select the test script you want to export, then click the on the [Export X Test script] button (X is the number of test scripts you want to export).
4. Export Test Script to code
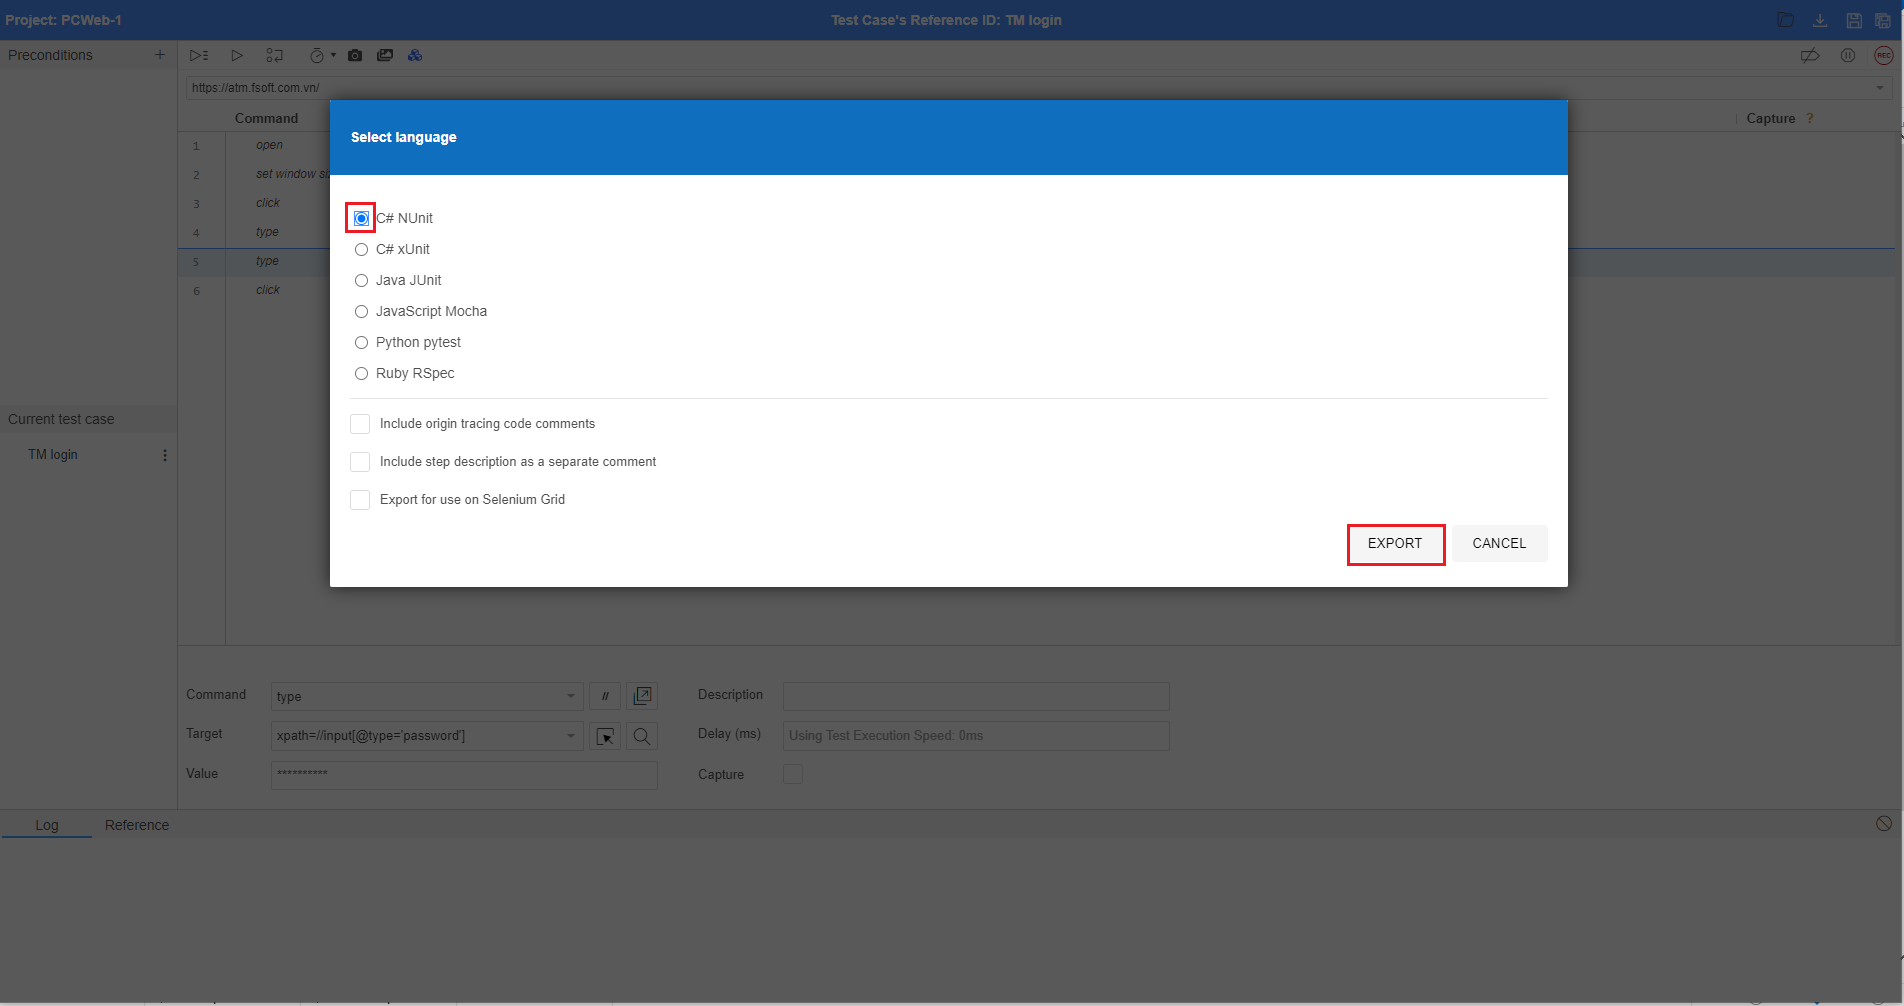
After creating the test script successfully, if you want to export the created test script to code, please follow these steps:
Step 1: On the ATOMP Studio Web, click on icon  then click on Export button. The [Select language] pop up is displayed.
Step 2: Select language then click on button Export.